
All the things You Have to Know About Net Software Firewalls (WAFs)
This text is your one-stop, 360-degree useful resource protecting all the knowledge that you must learn about WAFs, together with how they operate, what they defend towards, tips on how to implement them, and rather more!
Defending your internet functions towards malicious safety assaults is important. Fortunately, WAFs (Net Software Firewalls) are right here to assist.
In a nutshell, a WAF works as a defend between the online software and the web, stopping mishaps that would happen with out it.
WAFs can defend you and your shoppers’ functions from cross-site forgery assaults, XSS (cross-site-scripting), and SQL injections, amongst others.
WAFs are right here to assist defend your website from hackers and malicious threats.
Increasingly more so, internet software safety has change into extra essential, contemplating internet software assaults are some of the widespread causes for breaches.
As you’re about to see, WAFs are a important a part of safety to protect towards vulnerabilities.
On this article, we’ll be protecting:
What’s a WAF?
WAFs and Community Firewalls
Variations Between Community-Based mostly, Host-Based mostly, and Cloud-Based mostly WAFs
How WAFs Defend Your Net Purposes From Malicious Assaults
WAFs Safety Fashions: Blocklist, Allowlist, Or Each
Assaults Prevented by WAFs
How WAFs Guard Your Net Apps In opposition to The “The OWASP High 10”
How WAFs Additionally Assist You Meet Authorized Safety Requirements
Completely different Sorts of WordPress Firewalls
WAF Safety Plugins
On-site Devoted WordPress WAFs
On-line WordPress Firewalls
Limitations of WordPress Firewalls
WAF Deployment
WAF Distributors
AWS
Cloudflare
Azure
WPMU DEV
Imperva
Prophaze
Akamai
Wordfence
Sucuri
Let’s begin at first, with…
What’s a WAF?
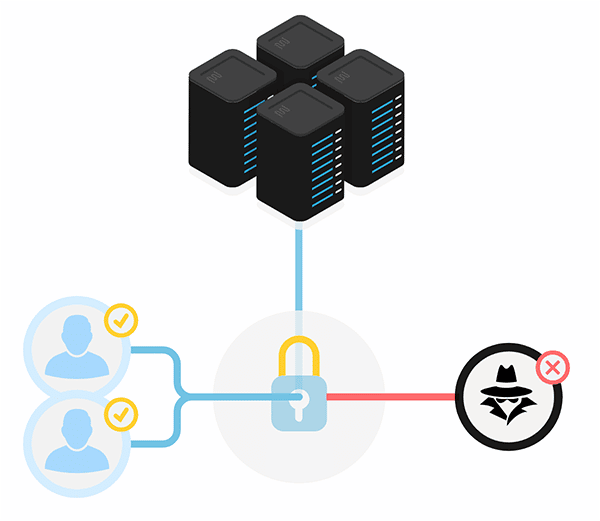
A Net Software Firewall (WAF) is a particular sort of firewall that protects your internet functions from malicious application-based assaults.
In layman’s phrases, a WAF acts as the center particular person or safety guard in your WordPress website.
It should assist defend internet functions from assaults like cross-site scripting (XSS), cookie poisoning, SQL injection, cross-site forgery, and extra.
WAFs will stand guard between the web and your internet functions, all of the whereas monitoring and filtering the HTTP visitors that wishes to get to your server.
It does this by adhering to insurance policies that help in figuring out what visitors is malicious and what visitors isn’t. Just like how a proxy server acts as a mediator to guard the id of a consumer, WAF capabilities in an identical approach — however in reverse.
It’s a reverse proxy, which acts as a go-between that protects the online software server from a potential malicious consumer.
WAFs use a algorithm (or insurance policies) to assist establish who’s truly in your visitor listing and who’s simply trying to trigger bother.
WAFs shouldn’t be confused along with your commonplace Community Firewall (Packet Filtering), which assesses incoming information primarily based on a set of standards, together with IP addresses, packet sort, port numbers, and extra.
Community firewalls are okay and nice at what they do. The one draw back is that they don’t perceive HTTP, and because of this, can not detect particular assaults that concentrate on safety flaws in internet functions.
That’s the place WAFs save the day and will help bolster your internet safety in methods a Community Firewall can not. There are various layers to it.
And using totally different safety measures will help you additional defend the person layers.
The OSI Mannequin
To know these layers, that you must perceive the OSI Mannequin (Open Techniques Interconnection Mannequin).
The OSI mannequin is a framework that divides the general structure of a community into seven totally different sections.
Each layer has its personal safety postures and mechanisms, and anybody overly involved with safety ought to know tips on how to detect and set up acceptable safety strategies for every.
The seven community layers are as follows:
The OSI mannequin breaks a community into seven distinct layers.
When analyzing the layers above, your typical Community Firewall helps safe layers 3 – 4, and a WAF assists with the safety of layer 7.
This also needs to function a reminder that WAFs are NOT a one-size-fits-all resolution. They usually’re finest paired with different efficient safety measures – resembling a top quality Community Firewall.
Variations Between Community-Based mostly, Host-Based mostly, and Cloud-Based mostly WAFs
WAFs are utilized in one in every of three numerous methods — network-based, host-based, and cloud-based. Every has advantages and drawbacks, so let’s check out every one individually and see how they examine.
Community-Based mostly: Community-based WAFs are sometimes hardware-based. They’re put in domestically; subsequently they decrease latency. Nonetheless, they’re an costly choice that additionally requires storage and upkeep of kit.
Host-Based mostly: When it comes to prices, that is lower than network-based WAFs. Plus, it affords extra customization choices. One of many downsides of this sort of WAF is the consumption of native server assets, upkeep prices, and it may be complicated to implement.
Cloud-Based mostly: That is an inexpensive choice — and it’s straightforward to implement. Often, it’s only a matter of change in DNS to redirect visitors. Additionally, cloud-based WAFs have a low upfront value, with versatile cost choices. These WAFs are persistently up to date to assist defend towards the latest threats that come up that gained’t require any work or bills on the person’s facet.
Most likely the largest draw back of this sort of WAF is it’s from a third get together supply, so you’re restricted to customization choices and rely solely on their companies.
Now that we have now a primary concept of what a WAF is and the differing types, let’s dive deeper into HOW it protects your valuable internet apps.
How WAFs Defend Your Net Purposes From Malicious Assaults
In response to a 2019 internet functions report by Constructive applied sciences, on common, hackers can assault customers in 9 out of 10 internet functions. Yikes!
The report additionally discovered that breaches of delicate information have been a menace in 68% of internet functions.
Statistics like these reinforce the necessity for simpler internet app safety.
As talked about earlier, WAFs defend your server by analyzing the HTTP visitors passing via – detecting and blocking something malicious BEFORE it reaches your internet functions (see beneath).
Speak to the WAF hand pesky attacker.
As we simply mentioned, WAFs may also be community ({hardware}) primarily based, software-based, or cloud-based, that means digital or bodily.
In terms of how WAFs filter, detect, and block malicious visitors – they obtain this in a few alternative ways…
WAF Safety Fashions: Blocklist, Allowlist, Or Each
WAFs sometimes observe both a “Blocklist” (adverse) or “Allowlist” (optimistic) safety mannequin, or generally each.
When using a Blocklist safety mannequin, principally, you may assemble an inventory of undesirable IP addresses or person brokers that your WAF will robotically block.
The Allowlist mannequin does the alternative and means that you can create an unique listing of IP addresses and person brokers which can be permitted. All the things else is denied.
Each fashions have their professionals and cons, so trendy WAFs typically provide a hybrid safety mannequin that provides you entry to each.
Assaults Prevented by WAFs
Clearly, not each assault on the market could be stopped by a WAF, nevertheless, they assist deal with a whole lot of them.
A few of the main assaults that WAF safety will help cease are:
SQL Injection: That is malicious code that’s injected or inserted into an internet entry discipline. The injections enable assaults to compromise the applying and in addition underlying methods.
Cross-site Scripting (XSS): Shopper-side scripts are injected by attackers into internet pages different customers view.
Net Scraping: Used to extract information from web sites by information scraping.
Unvalidated Enter: HTTP requests are tampered with by attackers to bypass safety mechanisms on a website.
Cookie Poisoning: When a cookie is modified to achieve unauthorized information in regards to the person for malicious functions, resembling id theft.
Layer 7 DoS: HTTP flood assault that makes use of legitimate requests in typical URL information.
Safety enhancements are always being up to date and applied, so take into accout an excellent WAF can cowl much more than simply famous above.
When figuring out a WAF supplier, or implementing one, make certain it’s up-to-date and contains the necessities, particularly the OWASP High 10 — which we’ll be discussing subsequent.
How WAFs Guard Your Net Apps In opposition to The “The OWASP High 10”
OWASP has a High 10 that each one good WAFs ought to defend towards — or else that may sting.
In addition to performing primarily based on one of many three safety fashions talked about earlier, WAFs come robotically armed with a particular algorithm (or insurance policies).
These insurance policies mix rule-based logic, parsing, and signatures to assist detect and forestall many various internet software assaults like beforehand talked about.
Particularly, WAFs are well-known for shielding towards a lot of the high 10 internet software safety dangers listed yearly by OWASP (Open Net Software Safety Venture).
This contains malicious assaults resembling Server-Facet Request Forgery (SSRF), Injections, and Safety Logging.
Right here’s a have a look at the present High 10. You’ll be able to see that there’s some consolidation and new classes from 2017.
These are what’s rating in 2021 for OWASP. (Supply: https://owasp.org/www-project-top-ten/)
Discover extra details about OWASP right here.
Digital Patch
One other sufficient safeguard you’ll hear many WAF suppliers discuss is one thing known as a “digital patch.”
A VP is basically a rule (or typically a algorithm) that may assist resolve a vulnerability in your software program with no need to regulate the code itself.
Many WAFs can deploy digital patches to restore WordPress core, plugin, and theme vulnerabilities when required.
How WAFs Additionally Assist You Meet Authorized Safety Requirements
Together with safety, a WAF will help with legalities.
In case your group works with, processes, or shops delicate info (bank card particulars, and many others.), it’s important you adjust to safety necessities and requirements. That is the place a WAF comes into play.
WAFs will help companies of all sizes adjust to regulatory requirements just like the PCI, HIPAA, and GDPR, making the firewall useful from compliance and safety views.
For instance, the primary requirement for organizations underneath the Fee Card Trade Information Safety Commonplace (PCI) is: “Putting in and sustaining a firewall configuration to guard cardholder information.”
And let’s face it, retaining in compliance with legalities additionally offers you an awesome status. It’s a win-win to make use of a WAF to fulfill authorized requirements.
Completely different Sorts of WordPress Firewalls
Contemplating WordPress is the world’s hottest content material supervisor and a frequent goal of assaults, it’s vital WordPress websites have a WAF in place. There are a number of varieties of firewalls varieties you may deploy, that are:
WAF Safety Plugins
On-site Devoted WordPress WAFs
On-line WordPress Web site WAFs
Right here’s a have a look at every one.
WAF Safety Plugins
Most self-hosted WordPress firewalls are WordPress plugins. They’re supreme, contemplating how straightforward they’re to implement and inexpensive. Plus, it’s widespread for the WAF plugins to have malware scanners, too.
Some observe a “SAAS” mannequin, providing a straightforward and stress-free introduction to the world of software firewalls.
On the opposite facet of the coin, some plugins gained’t match the invoice. It’s all depending on the extent at which the WAF sits.
For instance, some plugin WAFs sit on the DNS stage, which normally means the firewall displays and filters HTTP visitors earlier than reaching their cloud proxy servers.
That is the really useful stage for these sorts of firewall plugins. Some well-known WAF suppliers are arrange on this approach (e.g. Cloudflare — which is without doubt one of the suppliers we’ll be discussing later on this article).
Then you’ve gotten different WordPress safety plugins with built-in WAFs that sit on the software stage. This implies the firewall examines incoming visitors after it has already reached your server – however earlier than loading WordPress scripts.
Plugins are a easy and efficient resolution to WAF and customarily work for small or medium-sized web sites. We’ll be going over some choices of WAF distributors afterward on this article.
On-site Devoted WordPress WAFs
All these firewalls are put in between your WordPress websites and an web connection. Which means each HTTP request despatched to your WordPress website initially passes via the WAF.
Net software WAFs are a bit safer opinion than plugins. That being mentioned, they’re costlier and would require some technical information to handle.
On-line WordPress Firewalls
This sort of firewall doesn’t should be put in on the identical community as your webserver to operate. It’s an internet service that works like a proxy server, the place your website’s visitors comes via it for filtering and is then forwarded to your web site.
With an internet WordPress firewall, your website’s area’s DNS information will should be configured to level to the web WAF. So, this entails your WordPress guests speaking with the web WordPress firewall, not exactly along with your WordPress web site.
The draw back? Your internet server must be accessible over the web for the WAF to ahead visitors to your web site. In different phrases, folks can proceed to speak instantly along with your internet server if the IP deal with is understood.
Principally, in a non-targeted WordPress assault, wherein attackers scan total networks for susceptible websites, your internet server and website will nonetheless be reachable.
Fortunately, you may configure your server’s firewall to solely reply to visitors coming from the web WordPress firewall, so if this assault occurs, you gained’t be a sufferer.
Limitations of WordPress Firewalls
Like something, firewalls could be imperfect. Positive, they provide added safety, however there are some vulnerabilities.
A few examples of this are Restricted Zero-Day Vulnerability Safety, and Net Software Firewall Bypasses.
With the zero-day WordPress vulnerability, there’s potential that your WordPress firewall gained’t block an assault.
That is why your vendor responsive menu is important. Plus, it’s best to all the time use software program from responsive and trusted companies to make sure the firewall guidelines are up to date.
Within the case of internet software firewall bypasses, it’s only a matter of them having vulnerabilities. There are strategies on the market about bypassing the safety of WAFs.
Right here once more, in case your vendor is responsive and may remediate points in a fast time-frame, you ought to be okay.
It’s additionally not unusual for WAFs to have false positives (the place they block innocent visitors) and false negatives (letting dangerous visitors via). It’s because the applying is protected by WAF modifications often.
Moreover, some safety protocols are sometimes uncared for. This contains preventative measures, resembling code and infrastructure audits not being taken.
There’ll all the time be new WAF vulnerabilities that come up as new digital instruments emerge. Many safety points get resolved, however some aren’t seen straight away.
All this being mentioned, WAFs should be actively maintained and configured to make sure they’re up-to-date.
WAF Deployment
WAFs are deployed in just a few methods. This all will depend on the place your functions are deployed, what companies are wanted, the way you need them managed, and the extent of flexibility and efficiency required.
Right here’s the short rundown…
Reverse Proxy: The WAF is a proxy to the applying server, so machine visitors heads on to the WAF.
Clear Reverse Proxy: It is a reverse proxy with clear mode. Due to this, the WAF individually sends filtered visitors to internet functions, which permits for IP masking by having the deal with of the applying server hidden.
Clear Bridge: That is the place HTTP visitors goes straight to the online software. The result’s the WAF is clear between the machine and the server.
You’ll need to determine what methodology of deployment works finest and covers all that you just want.
WAF Distributors
In terms of implementing WAFs, there’s no scarcity of corporations and distributors which can be on the market to assist. Simply google “WAF Distributors” — and a ton of outcomes will seem, together with a whole lot of High 10 lists and extra.
That being mentioned, here’s a have a look at a number of the high corporations on the market which have caught out to us as main contenders on the subject of WAFs. All of them have options that cater to particular person wants.
We’ll check out the next WAF distributors:
AWS
Cloudflare
Azure
WPMU DEV
Imperva
Prophaze
Akamai
Wordfence
Sucuri
There’s a abstract of who they’re and what they’re finest at. Plus, we’ll level out a number of the high options of every firm and the numerous preventative safety measures they handle.
AWS
AWS is a superb WAF resolution for small to giant companies.
Amazon’s AWS WAF helps cease assaults from internet exploits and bots that may alter availability, have an effect on your safety, and devour a ton of assets.
With this WAF, you’ll be in charge of how visitors reaches your functions by establishing safety guidelines that run bot visitors and block widespread assault patterns (e.g. SQL Injections).
This WAF is deployed on Amazon CloudFront as a part of your CDN. What’s particularly pretty about this WAF is that you just pay just for what you employ, and the prices are primarily based on the variety of guidelines you’ve gotten. Plus, there are prices related to the variety of internet requests your software receives.
High Options: Amazon’s AWS WAF contains its cost-effective internet software safety. Together with that, it has an ease of deployment and upkeep. Safety can also be built-in relying on the way you develop your functions, providing you with extra customization choices than different WAFs.
Finest For: Companies of all sizes, so long as they’re AWS shoppers.
Helps Mitigate: DDoS assaults, SQL Injections, and Cross-Web site Scripting (XSS).
Cloudflare
Cloudflare is right here to assist safe your property with layered defenses.
Cloudflare is a top-rated cloud-delivered software safety firm. And, in fact, a strong WAF is built-in with its safety. Their WAF blocks over 57 billion cyber threats per day.
Its world 100 Tbps community sees 30M requests per second, so it’s up for the job on the subject of dealing with your web sites. It affords full software safety from the identical cloud community, making it sensible and uniform on the subject of safety posture.
Cloudflare’s community has unparalleled visibility into threats, which yields the sharpest and only machine studying.
Everything You Need to Know About Web Application Firewalls (WAFs)
High Options: It has layered defenses, together with Cloudfare managed guidelines, that provide superior zero-day vulnerability protections. Plus, it makes use of the core OWASP guidelines, makes use of customized rulesets, displays & blocks stolen or uncovered credentials, and has versatile response choices.
Moreover, it has logging & reporting, problem monitoring, analytics, and application-layer management.
Finest For: Private use to small and mid-sized companies. Additionally, it’s wonderful for high-level enterprises and corporations. Plus, it has WordPress WAF guidelines, so it’s nice for WordPress websites.
Helps Mitigate: OWASP High 10, Remark Spam, DDoS assaults, SQL injections, HTTP Headers, and extra.
Azure
Azure is Microsoft’s WAF resolution.
Microsoft’s Azure is a cloud-native WAF that is without doubt one of the most profitable cloud platforms on the market.
The Azure service affords a spread of software program that present utilities to different methods, and one of many merchandise is the WAF. It tracks for the highest ten vulnerabilities logged by OWASP, and you may add customized guidelines, too.
It has a metered cost charge, calculated on an hourly charge and information throughput charge — then charged month-to-month. This supplies a lot decrease upfront prices in comparison with another WAF suppliers.
High Options: Azure has complete safety for OWASP, real-time visibility into your atmosphere, and safety alerts. Plus, it has full REST API help in order that it could automate DevOps processes. It additionally has DDoS safety.
Finest For: Main and small companies, alike.
Helps Mitigate: OWASP High 10, DDos Assaults, and any customized guidelines (and extra).
WPMU DEV
Sure, our internet hosting features a WAF.
We couldn’t let this text go by with out mentioning our very personal extremely optimized WAF right here at WPMU DEV. Our WAF is totally free to make use of with our internet hosting, already tweaked for WordPress, up to date day by day, and rather more.
The WAF we use makes use of fewer server assets by not operating in PHP. Moreover, it doesn’t want to make use of a line of code, so your website’s efficiency will stay sturdy.
We even have over 300+ firewall guidelines (or insurance policies). These insurance policies mix rule-based logic, parsing, and signatures — which lets them detect and cease internet software assaults.
High Options: After testing, our WAF is 25% sooner than main plugin-based firewall. On high of our 300+ firewall ruleset, we additionally defend towards the OWASP High Ten. Moreover, it’s free with any hosted account!
Finest For: Small to main WordPress websites, internet hosting resellers, and any company or person who manages a number of web sites.
Helps Mitigate: Assaults starting from SQL injections, XSS, and plenty of extra.
Imperva
Imperva is a good choice that you could strive without spending a dime.
Imperva’s WAF stops assaults with virtually zero errors on the subject of false positives. It additionally has a world SOC to verify your organization is protected inside moments of discovery.
It’s an all-in-one safety resolution that has all of the options required for web site safety. There are free instruments for Information Classification and Database Vulnerability Testing.
High Options: Imperva options safe cloud and on-premises functions. It stops OWASP High 10 and Automated High 20, plus has assault detection, SIEM integration, and reporting.
Finest For: Small to large-sized corporations.
Helps Mitigate: OWASP High 10 and Automated High 20 and extra.
Prophaze
Porphaze affords limitless rule units.
Prophaze WAF handles a ton on the subject of safety. Not solely is it a WAF, nevertheless it’s additionally a mix of RASP, CDN, DDoS, and extra.
It affords real-time web site safety by implementing highly effective cloud-based applied sciences that work towards the newest threats. It robotically scans your website for hundreds of vulnerabilities and the OWASP High 10. On high of that, it doesn’t want any further configurations and automated updates to deal with new threats.
Prophaze has limitless rule units. Plus, customized integrations with SIEM Options and helps all public clouds (e.g. AWS).
High Options: Some key safety features are Bot Migration, Actual-Time Dashboard, 24-7 help, and ML Based mostly Menace Intelligence.
Finest For: A spread from midmarket to excessive stage enterprise.
Helps Mitigate: OWASP High 10 API, DDoS, Bot Safety, and extra.
Akamai
Akamai WAF makes use of crowdsourced intelligence to assist defend towards threats.
Akamai’s WAF is a reliable resolution that can defend your website towards all recognized assaults. Its a world chief in DDoS, plus integrates full DDoS safety with its WAF. That makes it so that you gained’t must have visitors routed via two corporations to obtain optimistic requests to your internet server.
With Akamai, detect threats with crowdsourced intelligence. Plus, deploy and handle effectively with only a few clicks.
High Options: Akamai has extra automation than many different choices. It’s additionally straightforward to make use of with safety towards DDoS assaults and extra. It additionally includes a dashboard, alerts, and extra details about blocked assaults and the way your website was protected.
Finest For: Small to Massive Corporations
Helps Mitigate: DDoS Assaults and all OWASP High 10.
Wordfence
Wordfence is a WAF that runs on the endpoint, which makes for deep integration with WordPress.
Wordfence is one other strong choice for a WAF that’s made for WordPress websites as a preferred all-in-one safety plugin with over two million lively installs. It contains an endpoint firewall and malware scanner that was particularly constructed for WordPress.
Its WAF runs on the endpoint, which allows deep integration with WordPress, which is totally different than cloud options because it doesn’t break encryption, can’t be bypassed, and may’t leak information.
It additionally comes with a pleasant dashboard that signifies safety threats, scans, and extra.
High Options: Spam filter, scheduled safety scans, brute drive assault prevention, reside visitors monitoring, and extra.
Finest For: WordPress websites and small to giant companies.
Helps Mitigate: Brute drive assaults, OWASP High 10, and different malicious assaults.
Sucuri
One other wonderful choice in your WAF and WordPress.
Sucuri is a number one safety firm for WordPress. It includes a cloud-based WAF that’s persistently up to date to enhance detection and mitigation towards new and evolving threats. Plus, you may add your personal customized guidelines.
With Sucuri, you can even improve your WordPress’s efficiency. It options caching optimization, Analyst CDN, and web site acceleration.
High Options: DNS Stage Firewall, malware & blocklist removing companies, and brute drive safety.
Finest For: WordPress websites and corporations/companies of any dimension.
Helps Mitigate: All recognized assaults (e.g. SQL injections, RCE, RFU, and many others.).
In fact, there are various extra choices on the market as properly. That is only a shortlist of some extremely rated corporations that may serve you properly on the subject of WAFs.
It’s No Gaffe That You Want a WAF
Now that we’ve lined the spectrum of WAFs, in case you didn’t know, you may see that they’re useful for safety, compliance, status, and peace of thoughts. And hopefully, you realized extra about WAFs than you ever thought you’d!
Plus, with the various distributors to offer a WAF, you may have one up and operating in a matter of moments. Whether or not you run a WordPress website or not — there’s a WAF for you.
Hopefully, this reference information has helped to reply any questions you or your shoppers have about WAFs.

Why Content Is Such A Fundamental Part Of The Web Design Process
When embarking on a new website project, designers tend to focus on the aesthetics and functionality of their work. This means that content writing is a task often pushed onto the client to fulfil. The unfortunate consequence of this decision is that the website’s content ultimately comes in too late, in the wrong format, and of poor quality.
21 years ago, usability consultant Jakob Nielsen said this about content written by laypeople:
“The biggest problem is that most people are (and always have been) bad content creators. That’s why we have professional writers, graphic designers, filmmakers, speakers, musicians, and other types of media professionals. When an average person tries to create content, they typically don’t have much to say and what they do say is often said badly.”
When it comes to writing content, I’m sorry to say that clients are often just not very good. My clients are amazing in many ways, but writing persuasive and informative content that prompts the reader to action, is generally not one of their talents.
As a web designer myself, I have been guilty of encouraging my clients to produce their own content. In one project I used Google Drive to manage the process. Unfortunately, the client required a lot of coaching on how to use the document editor and when they finally produced the content much of it lacked focus. I had to tell them it was unworkable. They went back to the drawing board and the project took months longer than it otherwise could have.
I sometimes feel like I’ve spent half my career waiting around for clients to write content. The other half has been spent trying to make sure whatever they produce doesn’t ruin the design.
Content production within the website design process can be tricky to manage. In this article I share my key learnings from years of experience, as well as offer some tips to enhance your own procedures.
The Difference Between Design And Content
In its most essential form, content is the material that users consume. Content can take the shape of words, pictures, video and audio. It is the tangible material that people cognitively consume, where design is the presentation of that content, influencing how people feel in the moment. They are symbiotic, yet distinct in their own right.
A common misconception among clients, and even designers themselves, is that design and content are one and the same. As such, it becomes incredibly difficult to know where the work of the designer ends. Most web designers will acknowledge that it is not their job to create video content, but at the same time, they may stray into the production of written content. This is not a problem if the designer has the expertise and resources to deliver on this fundamental aspect of the project, but most often they do not, and nor does their client. The reality is that design and content are completely separate.
It is imperative, therefore, that content be given its place alongside visual design during the web development process.
Why We Should Start With Content
There is a well-known maxim born out of the building industry in the 1800s which states that form follows function. Coined by architect Louis Sullivan, his full quote expresses this idea eloquently:
“Whether it be the sweeping eagle in his flight, or the open apple-blossom, the toiling work-horse, the blithe swan, the branching oak, the winding stream at its base, the drifting clouds, over all the coursing sun, form ever follows function, and this is the law.”
Architects know that if a building does not meet real world needs, it would be impractical, regardless of how nice it appeared. This law can be applied directly to the way we build websites today. The relatively modern role of the UX designer was intended to act as the glue between form and function, bridging the gap between what something looks like and how it is interacted with. But the truth is that few projects carry the budget for a dedicated UX designer, and as such this responsibility often falls to the web designer who may be more concerned with aesthetics.
The client, who comes to us for guidance, is mostly interested in what a website can do for them. Therefore, their role is to bring their business objectives and specialist knowledge, not to write pages of content.
Can you see the problem? A cavernous gap has emerged, one that allows the production of content to fall through. We need to bring content production into our website design process, and that means creating a space for it at the start.
Naturally, this extension to our project will incur a greater cost. This often means the need for professional content production is met with resistance. Let’s have a look at some strategies for dealing with this.
What To Do If Your Client Cannot Afford Copywriting
Not only does content production often represent an unwelcome deviation for a designer, but clients also see it as an unnecessary cost. We must challenge this mindset, and that begins by covering the positives. Professional website copy will:
Consolidate and solidify the overall brand message.
Save a lot of time for you and the client.
Make the design (and the design process) more effective.
Result in a better end user experience.
The bottom line? Professionally written content will drive a higher return on the overall investment.
The reason that clients often claim they “cannot afford” copywriting is because they don’t understand what it can do for them. They don’t appreciate the potential for a return, and therefore they are hesitant to make the investment. Simple economics commands that if you can make the offer compelling, the person will want it. Use those bullet points above to instil the vitality of good content, not just on the web, but in business comms more generally.
I recently worked with a company whose services proved a challenge to understand at first, but with the help of a copywriter we developed a sitemap that reflected both the end-user’s needs and covered what was on offer succinctly. This freed me up to work on the visual design system and more technical integrations. Without this investment in content production, the end result would have been much poorer for it.
Now let’s take a look at some strategies for plugging content writing into the website creation process.
Strategies For Stitching Design And Content Together
If you want to create a great website that fulfils the business objectives of your client and doesn’t give you the headache of sourcing content along the way, you will need to give copywriting its due attention. After years of struggling with this, what follows are some core ideas I’ve used to improve the process.
1. Run A Content Workshop With Your Client
Spending a couple of hours focusing on content enables you to work out what is important to the project. It also internalizes a team-wide sense of how vital content is. Here are some ways you might run such a session:
Discuss the overarching goals by asking good, open-ended questions such as “what might a visitor want from the homepage? Who would find this piece of content useful? How might the visitor proceed after having read this page?”
Intentionally steer the discussion away from how things might look, instead focusing on messaging, and how we expect the visitor to feel.
Consider front-loading the session with a definition of content and showing some good/bad examples. Ask the team for their live feedback to gauge and guide their understanding.
This session is as much symbolic as it is tangible in use. Whilst some solid ideas will come out of the meeting, it’s real purpose is to get the client on board with the idea that design and content are separate deliverables. Taking this a step further, you might choose to run this workshop as an individual product for which the client pays a fixed fee, before you even begin talking about website design.
2. Partner With A Copywriter Ahead Of Time
By bringing a copywriter into your process you can effectively merge their service with yours. A common approach many web developers take when preparing a quote for a client is to itemize each service. For example, they might split front-end and back-end development into separate deliverables. This is a problem, because it creates an opportunity for the client to ask unhelpful questions. Querying an investment is, of course, wise, but in this case it can force you to justify individual services that are required to deliver the whole.
One of the best ways to integrate content writing into your delivery process is to simply begin behaving like it is a non-negotiable step. The next time you prepare an estimate, include copywriting as a standard part of the process like any other. Here is an example statement you can drop into your proposals to help with this:
Note: A strong content strategy is fundamental to making your website redesign a success. As part of this proposal we will develop content for your new website that will resonate with your visitors and prompt action from them. We will conduct an interview with you to understand your audience and objectives, and integrate this into our content writing process.
If this is met with questions, or if your client wishes to drop this part to save costs, refer back to the benefits I outlined earlier.
3. Use Real Content As Quickly As Possible
To this day I sometimes find myself designing layouts using Lorem Ipsum placeholder copy. I slap myself on the wrist every time. In an ideal world, design would not begin until you have, at least, some of the content. It’s difficult to bring a piece of design to life unless its purpose is rooted in a real world use case, and placeholder text simply doesn’t achieve that.
Don’t be tempted, either, to begin writing content as you design. I have tried this, and unfortunately the copy tends to get subsumed by the design process and forgotten about. Only when it’s time to launch does somebody question it, by which point it becomes a headache to put right. You don’t want to be retrofitting a content strategy deep into the design process; use real content as early on in your project as you can.
4. Interrogate The Brand
Our clients mission and values provide a deep well of content that most designers barely dip their feet into. Many insights and content ideas can be found here, but it means stepping back from the website process to interrogate the brand. This can seem quite daunting, but it is often worth doing in order to understand the core motivations of the project. Here are some questions you can ask your client to help form a content strategy:
Why do you do what you do?
How does your product or service make your customer’s life better?
How do your customers describe you?
Who are your competitors and how do you differ?
Where will this project take you?
The goal here is to get the client thinking about themselves and their customers. Your aim is to translate their responses into useful content and design decisions. When a client is struggling to understand the value of the substance of content, these discussions can lead to a few “lightbulb” moments.
If you’re feeling bold, consider bringing your clients’ customers into the conversation as well to add an extra dimension. This might feel a little scary, but you could do it in any of the following ways:
Ask for existing feedback that your client may have received from their customers. Look for common questions or complaints.
Conduct a survey with their customers, acting either on behalf of the client or as yourself.
Organise a series of video interviews with their customers. This could add immense value to the project and level you up to a more vital position in the eyes of the client.
Bring a handful of customers into your content workshop with the client to involve them in discussions.
It’s important to remember here that when interrogating the brand, we’re simply looking for answers. How do people experience this company? Promote an objective agenda to reduce in-fighting, and this extra mile will serve you very well.
5. If The Client Is To Write Their Own Content, Make It Easy For Them
In situations when the client has in-house resources to produce copy, your job will be to guide them. Here are some tips for keeping the project on track:
Delay jumping into visual design until you have some real content to work with.
Give the client a content-delivery deadline.
Set up all the documents for the client as Word files or Google Drive documents. Ensure each is reflected by a page within the sitemap, and ideally a wireframe to signify layout. This gives the client a framework to write within.
Give them templates and use constraints to help them produce content that will work well. For example, have a field for “page title” and state that it should be no more than 6-8 words. Here is a template that I have used with my clients in the past.
If there is no budget to run a content workshop, have a pre-recorded video you can point them to or an article on your blog that explains the point of good content.
Make content production the responsibility of one individual. If the whole team input, the project will quickly spiral.
Essentially, in cases where your client does not invest in external copywriting, you should seek to make the process as simple as possible. Left to their own devices, you may receive content in dribs and drabs, and when you finally piece it together you’ll end up with a Frankenstein’s Monster. Making it easy for them by managing the process can help avoid this.
Some Resources To Help Facilitate The Content Process
Whether you are collating the content yourself, working with a copywriter or leaning on your client to provide it, you need tools and a process. A common approach, and one that has worked for me, generally follows these steps:
You audit the current website to gain a deeper understanding of content that a) needs to be rewritten, b) needs to be deleted or, c) needs to be produced from scratch.
You work with the client and writer to establish a sitemap, the overarching structure of the website content. Gloomaps is a wonderful tool to help with this, but there are more sophisticated tools such as Miro that provide a collaborative space.
You mock up content layout using wireframe models of key pages. You can go deep into this or keep it surface-level. There are dedicated apps like UXPin and Mockflow, but I find that Adobe Illustrator works well with the right wireframe UI kit.
The key principle here is to include your client in discussions about content and structure. Too often designers disappear into a shaded room, emerging weeks later with a “finished” product. Whilst some clients appreciate a “done for you” service, most find greater satisfaction by being brought into the process. You’ll do better work when you draw on their knowledge and experiences, too.
In Summary: Take Content Seriously
The uncomfortable fact of the matter is that content is the thing you’re designing. Influential copywriter and marketer Eugene Schwartz said:
“Copy is not written, it is assembled.”
Best web designers know that their job is about composition and user experience. We provide the interface to that which the reader seeks. It’s often easy to forget this when faced with the politics and preferences of most web design projects. We get our heads turned by new trends, fancy CSS animations and the latest frameworks. We get stuck into the problem, which is what makes us designers and developers in the first place.
But there will always be a need to refocus. To align our work with the core aims of the project, and in most cases, that is simply to get a message across in the clearest way possible.
We need better content on the web, and that requires investment. As designers we can fly the flag for professional copywriters, or we can distract ourselves with aesthetics. I’ve done both, and I can tell you with confidence that the former produces better work, more quickly, and with less hassle.
Further Reading on SmashingMag:
Getting Practical With Microcopy
A Comprehensive Website Planning Guide (Part 1)
How To Deal With Redundant, Out-Of-Date And Trivial Content ROT
Creating Content Wireframes For Responsive Design
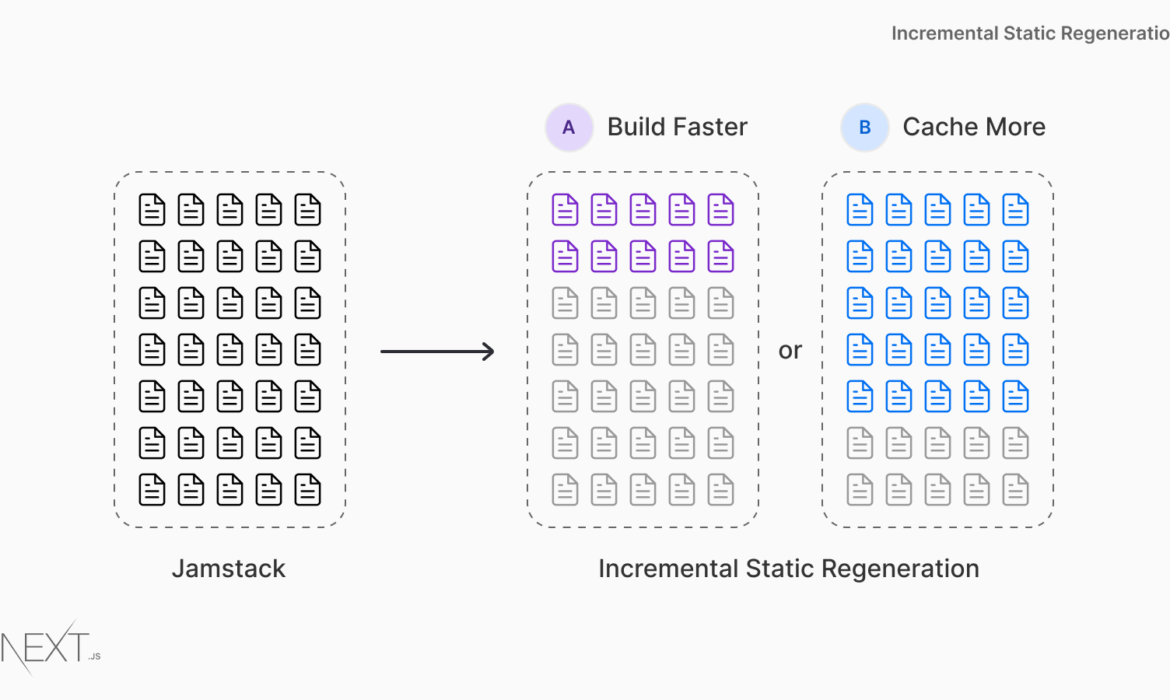
A Complete Guide To Incremental Static Regeneration (ISR) With Next.js
A year ago, Next.js 9.3 released support for Static Site Generation (SSG) making it the first hybrid framework. I’d been a happy Next.js user for about a few years at this point, but this release made Next.js my new default solution. After working with Next.js extensively, I joined Vercel to help companies like Tripadvisor and Washington Post as they adopt and scale Next.js.
In this article, I’d like to explore a new evolution of the Jamstack: Incremental Static Regeneration (ISR). Below you’ll find a guide to ISR — including use cases, demos and tradeoffs.
The Problem with Static-Site Generation
The idea behind the Jamstack is appealing: pre-rendered static pages which can be pushed to a CDN and globally available in seconds. Static content is fast, resilient to downtime, and immediately indexed by crawlers. But there are some issues.
If you’ve adopted the Jamstack architecture while building a large-scale static site, you might be stuck waiting hours for your site to build. If you double the number of pages, the build time also doubles. Let’s consider Target.com. Is it possible to statically generate millions of products with every deployment?
Even if every page was statically generated in an unrealistic 1ms, it would still take hours to rebuild the entire site. For large web applications, choosing complete static-site generation is a non-starter. Large-scale teams need a more flexible, personalized, hybrid solution.
Content Management Systems (CMS)
For many teams, their site’s content is decoupled from the code. Using a Headless CMS allows content editors to publish changes without involving a developer. However, with traditional static sites, this process can be slow.
Consider an e-commerce store with 100,000 products. Product prices change frequently. When a content editor changes the price of headphones from $100 to $75 as part of a promotion, their CMS uses a webhook to rebuild the entire site. It’s not feasible to wait hours for the new price to be reflected.
Long builds with unnecessary computation might also incur additional expenses. Ideally, your application is intelligent enough to understand which products changed and incrementally update those pages without needing a full rebuild.
Incremental Static Regeneration (ISR)
Next.js allows you to create or update static pages after you’ve built your site. Incremental Static Regeneration (ISR) enables developers and content editors to use static-generation on a per-page basis, without needing to rebuild the entire site. With ISR, you can retain the benefits of static while scaling to millions of pages.
Static pages can be generated at runtime (on-demand) instead of at build-time with ISR. Using analytics, A/B testing, or other metrics, you are equipped with the flexibility to make your own tradeoff on build times.
Consider the e-commerce store from before with 100,000 products. At a realistic 50ms to statically generate each product page, this would take almost 2 hours without ISR. With ISR, we can choose from:
Faster Builds
Generate the most popular 1,000 products at build-time. Requests made to other products will be a cache miss and statically generate on-demand: 1-minute builds.
Higher Cache Hit Rate
Generate 10,000 products at build-time, ensuring more products are cached ahead of a user’s request: 8-minute builds.
Let’s walk through an example of ISR for an e-commerce product page.
Getting Started
Fetching Data
If you’ve never used Next.js before, I’d recommend reading Getting Started With Next.js to understand the basics. ISR uses the same Next.js API to generate static pages: getStaticProps. By specifying revalidate: 60, we inform Next.js to use ISR for this page.
Next.js can define a revalidation time per page. Let’s set it at 60 seconds.
The initial request to the product page will show the cached page with the original price.
The data for the product is updated in the CMS.
Any requests to the page after the initial request and before 60 seconds are cached and instantaneous.
After the 60-second window, the next request will still show the cached (stale) page. Next.js triggers a regeneration of the page in the background.
Once the page has been successfully generated, Next.js will invalidate the cache and show the updated product page. If the background regeneration fails, the old page remains unaltered.
// pages/products/[id].js
export async function getStaticProps({ params }) {
return {
props: {
product: await getProductFromDatabase(params.id)
},
revalidate: 60
}
}
Generating Paths
Next.js defines which products to generate at build-time and which on-demand. Let’s only generate the most popular 1,000 products at build-time by providing getStaticPaths with a list of the top 1,000 product IDs.
We need to configure how Next.js will “fallback” when requesting any of the other products after the initial build. There are two options to choose from: blocking and true.
fallback: blocking (preferred)
When a request is made to a page that hasn’t been generated, Next.js will server-render the page on the first request. Future requests will serve the static file from the cache.
fallback: true
When a request is made to a page that hasn’t been generated, Next.js will immediately serve a static page with a loading state on the first request. When the data is finished loading, the page will re-render with the new data and be cached. Future requests will serve the static file from the cache.
// pages/products/[id].js
export async function getStaticPaths() {
const products = await getTop1000Products()
const paths = products.map((product) => ({
params: { id: product.id }
}))
return { paths, fallback: ‘blocking’ }
}
Tradeoffs
Next.js focuses first and foremost on the end-user. The “best solution” is relative and varies by industry, audience, and the nature of the application. By allowing developers to shift between solutions without leaving the bounds of the framework, Next.js lets you pick the right tool for the project.
Server-Side Rendering
ISR isn’t always the right solution. For example, the Facebook news feed cannot show stale content. In this instance, you’d want to use SSR and potentially your own cache-control headers with surrogate keys to invalidate content. Since Next.js is a hybrid framework, you’re able to make that tradeoff yourself and stay within the framework.
// You can cache SSR pages at the edge using Next.js
// inside both getServerSideProps and API Routes
res.setHeader(‘Cache-Control’, ‘s-maxage=60, stale-while-revalidate’);
SSR and edge caching are similar to ISR (especially if using stale-while-revalidate caching headers) with the main difference being the first request. With ISR, the first request can be guaranteed static if pre-rendered. Even if your database does down, or there’s an issue communicating with an API, your users will still see the properly served static page. However, SSR will allow you to customize your page based on the incoming request.
Note: Using SSR without caching can lead to poor performance. Every millisecond matters when blocking the user from seeing your site, and this can have a dramatic effect on your TTFB (Time to First Byte).
Static-Site Generation
ISR doesn’t always make sense for small websites. If your revalidation period is larger than the time it takes to rebuild your entire site, you might as well use traditional static-site generation.
Client-Side Rendering
If you use React without Next.js, you’re using client-side rendering. Your application serves a loading state, followed by requesting data inside JavaScript on the client-side (e.g. useEffect). While this does increase your options for hosting (as there’s no server necessary), there are tradeoffs.
The lack of pre-rendered content from the initial HTML leads to slower and less dynamic Search Engine Optimization (SEO). It’s also not possible to use CSR with JavaScript disabled.
ISR Fallback Options
If your data can be fetched quickly, consider using fallback: blocking. Then, you don’t need to consider the loading state and your page will always show the same result (regardless of whether it’s cached or not). If your data fetching is slow, fallback: true allows you to immediately show a loading state to the user.
ISR: Not Just Caching!
While I’ve explained ISR through the context of a cache, it’s designed to persist your generated pages between deployments. This means that you’re able to roll back instantly and not lose your previously generated pages.
Each deployment can be keyed by an ID, which Next.js uses to persist statically generated pages. When you roll back, you can update the key to point to the previous deployment, allowing for atomic deployments. This means that you can visit your previous immutable deployments and they’ll work as intended.
Here’s an example of reverting code with ISR:
You push code and get a deployment ID 123.
Your page contains a typo “Smshng Magazine”.
You update the page in the CMS. No re-deploy needed.
Once your page shows “Smashing Magazine”, it’s persisted in storage.
You push some bad code and deploy ID 345.
You roll back to deployment ID 123.
You still see “Smashing Magazine”.
Reverts and persisting static pages are out of scope of Next.js and dependent on your hosting provider. Note that ISR differs from server-rendering with Cache-Control headers because, by design, caches expire. They are not shared across regions and will be purged when reverting.
Examples of Incremental Static Regeneration
Incremental Static Regeneration works well for e-commerce, marketing pages, blog posts, ad-backed media, and more.
E-commerce Demo
Next.js Commerce is an all-in-one starter kit for high-performance e-commerce sites.
GitHub Reactions Demo
React to the original GitHub issue and watch ISR update the statically generated landing page.
Static Tweets Demo
This project deploys in 30 seconds, but can statically generate 500M tweets on-demand using ISR.
Learn Next.js Today
Developers and large teams are choosing Next.js for its hybrid approach and ability to incrementally generate pages on-demand. With ISR, you get the benefits of static with the flexibility of server-rendering. ISR works out of the box using next start.
Next.js has been designed for gradual adoption. With Next.js, you can continue using your existing code and add as much (or as little) React as you need. By starting small and incrementally adding more pages, you can prevent derailing feature work by avoiding a complete rewrite. Learn more about Next.js — and happy coding, everyone!
Further Reading
Getting Started With Next.js
Comparing Styling Methods In Next.js
How To Build A GraphQL Server Using Next.js API Routes
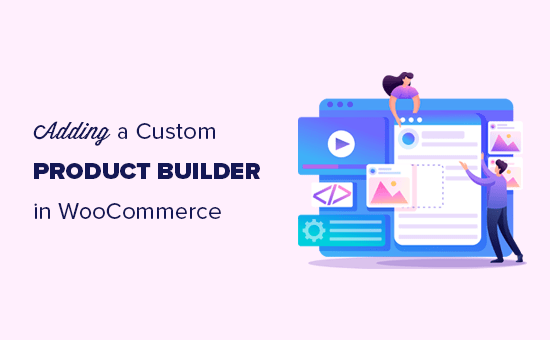
How to Add a Custom Product Builder in WooCommerce
Do you want to add a custom product builder in WooCommerce?
A custom product builder in WooCommerce allows customers to design products and customize them to their own requirements. This interactive way of customizing product orders can boost sales conversions.
In this article, we will show you how to easily add a custom product builder in WooCommerce without hiring any developers or writing any code.
Why Add a Custom Product Builder in WooCommerce?
Adding a custom product builder in WooCommerce allows your customers to customize the products before placing an order.
For instance, you can add print-on-demand products and allow customers to add their logos, images, and text to the products.
A custom product designer for WooCommerce can be used to sell your own products that you can customize for the customers before shipping.
Alternatively, you can also start a dropshipping business and let a third-party vendor take care of customization and shipping.
That being said, let’s take a look at how to add a custom product builder to your WooCommerce store.
Adding Custom Product Builder to a WooCommmerce Store
For this tutorial, we will be using Zakeke. It is a product customizer tool for WooCommerce and offers a seamless product builder experience for your users. The product designer is really easy to use for customers as well as store owners.
First, you need to sign up for a Zakeke account.
After that, you will be asked to choose your eCommerce integration. Simply click on the Next button to continue.
Zakeke works with most popular eCommerce platforms including WooCommerce.
To connect your store to Zakeke, switch back to your WordPress website admin area.
Next, you need to install and activate the free Zakeke plugin. For more details, see our step by step guide on how to install a WordPress plugin.
Upon activation, you’ll be asked to connect your WooCommerce store to your Zakeke account. Simply click on the Connect button to continue.
You’ll be then asked to allow Zakeke access to perform actions on your WooCommerce store. Click on the Approve button to move forward.
This will bring you back to Zakeke website to start your free trial or choose a pricing plan. Click on the next button to continue.
On the next page, you will see pricing options for different plans. Each plan comes with a free 14-day trial and does not require a credit card.
Apart from the Starter plan, all other plans charge an additional 1.9% transaction fee on sold products.
Click to choose your plan and you are good to go.
Adding Your First Customizable Product
You can now click on the Next button to launch the Product configurator and start adding your products.
You can then choose a product from your own store, or you can select a print-on-demand service.
For the sake of this tutorial, we will choose to add products from our own demo store.
Next, Zakeke will load products from your store, and you need to choose the product that you want to configure.
After that, it will choose your product image from your store. If you want to use a different image, then you can upload it. You can also add a back side of the product image or add variations.
Once you are satisfied with the product images, click on the ‘Set print area’ button. This will bring up a popup where you need to set a ruler by simply drawing a line with your mouse and providing a measurement.
Next, you need to select a shape for the print area and then draw it on the product image.
Once you are satisfied with your selection, click on the Save button to continue.
Next, you need to click on the Proceed to preview button to finalize your changes.
You’ll now see your product details. Don’t forget to save your changes as draft or publish it to your store.
Setting The Print Methods
The next step is to set print methods. This is where you can choose how you want the design files to be formatted for printing.
From your Zakeke account dashboard, go to the Printing Methods from the left column and then click on the Add Printing Method button.
From here, you can choose what printing features you want to allow to your customers. You can also choose the file types, resolution, and format.
At the bottom, you can choose the existing products that this method would apply to.
Don’t forget to click on the Save Print Method button to store your changes.
Using The Custom Product Builder in WooCommerce
Zakeke will take care of adding the product customization option to all the products that you have added using the product configurator.
You can simply visit the product in your store, and you will see the option to Customize the product.
This will open up the product designer interface with a preview of the product image design tools on the right. Users can add text or upload images from their devices.
Users can adjust the image or text to the print area by simply dragging the corners. They can choose different fonts, colors, and styles.
The product designer also works on mobile devices and automatically adjusts to match the user’s screen size.
Once finished, they can download a copy of their design as PDF, save it, or simply add it to the cart.
After that, customers can check out as they would normally do with a preview of their customized product in the cart.
Processing the Custom Product Order in WooCommerce
Zakeke makes it really simple to get the customization files for each order.
Simply go to the WooCommerce » Orders page and click on an order for your customizable product.
On the Order details page, you’ll see a preview of the custom design created by the customer with a link to download the customization files.
You can then download the print files and send them for print or to your dropshipping vendor.
Bonus Tip: Selling More Customizable Products in WooCommerce
Customizable products and a sleek product designer would help you make more sales. However, customers may not know that they can customize and design their products.
This is where OptinMonster comes in.
It is the best conversion optimization software on the market and allows you to easily convert WooCommerce visitors into paying customers.
OptinMonster comes with lightbox popups, slide-in popups, notification bars, countdown timers, and more. All these tools help you display the right message to your customers at the precise time.
With its powerful display rules, you can target customers and show them personalized campaigns.
For instance, you can offer free shipping to customers in a particular area, show a slide-in popup for customizable products, or give a limited-time coupon to recover abandoned cart sales.
We hope this article helped you learn how to easily add a custom product builder in WooCommerce. You may also want to see our guide on how to track conversions in WooCommerce to grow your business, and our comparison of best WooCommerce hosting providers.
If you liked this article, then please subscribe to our YouTube Channel for WordPress video tutorials. You can also find us on Twitter and Facebook.
The post How to Add a Custom Product Builder in WooCommerce appeared first on WPBeginner.
How to Add a Double Border to SVG Shapes
Let’s say someone asks you to add a double border to some random geometric SVG shapes. For some reason, you can’t use any graphic editor — they need to be generated at runtime — so you have to solve it with CSS or within the SVG syntax.
Your first question might be: Is there anything like stroke-style: double in SVG? Well, the answer is not yet and it’s not that easy. But I’ll attempt it anyway to see what methods I can uncover. I’ll explore the possibilities of three different basic shapes: circle, rectangle, and polygon. Pointing the ones that can keep a transparent color in the middle of the two lines.
Spoiler alert: all the results have their downsides, at least with CSS and SVG, but let me walk you through my intents.
The simple solutions
These don’t work with all shapes, but they are the easiest of the solutions.
outline and box-shadow
The CSS properties outline and box-shadow only apply to the bounding box of the shape or SVG, and so both are great solutions only for squares and rectangles. They also allow flexible colors using custom properties.
It only takes two lines of CSS with outline, plus it keeps the background color visible through the shape.
🙁 Solution only for one shape.✅ Simple code✅ Borders are smooth✅ Transparent background
box-shadow only needs one line of CSS, but we have to make sure that each shape has its own SVG as we can’t apply box-shadow directly to the shapes. Another thing to consider is that we have to apply the color of the background in the declaration.
🙁 Solution only for one shape✅ Simple code✅ Borders are smooth🙁 No transparent background
SVG gradients
SVG radial gradients only work on circles ☺️. We can directly apply the gradient on the stroke, but it’s better to use variables as we have to declare the colors many times in the code.
🙁 Solution only for one shape✅ Simple code🙁 Borders are smooth🙁 No transparent background
Solutions for all shapes
These will work with all shapes, but the code could become bloated or complex.
filter: drop-shadow()
Finally, one solution for all shapes! We must have each shape in its own <svg> since the filter won’t apply directly to the shapes. We are using one declaration in CSS and have flexible colors using variables. The downside? The borders don’t look very smooth.
✅ One solution for all shapes✅ Simple code🙁 Borders look pixelated🙁 No transparent background
SVG filters
This is a very flexible solution. We can create a filter and add it to the shapes through SVG’s filter attribute. The complicated part here is the filter itself. We’ll need three paintings, one for the outside border, one for the background flood, and the last one to paint the shape on the front. The result looks better than using drop-shadow, but the borders are still pixelated.
✅ One solution for all shapes🙁 Complex code🙁 Borders look pixelated🙁 No transparent background
Reusing shapes
There are a couple of possible options here.
Option 1: Transforms
This solution requires transforms. We place one figure over the other, where the main figure has a fill color and a stroke color, and the other figure has no fill, a red stroke, and is scaled and repositioned to the center. We defined our shapes on the <defs>. The trick is to translate half of the viewBox to the negative space so that, when we scale them, we can do it from the center of the figure.
✅ One solution for all shapes🙁 Duplicated code✅ Borders are smooth✅ Transparent background
Option 2: <use>
I found a clever solution in the www-svg mailing list by Doug Schepers that uses SVG <use>. Again, it requires defining the shapes once and referring to them twice using <use>. This time the main shape has a bigger stroke. The second shape has half the stroke of the main shape, no fill, and a stroke matching the background color.
✅ One solution for all shapes🙁 Duplicated code✅ Borders are smooth🙁 No transparent background
Here are the full results!
Just so you have them all in one place. Let me know it you can think of other possible solutions!
SolutionAll shapesSimple codeSmooth bordersTransparent backgroundoutline🙁✅✅✅box-shadow🙁✅✅🙁SVG gradients🙁✅🙁🙁filter: drop-shadow()✅✅🙁🙁SVG filters✅🙁🙁🙁Reusing shapes:
Tranforms✅🙁✅✅Reusing shapes:
<use>✅🙁✅🙁
The post How to Add a Double Border to SVG Shapes appeared first on CSS-Tricks.
You can support CSS-Tricks by being an MVP Supporter.
Sticky Headers: 5 Ways to Make Them Better
Page Laubheimer says that if you’re going to do a sticky header…
Keep it small.Visually contrast it with the rest of the page.If it’s going to move, keep it minimal. (I’d say, respect prefers-reduced-motion.)Consider “partially persistent headers.” (Jemima Abu calls it a Smart Navbar.)Actually, maybe don’t even do it.
I generally like the term “sticky” header, because it implies you should use position: sticky for them, which I think you should. It used to be done with position: fixed, but that was trickier to pull off since the header would move in-and-out of flow of the document. Using sticky positioning helps reserve that space automatically without JavaScript or magic numbers.
Direct Link to Article — Permalink
The post Sticky Headers: 5 Ways to Make Them Better appeared first on CSS-Tricks.
You can support CSS-Tricks by being an MVP Supporter.
How To Set Up Your Only Fans Page
So you’ve signed up to Only Fans and you are ready to conquer the world. Here are the steps to setting up your account quickly and effectively
What you need to do:
Sign up to OnlyFans: So much like most sites you want to click on“Sign Up” and add an e-mail address and choose a password. At this time Only Fans does not offer the very common “sign up through” Facebook/Apple/Google etc that many sites currently have. So you will need to give them your email address. Make sure that you have access to this e-mail as you will need to authenticate it as well.Edit your profile: So the first thing you want to do once you sign in is choose your user name. This is VERY important and something you don’t want to change in the future, especially once you have started sharing your link for promotion. You can choose your display name as well but that can be changed as often as you like. You also want to add a profile picture, banner image and short bio. The site allows you one external link as well so choose it wisely.Add a bank account: You’ll want to go ahead and add your bank account information. The reason you want to do this is to get paid. You also can’t set subscription prices above zero unless Only Fans has this information. Once they do you’ll be sure to get paid and be able to add PPV item prices as well as subscription prices.Add your ID and await Age and Identity Verification: This is a stumbling block for some but for most creators you will be able to get approved in 48 hours via ID verification. Only Fans has added instant verification but when I used this on my own account it just “stalled out”. Make sure to take clear pictures of both your ID and yourself with proper lighting otherwise you could be asked to resubmit the information. This is an important step as it keeps anyone under 18 years old from using the platform.Set your subscription price: As mentioned once you have your bank information in the system you can then start to set your subscription price. If you don’t have a FREE account keep in mind that no one will be able to see anything n your page except for your Bio, Profile pic and banner unless they pay the amount that you have listed.
Well those are some initial steps to getting your Only Fans Page up and running. A journey of a thousand miles begins with the first step and that is your first step towards success on Only Fans.
The post How To Set Up Your Only Fans Page first appeared on Seo Bounty.


Design-Nation Publishes ’20 Makers, 20 Objects’


Wish to know the one factor that each profitable digital marketer does first to make sure they get the most important return on their advertising and marketing finances? It’s easy: goal-setting. That is a fully important apply for any digital marketer who is aware of learn how to execute their campaigns in a productive, cost-effective manner. With a couple of. With a couple of easy ideas, you may be doing the identical very quickly! On this weblog, we’ll stroll you thru the primary steps each savvy digital marketer takes to make sure that they’re heading in the right direction to hit all their advertising and marketing aims. Prepare for income!
Bear in mind: even when the channel you’re contemplating is all the craze proper now, it won’t suit your model. All the time make knowledgeable selections that immediately relate to your organization. In any other case, your message gained’t be delivered to its meant viewers and also you’ll have wasted time, effort and cash.
Know Your Targets
Step one is clearly figuring out which targets you wish to obtain. Get particular. Do you wish to enhance model consciousness? Are you all about locking in leads? Do you wish to set up a powerful community of influencers that may assist you be found? How about pushing engagement on social media?
Get Particular
A great tool for narrowing down your targets to make sure they’re viable is the SMART mnemonic. It’s essential to get particular to know precisely what you’re working in the direction of, and assist you break down the method of hitting your targets. That is precisely what this mnemonic lets you obtain.
- Does the channel attain my meant viewers?
- Is the channel sustainable and reasonably priced inside my firm’s advertising and marketing finances?
- Will I be capable to measure the success of the channel?
- Does the channel enable me to specific my model’s meant message?
- Do the channels I’m contemplating work collectively to convey my message?
All the time Bear in mind Your Targets!
Establishing a strong imaginative and prescient for your online business is step one to planning your digital advertising and marketing finances. All the time hold your closing targets in sight when organising something in your firm. When deciding which steps to take subsequent in your online business, ask your self how they may assist you obtain the targets you outlined in Step #1. This can be sure that you keep on observe and forestall you from spending your finances on something that gained’t assist you obtain.
Cum et essent similique. Inani propriae menandri sed in. Pericula expetendis has no,
quo populo forensibus contentiones et, nibh error in per.Denis Robinson
As your finances progresses and evolves, proceed referring to your SMART aims. Keep targeted and bear in mind your targets – they may at all times inform what the next step will probably be!

Furnishings Firm Appoints Retail Heavyweight
Need to know the one factor that each profitable digital marketer does first to make sure they get the most important return on their advertising and marketing finances? It’s easy: goal-setting. That is a fully important observe for any digital marketer who is aware of the right way to execute their campaigns in a productive, cost-effective method. With just a few. With just a few easy suggestions, you could be doing the identical very quickly! On this weblog, we’ll stroll you thru the primary steps each savvy digital marketer takes to make sure that they’re on the right track to hit all their advertising and marketing goals. Prepare for income!
Keep in mind: even when the channel you’re contemplating is all the trend proper now, it won’t suit your model. At all times make knowledgeable selections that immediately relate to your organization. In any other case, your message received’t be delivered to its supposed viewers and also you’ll have wasted time, effort and cash.
Know Your Objectives
Step one is clearly figuring out which targets you wish to obtain. Get particular. Do you wish to improve model consciousness? Are you all about locking in leads? Do you wish to set up a robust community of influencers that may enable you to be found? How about pushing engagement on social media?
Get Particular
A great tool for narrowing down your targets to make sure they’re viable is the SMART mnemonic. It’s essential to get particular to know precisely what you’re working in direction of, and enable you to break down the method of hitting your targets. That is precisely what this mnemonic lets you obtain.
- Does the channel attain my supposed viewers?
- Is the channel sustainable and reasonably priced inside my firm’s advertising and marketing finances?
- Will I have the ability to measure the success of the channel?
- Does the channel permit me to precise my model’s supposed message?
- Do the channels I’m contemplating work collectively to convey my message?
At all times Keep in mind Your Objectives!
Establishing a stable imaginative and prescient for your small business is step one to planning your digital advertising and marketing finances. At all times preserve your closing targets in sight when organising something in your firm. When deciding which steps to take subsequent in your small business, ask your self how they may enable you to obtain the targets you outlined in Step #1. This can make sure that you keep on monitor and forestall you from spending your finances on something that received’t enable you to obtain.
Cum et essent similique. Inani propriae menandri sed in. Pericula expetendis has no,
quo populo forensibus contentiones et, nibh error in per.Denis Robinson
As your finances progresses and evolves, proceed referring to your SMART goals. Keep centered and bear in mind your targets – they may at all times inform what the next step will likely be!


Subscribe to MarketingSolution.
Receive web development discounts & web design tutorials.
Now! Lets GROW Together!