
Have You Been Hacked? How to Clean Your Site and Get Off Google’s Blocklist
So, did it hurt? When you landed at the bottom of the SERPs, I mean, and Google slapped a scary red warning message on your site telling people to keep out.
If this happened due to an error on your part (bad SEO, shady linking tactics, etc) that’s one thing.
But if your site was hacked and now contains malicious code, that’s just adding insult to injury – and can really damage your reputation.
Unfortunately, that’s just one of the risks of being in charge of your own site maintenance. Stuff like this can happen.
Sure, it’s fantastic to build your own site in WordPress, but as Spiderman says, with great power comes great responsibility.
To put it plainly, you have control over how your site looks, but you’re also in control when/if your site runs into problems.
If you’re hacked, you will probably get blocklisted by Google. Period. Google isn’t going to take any chances with its reputation.
So, if your site smells even the slightest bit fishy, the search engine is going to blocklist you, knock you from your spot in the rankings that you’ve worked so hard for, send your site plummeting in the SERPs and tell anyone who lands on your site to stay away because it’s dangerous.
And that’s a real bummer. But the key is knowing what to do next.
Should you find yourself on Google’s Blocklist (or you’re a bit fuzzy on what the blocklist even is), we’ve put together a comprehensive step-by-step guide to getting it handled ASAP.
(Click here to go straight to the step-by-step-guide)

Google Blocklist: A Definition
A website that has been blocklisted by Google will generally experience a dramatic drop in organic search traffic.
It’s sudden and huge, and when your Analytics graph inverts sharply, it’s usually the biggest clue to a webmaster that something bad has happened.
How Did I Get on the Blocklist?
There are several ways your site might’ve got on the blocklist. But generally speaking, when a search engine finds suspicious code or activity on your site that its internal algorithms determine to be malware, it will remove the site from search results immediately.
Instead of risking the integrity of the search results and their safety for users, removing the questionable site is the least resource-intensive action the search engine can take.
Now, what is malware exactly?
In this case, it can be anything that Google deems suspicious, including phishing schemes, hacks, information or email address scrapers, trojan horses, and more.
The sad thing here is that you won’t even know your site has been hacked the vast majority of the time until your organic search traffic falls off a cliff.
In some cases, however, there will be tell-tale signs that something is amiss.
This can either come in the form of suspicious things you come across yourself or through warnings, shutdowns, or other actions taken by external sources.
Of course, there are occasions where the webmaster is responsible for the blocklisting.
Things you should never do if you want to avoid the blocklist include:
- Violating Copyright or DMCA Claims: Stealing content is frowned upon by the world. Don’t do it.
- Keyword Masking: Hiding keywords by making the text the same color as the site’s background is so 1998. If Google finds out, you’ll be de-indexed quick.
- Linking to Spammy Sites: Be mindful of where you link to. It should be a priority of yours to link only to high-quality sites.
However, a lot of the time, hackers will implement these link baiting and keyword spam schemes as a part of infecting your site with malware.
Regardless of whodunnit, however, Google will treat affected sites the same way: with a swift and thorough blocklisting.
What Does Blocklisting Look Like?
Blocklisting is fairly obvious when it happens.
Your analytics will take a nosedive, as I mentioned above. Or, if you do a simple Google search for “site:yoursitehere.com” and no results are found (assuming your site has already been indexed), chances are really good that your site has been blocklisted. This is one of the manual ways to check for blocklisting.
Another way to check for blocklisting is to regularly access and review data in Google Search Console.
This makes it easy for you to see what sites link to you, what search queries you’re ranked for, 404s, server errors, and overall site health.
Any funny business happening with your site is likely to show up here before your site is blocklisted, so keeping a watchful eye is really important when attempting to maintain the integrity of your site.
Security plugins can also be a great tool to help determine if your site has been hacked and/or blocklisted.
A Plugin to the Rescue

When it comes to a plugin, our very own answer to security, Defender, can stop brute force attacks, SQL injections, cross-site scripting XSS, and more vulnerabilities that will prevent you from getting hacked and blocklisted in the first place.
Defender can also scan your site and track down malicious code. If there’s malicious code detected, Defender shows you exactly what it is and the locations. You can then delete it in one click.
Be sure to read our article about stopping hackers in their tracks, so you don’t even have to worry about getting blocklisted by Google to begin with and try Defender out for yourself for free.
Security Warnings & Diagnostics: A Primer
So, we’ve already talked about preventative measures and the ways you can check to see if your site has been blocklisted, but I feel like it’s a good idea to spend additional time talking about what some refer to as the “symptoms” of being blocklisted.
Not every blocklisted site will exhibit these features, but this is a good rundown of what to look for:
- There is sudden traffic to your site for keywords that have nothing to do with your site’s content—particularly related to pharmaceuticals.
- Your site suddenly redirects to another site not in your possession.
- New administrators or users appear in your site’s dashboard that wasn’t created by you or anyone with authorized admin access.
- Your site is suddenly flagged as potentially containing malware in search engine results and by desktop or mobile anti-virus detection software.
- Your web host shuts down your site.
It’s important to note the various security warnings Google can provide as well. While these aren’t technically blocklisting, they can sometimes indicate your site is well on its way to being blocklisted.
Should you be fortunate enough to catch suspicious activity thanks to a security warning, you may be able to sidestep the headache of being blocklisted altogether.
These warnings appear on the search engine result page where your site is listed. They can also take a couple of different forms. Here are two of the most common warnings you’ll come across:
This site may harm your computer
This warning occurs when Google believes your site contains a Trojan or other piece of code that triggers a download prompt that is malicious.
Those fake anti-virus pop-ups and automatic file downloads are the most common examples of what Google is referring to when it displays this warning.

This site may be hacked
This gets to the point, doesn’t it? This warning displays when Google has reason to believe your site has been completely hacked and taken over by someone other than you.
The sudden appearance of content that doesn’t belong with the rest of your site, bank directories, and other red flags trigger this warning.

Other Blocklists
While this article focuses on getting off Google’s blocklist, it’s worth noting there are other blocklists that may pick up on malicious content or security threats on your site.
These are some of the main blocklists:
- Norton Safe Web
- Phish Tank
- Opera
- SiteAdvisor McAfee
- Yandex (via Sophos)
- ESET
If Google reports your site as clean, it is still possible for Opera (the browser, that is) or even Yandex (the search engine) to blocklist your site.
So if you do notice a drop in SERPs or security warnings displaying in browsers other than Chrome, it’s a good idea to check these other blocklists to see if your site has been compromised.
A Step-by-Step Guide for Getting off the Google Blocklist
Now that you’re all clear on what blocklisting is, how to tell if it’s happened, and what the warning signs are that you might be headed for the blocklist, we can start discussing how to get your site off it for good.
Step 1: Check if you’re blocklisted
Should go without saying, but you need to be 100% sure if your site has been blocklisted before you move forward.
- Check your site’s status to determine safe browsing. Just input your site’s URL and review the results.
- Use Google Search Console’s URL inspection tool to see what Googlebot sees when accessing your site.
Step 2: Locate the Suspicious Code
There are many different places you can look on your site to find malware.
As mentioned before, the simplest way of finding malware is with a resource like our Defender plugin.
If you’re not using a plugin like Defender, it’s not always so easy and scanning through the code on each page, however, sometimes the culprit is embedded in your server somewhere.
Still, there are a few places that hackers target more than others. You will need FTP access to get to some of these areas to start cleaning up the mess.
If your site is suddenly redirecting to another site, you should check the following areas for suspicious code:
- Core WordPress files
- Your site’s index (check both .php and .html!)
- .htaccess
If your site is now triggering downloads for visitors, check out the following spots:
- Header
- Footer
- Index (check both .php and HTML)
- Your theme’s files
If you’re suddenly seeing a bunch of Pharma information on your site and believe it’s been compromised by a phishing campaign, check:
- Any HTML file
- Index .php and .html
- For the appearance of new directories you didn’t create
You can also leverage the Google Diagnostic Page to figure out specifically what part of your site has been compromised. Is it just one page? One directory? Or the whole site?
Keep reading through the results to see when Google last visited your site.
This is referred to as the “scan date.” Also, take note of when Google found malware or suspicious content. This is referred to as the “discovery date.”
Now, if you’ve tried to fix your site after the last “scan date,” Google doesn’t know about it yet. Patience is a requirement when getting your site off the blocklist, unfortunately.
You can bring Google’s attention to your attempts to fix the issues, but we’ll talk more about that later.
Note: Sometimes, Google Search Console will show that certain HTML pages of your site have been infected, but this isn’t necessarily the case. When dealing with WordPress, likely, the core file responsible for generating the HTML file in question is infected.
Step 3: Dig Deeper: Pretend You’re a Bot or User Agent
Sometimes running tests to see if your site (or a client’s) is infected would put your own computer at risk.
You couldn’t just open up your web browser and load the site directly without putting your machine in danger.
So, to bypass this, you can use cURL in the command-line interface (CLI) to basically pretend you are a Google bot or a user agent.
For example, you would input the following to emulate a bot:
$ curl –location -D – -A “Googlebot” somesite.com
Once you input this, you’re going to want to look for anything that doesn’t make sense in the code.
So, bits that are in a different language than your own or content that looks like total gibberish.
Yes, you’ll need to understand HTML, at the very least, here. Anything in an iframe or script tag should get your careful attention, too.
You can also use this bit of code to emulate a user-agent:
$ curl -A “Mozilla/5.0 (compatible; MSIE 7.01; Windows NT 5.0)” http://www.somesite.com
You can swap out what browser is referenced here depending on your needs.
A few other commands you might want to get familiar with include Grep, Find, and SSH.
These will help you locate specifically where the hacking took place on your site, so you manually remove the code that put you on the blocklist.
If the CLI stuff is leaving you scratching your head, here’s a list of resources you can use to get up to speed on the terminal and the specific commands you’ll need to clean your site:
- Command line
- Taming the Terminal
- How to Use cURL
- How to use grep command in Unix and Linux with examples
- How to Use Find from the Windows Command Prompt
Once you locate the source of the problem, you can remove it.
Or, if you’re a WPMU DEV member and have any questions about specific code and whether it’s an issue, contact our 24/7 support, and we’ll help you out.
Step 4: Removing Bad Code
If your site has been hacked, you’ll need to remove the malware that caused the blocklisting and/or security warnings.
If the hackers created new pages with malicious code, you could remove them from the SERPs altogether by going to the Search Console and using the Remove URLs feature.
You’ll also want to delete the pages in question from your server, but using Remove URLs can help expedite Google’s awareness of your cleanup attempt.
Again, I’ll refer back to Defender here as a simple solution. You can easily remove suspicious code in one-click with his help.
One thing to keep in mind is Defender does not scan the DB tables in cases where a Pharma hack has already happened. In this case, infected content on post pages needs to be cleared manually.
Remember, you shouldn’t use Remove URLs for pages you want to be indexed but have bad code. This is a feature you should only use when a page should disappear from search results for good.
To remove all evidence of your site’s hacking, you’ll need to backup from an older version of your site.
Regular backups are super important for this very reason, so hopefully, you have a clean version of your site on file to use. This is the first step in cleaning your site’s server.
Next, install any new core, theme, and plugin updates that are available. Make sure everything is as up to date as possible. This will reduce your site’s vulnerabilities.
Follow best practices for site security here (limit the number of plugins you use, delete outdated themes you no longer use, old user accounts, etc).
Finally, change all the passwords for your site. And I mean all of them. Not just the WordPress administrator and user passwords.
You also need to change the passwords for your FTP account, database(s), hosting, and anything else related to your site to ensure security.
If the version of the site you’re restoring from the backup is way out of date, you should make a disk image of your infected but current site before installing the clean outdated version.
Once you install updates and change passwords, you’ll need to restore the new content manually. Google offers some pointers on how to accomplish this.
Step 5: Resubmit Your Site
If your site has been blocklisted, it’s been removed from the search results. To get back in the SERPs, you’ll need to submit your site for review.
Otherwise, Google won’t know that you’ve taken steps to remedy the problem (or, at least, won’t crawl across your squeaky clean site for a long time).
And every day your site is out of the SERPs is money lost, right? So to speed things up, you have to go through a couple of official channels.
If your site was infected with malware or was involved in phishing, you’ll need to submit a reconsideration request via Google Search Console.
The steps required to submit a review depend on your specific security issue/situation, But luckily GSC has kindly outlined the full review and reconsideration process right here.
Once you’ve completed the review process, if Google finds your site is clean, warnings from browsers and search results should be removed within 72 hours.
You should also verify your site works as expected: pages load properly and links are clickable.
If your request is NOT approved, reassess your site for malware or spam, or for any modifications or new files created by the hacker.
Alternatively, you might consider requesting more help from specialists (WPMU DEV’s superhero support team is a great place to start!)
Have You Ever Been Hacked?
The process of cleaning up after being hacked and getting on Google’s blocklist can be arduous at best, I’m not going to lie.
But if you lay out a plan or create a checklist for the steps to take, you can tick them off little by little until your site is clean, back online, and back in the SERPs.
Plus, you can prevent hacking in the first place. Check out our article on stopping Hackers in their tracks with Defender.
It’ll take some effect, but the important thing is you’ll restore your site’s reputation.
And if anything, it’ll allow you to prioritize security in a way that you might not have thought about before.
Small silver lining?

Join Us For Smashing Meets Happy Holidays
If you are missing your festive meetups this year or just fancy seeing some friendly faces and learning some new things join us on December 17th for another Smashing Meets event.
Tickets are only 10 USD (and free for our lovely Smashing Members). The fun starts at 9AM ET (Eastern Time) or 15:00 CET (Central European Time) on the 17th December.
Ok. This is important. Smashing Meets by @smashingconf was soooo much fun. I will have to tune in whenever the timezone suits, it was an absolute blast!!!
— Mandy Michael (@Mandy_Kerr) May 19, 2020
This time, we will have talks from three speakers—Adekunle Oduye, Ben Hong, and Michelle Barker. There will be an interface design challenge and chance to network and meet other attendees. Just like an in-person meetup but you won’t have to go out in the cold!
If you want to know more about how our Smashing Meets events work, we have a review of a previous event, see some of the videos, or just head on over to the event page and get a ticket! I hope to see you there.

We Need You In The Smashing Family
At Smashing, we are looking for a friendly, reliable and passionate person to drive the sales and management of sponsorship and advertising. We work with small and big companies to help them get exposure and have their voice heard across a number of different media — from this very magazine to our online conferences, meet-ups and workshops. This includes:
- Smashing Magazine — display advertising and sponsored articles.
- Smashing Conferences — online and in-person.
- Smashing Podcast — published once every 2 weeks.
- Smashing Online Workshops — happening every week.
We sincerely hope to find someone who knows and understands the web community we publish for. A person who is able to bring onboard advertisers and sponsors that will be helpful to our audience, and who will benefit from the exposure and visibility at Smashing. We are looking for a person with experience in nurturing long-term relationships with advertisers, while not being afraid to push for new sales.
We are a small family of 12, and we’ve all been working remotely for years now. By joining our team, you will have the opportunity to shape the role and work with the Magazine as well as the Events team to create sponsorship opportunities that truly benefit both sides of the arrangement. We also would be open to outsourcing this work to another company or working with someone on a freelance basis who provides these services to other companies.
What’s In It For You?
- A small, friendly, inclusive and diverse team that is aligned and very committed to doing great work;
- The ability to shape your work in a way that would work best for you;
- No lengthy meetings or micro-management: we do everything to ensure you can do your best work.
Role And Responsibilities
- You’ll be working with your existing contacts (those of which Smashing has already made) and find new contacts to sell advertising and sponsorship across the range of our products;
- You’ll be managing sponsors and advertisers once they come on board, ensuring that expectations are managed and deadlines on both sides understood;
- You’ll be exploring creative partnerships to ensure that sponsors get exposure they need while staying true to principles that Smashing stands for;
- Work closely with the our team to ensure that our commitments to sponsors are possible to fulfill given time and team availability;
- Being able to think creatively in terms of how we maximize sponsorship opportunities across our different outlets.
We’d Like You To:
- Have good written English, and ability to communicate clearly with sponsors from around the world;
- Be able to manage a flexible schedule in order to make calls to sponsors in timezones including the US West Coast;
- Be happy working in an asynchronous way, mostly via writing (we use Slack and Notion), given the distributed nature of the team and sponsors;
- Be conversant with web technologies to the extent of understanding who would be a good fit as a sponsor;
- Ideally, have existing connections with web companies;
- Fully remote, and probably fulltime. (Again, we also would be open to outsourcing this work to another company or working with someone on a freelance basis who provides these services to other companies.)
A Bit About Smashing
At Smashing, we focus on bringing quality content for web designers and developers, and support our community. The community around Smashing is indeed very important to us. They tell us when they like what we are doing, and also when they do not!
We are always looking for new ways to reach out to our community. Over the past year, we’ve taken conferences online and started running online workshops in response to the pandemic. Things will likely change over the coming year too, and we are keen to bring our existing sponsors along with us and continue to think creatively about how we can offer good value to them in a changing world.
Yet again, we are a very small team of dedicated people — fully distributed even before the pandemic. The majority of the team is in Europe, but we also have team members in the USA and Hong Kong. Therefore, location tends to be less important than an ability to work in a way that respects the time lag when dealing with multiple time zones.
Contact Details
If you are interested, please drop us an email at recruiting@smashing-media.com, tell us a bit about yourself and your experience, and why you’d like to be a part of the Smashing family. We can’t wait to hear from you!

New from WordPress.com Courses: Podcasting for Beginners
Would you like to learn how to create your own podcast or improve your existing podcast? WordPress.com Courses is excited to offer our new on-demand course, Podcasting for Beginners. We’ll help you get started, learn how to publish, and even how to use your podcast to make a living.
Our courses are flexible. You can join, and learn at your own pace. But that’s just the start. Podcasting for Beginners is more than just a course — it’s a community that gives you access to weekly Office Hours hosted by WordPress experts. A place where you can ask questions, share your progress, and pick up a few tips along the way.
Lessons include step-by-step videos covering:
- The Foundations (Curating your content and an editorial calendar.)
- Interviews (Recording, editing, and outreach.)
- Configuring Your Site (Integrating your podcast into your site and distributing it.)
- Growing Your Community (Engaging with listeners.)
- Making Money (Monetization basics and preparing for the future.)
Let us take you from “What is podcasting?” to launching a podcast of your own.
Cost: A $99 annual subscription gives you unlimited access to course content, our online community, and virtual sessions.
Join now as our first 100 customers will enjoy 50% off the subscription fee with the code PODCAST50.

State of the Word 2020
State of the Word is an annual keynote address delivered by WordPress project co-founder, Matt Mullenweg. This year’s keynote will be streamed on the WordPress.org blog, Facebook, YouTube, and Twitter on Thursday, Dec 17th, at 1600 UTC. You can view a replay of the event at any time after it airs on any of these platforms.

Sign up here to receive an email reminder, so you don’t miss the State of the Word broadcast!
We will only use this list to share State of the Word updates. Your personal information will not be used for anything else.
Processing…
Success! You’re on the list.
Whoops! There was an error and we couldn’t process your subscription. Please reload the page and try again.
New to State of the Word?
If this is your first time hearing of this talk and want to learn more, you’re in luck! Check out previous recordings below.
How To Use MDX Stored In Sanity In A Next.js Website
Recently, my team took on a project to build an online, video-based learning platform. The project, called Jamstack Explorers, is a Jamstack app powered by Sanity and Next.js. We knew that the success of this project relied on making the editing experience easy for collaborators from different companies and roles, as well as retaining the flexibility to add custom components as needed.

To accomplish this, we decided to author content using MDX, which is Markdown with the option to include custom components. For our audience, Markdown is a standard approach to writing content: it’s how we format GitHub comments, Notion docs, Slack messages (kinda), and many other tools. The custom MDX components are optional and their usage is similar to shortcodes in WordPress and templating languages.
To make it possible to collaborate with contributors from anywhere, we decided to use Sanity as our content management system (CMS).
But how could we write MDX in Sanity? In this tutorial, we’ll break down how we set up MDX support in Sanity, and how to load and render that MDX in Next.js — powered website using a reduced example.
TL;DR
If you want to jump straight to the results, here are some helpful links:
- See the example repo used in this tutorial.
- See this approach in action on Jamstack Explorers.
- Check out the Jamstack Explorers source code.
How To Write Content Using MDX In Sanity
Our first step is to get our content management workflow set up. In this section, we’ll walk through setting up a new Sanity instance, adding support for writing MDX, and creating a public, read-only API that we can use to load our content into a website for display.
Create A New Sanity Instance
If you don’t already have a Sanity instance set up, let’s start with that. If you do already have a Sanity instance, skip ahead to the next section.
Our first step is to install the Sanity CLI globally, which allows us to install, configure, and run Sanity locally.
# install the Sanity CLI
npm i -g @sanity/cli
In your project folder, create a new directory called sanity, move into it, and run Sanity’s init command to create a new project.
# create a new directory to contain Sanity files
mkdir sanity
cd sanity/
sanity init
The init command will ask a series of questions. You can choose whatever makes sense for your project, but in this example we’ll use the following options:
- Choose a project name: Sanity Next MDX Example.
- Choose the default dataset configuration (“production”).
- Use the default project output path (the current directory).
- Choose “clean project” from the template options.
Install The Markdown Plugin For Sanity
By default, Sanity doesn’t have Markdown support. Fortunately, there’s a ready-made Sanity plugin for Markdown support that we can install and configure with a single command:
# add the Markdown plugin
sanity install markdown
This command will install the plugin and add the appropriate configuration to your Sanity instance to make it available for use.
Define A Custom Schema With A Markdown Input
In Sanity, we control every content type and input using schemas. This is one of my favorite features about Sanity, because it means that I have fine-grained control over what each content type stores, how that content is processed, and even how the content preview is built.
For this example, we’re going to create a simple page structure with a title, a slug to be used in the page URL, and a content area that expects Markdown.
Create this schema by adding a new file at sanity/schemas/page.js and adding the following code:
export default {
  name: 'page',
  title: 'Page',
  type: 'document',
  fields: [
    {
      name: 'title',
      title: 'Page Title',
      type: 'string',
      validation: (Rule) => Rule.required(),
    },
    {
      name: 'slug',
      title: 'Slug',
      type: 'slug',
      validation: (Rule) => Rule.required(),
      options: {
        source: 'title',
        maxLength: 96,
      },
    },
    {
      name: 'content',
      title: 'Content',
      type: 'markdown',
    },
  ],
};
We start by giving the whole content type a name and title. The type of document tells Sanity that this should be displayed at the top level of the Sanity Studio as a content type someone can create.
Each field also needs a name, title, and type. We can optionally provide validation rules and other options, such as giving the slug a max length and allowing it to be generated from the title value.
Add A Custom Schema To Sanity’s Configuration
After our schema is defined, we need to tell Sanity to use it. We do this by importing the schema into sanity/schemas/schema.js, then adding it to the types array passed to createSchema.
  // First, we must import the schema creator
  import createSchema from 'part:@sanity/base/schema-creator';

  // Then import schema types from any plugins that might expose them
  import schemaTypes from 'all:part:@sanity/base/schema-type';

+ // Import custom schema types here
+ import page from './page';

  // Then we give our schema to the builder and provide the result to Sanity
  export default createSchema({
    // We name our schema
    name: 'default',
    // Then proceed to concatenate our document type
    // to the ones provided by any plugins that are installed
    types: schemaTypes.concat([
-     / Your types here! /
+     page,
    ]),
  });
This puts our page schema into Sanity’s startup configuration, which means we’ll be able to create pages once we start Sanity up!
Run Sanity Studio Locally
Now that we have a schema defined and configured, we can start Sanity locally.
sanity startOnce it’s running, we can open Sanity Studio at http://localhost:3333 on our local machine.
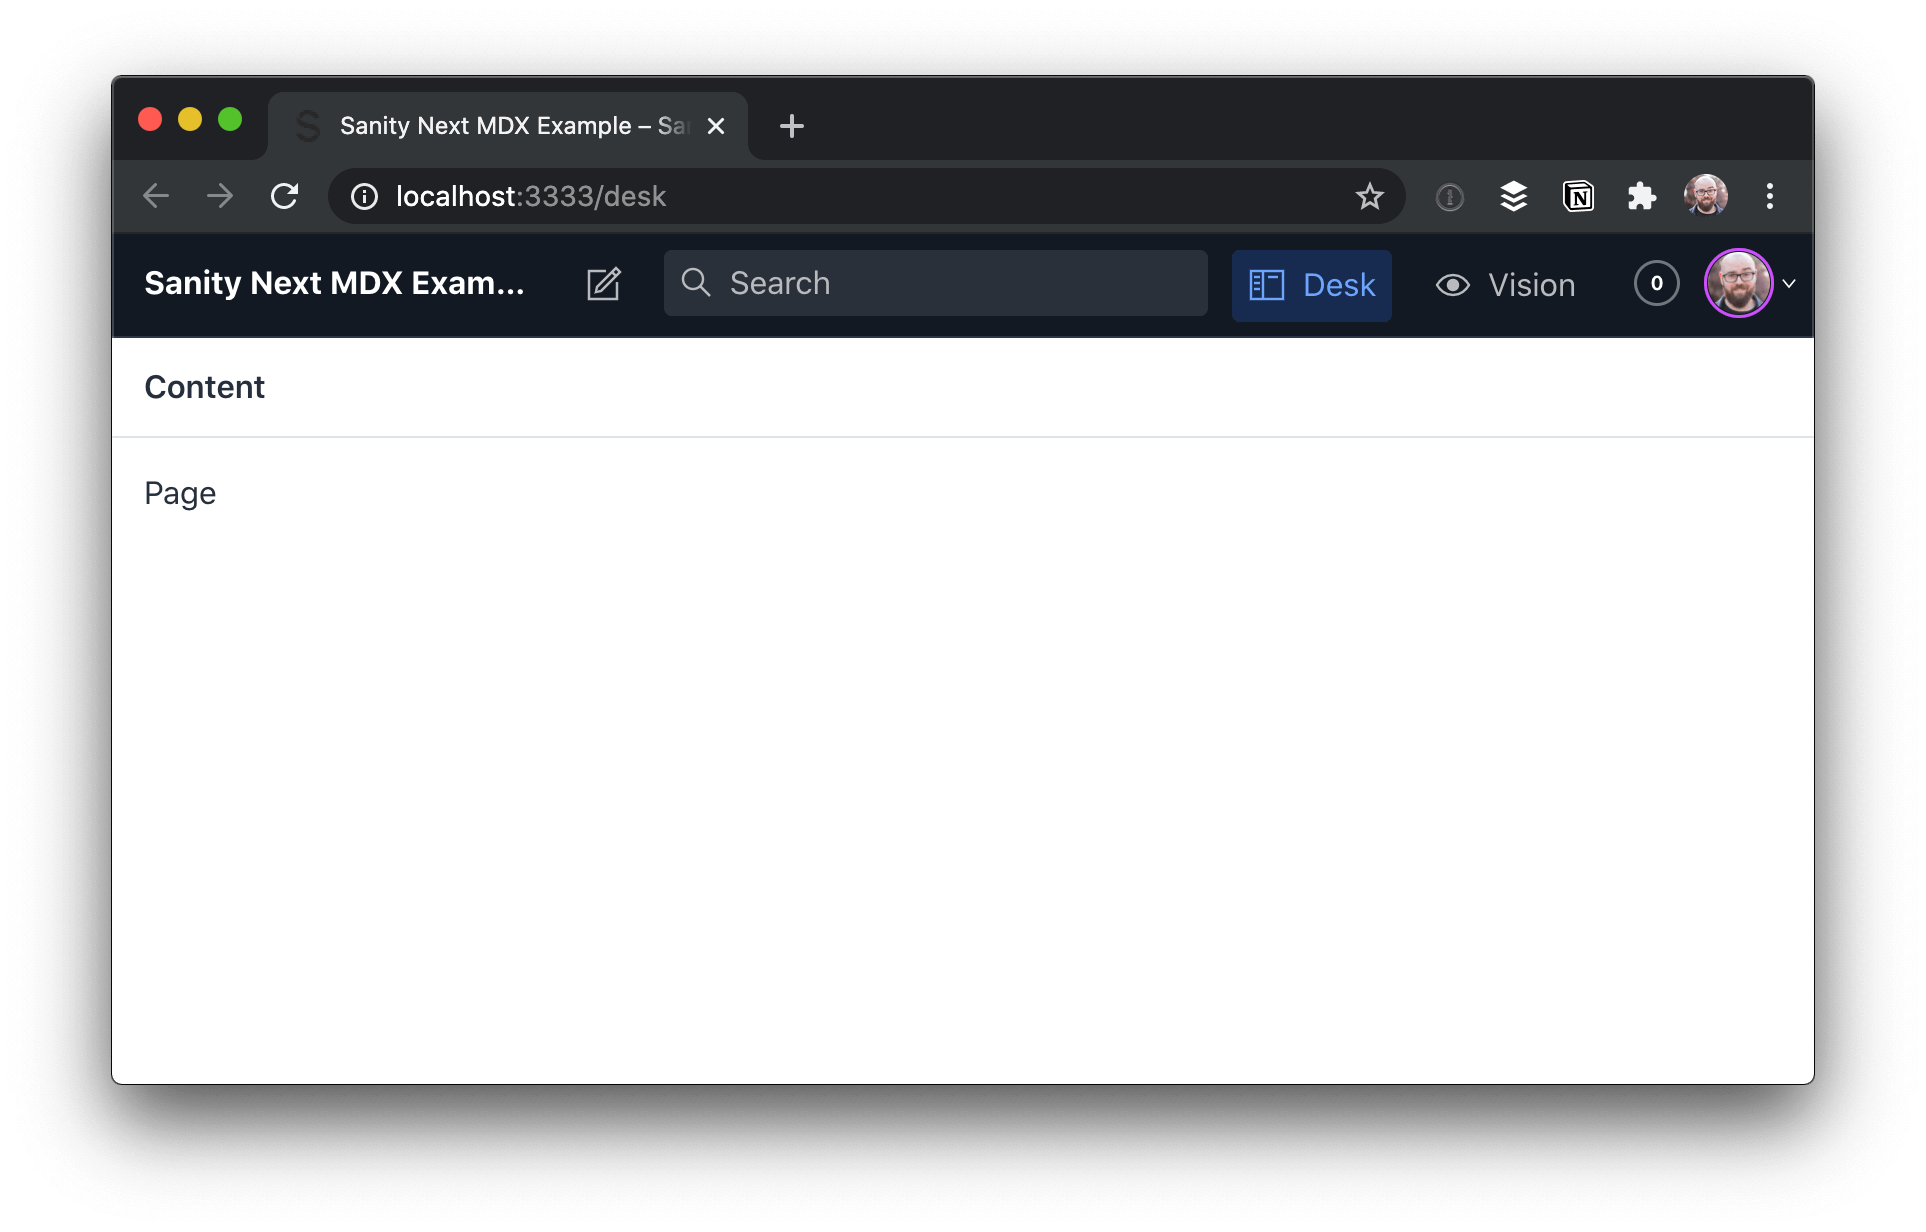
When we visit that URL, we’ll need to log in the first time. Use your preferred account (e.g. GitHub) to authenticate. Once you get logged in, you’ll see the Studio dashboard, which looks pretty barebones.
To add a new page, click “Page”, then the pencil icon at the top-left.
Add a title and slug, then write some Markdown with MDX in the content area:
This is written in Markdown.

But what’s this?

<Callout>

Oh dang! Is this a React component in the middle of our content? 😱

</Callout>

Holy buckets! That’s amazing!
Heads up! The empty line between the MDX component and the Markdown it contains is required. Otherwise the Markdown won’t be parsed. This will be fixed in MDX v2.

Once you have the content in place, click “Publish” to make it available.
Deploy The Sanity Studio To A Production URL
In order to make edits to the site’s data without having to run the code locally, we need to deploy the Sanity Studio. The Sanity CLI makes this possible with a single command:
sanity deployChoose a hostname for the site, which will be used in the URL. After that, it will be deployed and reachable at your own custom link.
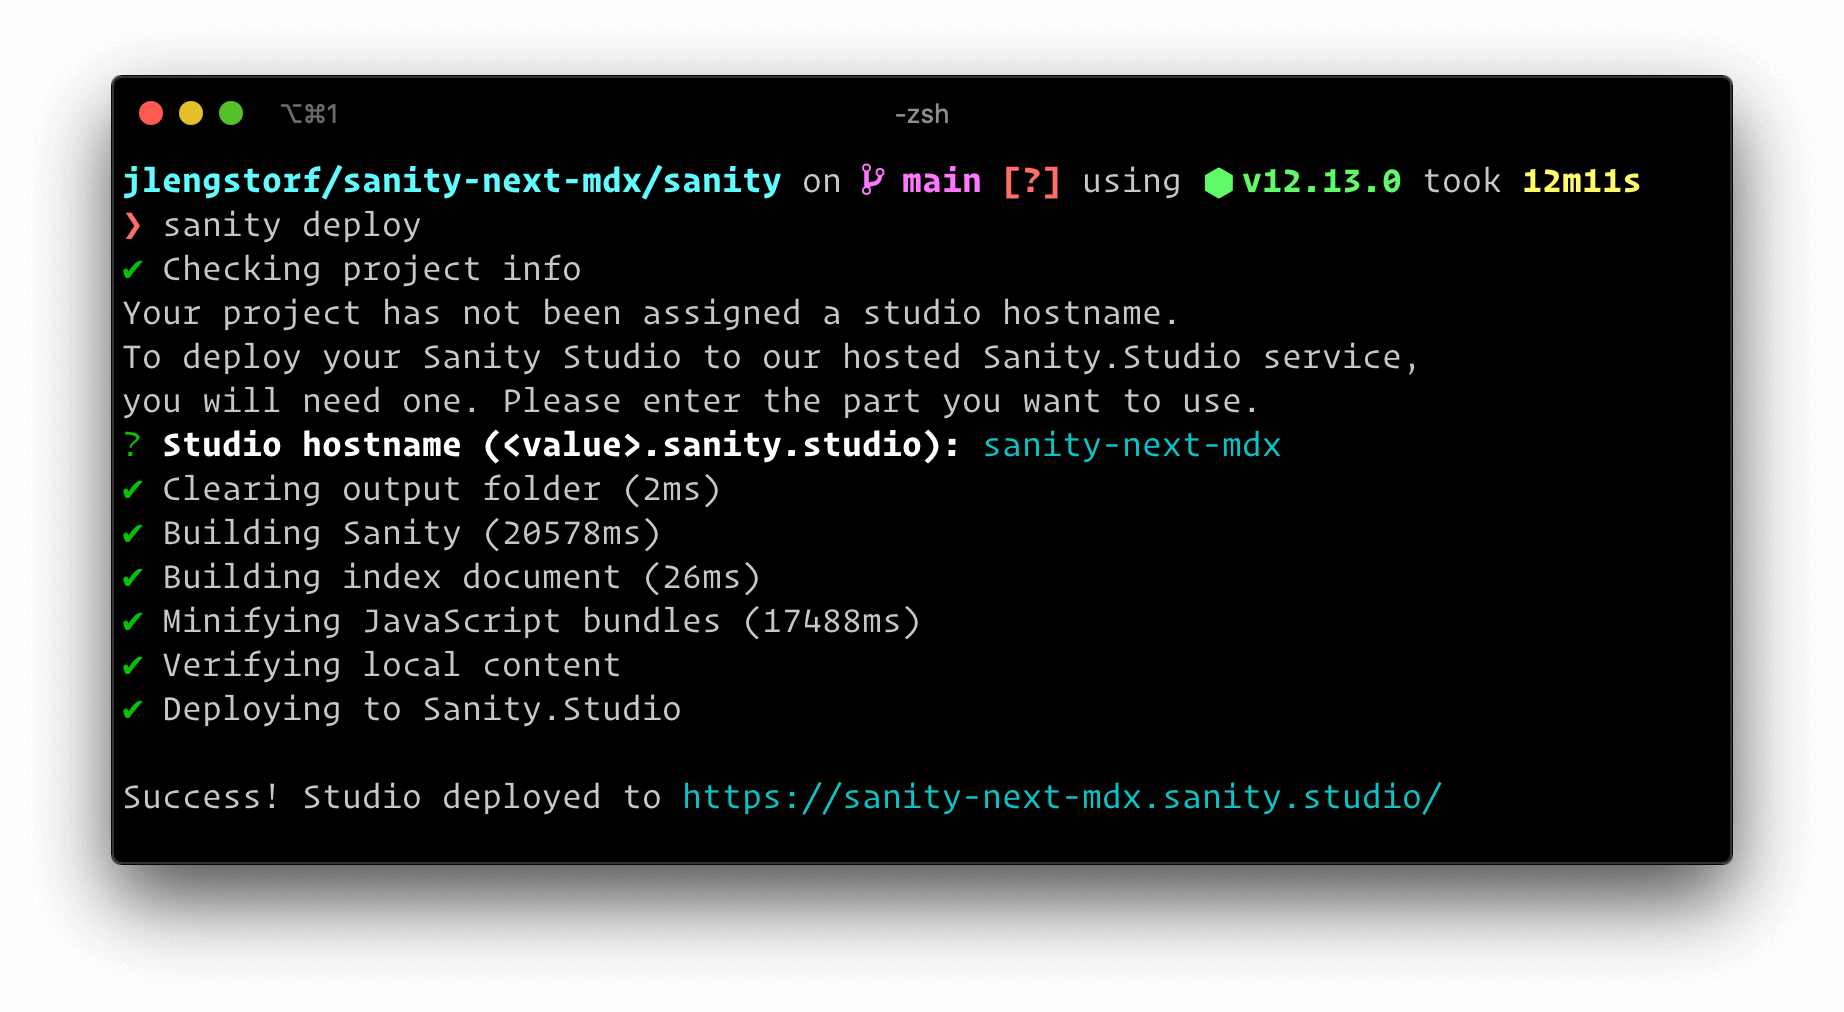
This provides a production URL for content editors to log in and make changes to the site content.
Make Sanity Content Available Via GraphQL
Sanity ships with support for GraphQL, which we’ll use to load our page data into our site’s front-end. To enable this, we need to deploy a GraphQL API, which is another one-liner:
sanity graphql deployWe can choose to enable a GraphQL Playground, which gives us a browser-based data explorer. This is extremely handy for testing queries.

Store the GraphQL URL — you’ll need it to load the data into Next.js!
https://sqqecrvt.api.sanity.io/v1/graphql/production/defaultThe GraphQL API is read-only for published content by default, so we don’t need to worry about keeping this secret — everything that this API returns is published, which means it’s what we want people to see.
Test Sanity GraphQL Queries In The Browser
By opening the URL of our GraphQL API, we’re able to test out GraphQL queries to make sure we’re getting the data we expect. These queries are copy-pasteable into our code.
To load our page data, we can build the following query using the “schema” tab at the right-hand side as a reference.
query AllPages {
  allPage {
    title
    slug {
      current
    }
    content
  }
}
This query loads all the pages published in Sanity, returning the title, current slug, and content for each. If we run this in the playground by pressing the play button, we can see our page returned.

Now that we’ve got page data with MDX in it coming back from Sanity, we’re ready to build a site using it!
In the next section, we’ll create an Next.js site that loads data from Sanity and renders our MDX content properly.
Display MDX In Next.js From Sanity
In an empty directory, start by initializing a new package.json, then install Next, React, and a package called next-mdx-remote.
# create a new package.json with the default options
npm init -y

# install the packages we need for this project
npm i next react react-dom next-mdx-remote
Inside package.json, add a script to run next dev:
  {
    "name": "sanity-next-mdx",
    "version": "1.0.0",
    "scripts": {
+     "dev": "next dev"
    },
    "author": "Jason Lengstorf <jason@lengstorf.com>",
    "license": "ISC",
    "dependencies": {
      "next": "^10.0.2",
      "next-mdx-remote": "^1.0.0",
      "react": "^17.0.1",
      "react-dom": "^17.0.1"
    }
Create React Components To Use In MDX Content
In our page content, we used the <Callout> component to wrap some of our Markdown. MDX works by combining React components with Markdown, which means our first step is to define the React component our MDX expects.
Create a Callout component at src/components/callout.js:
export default function Callout({ children }) {
  return (
    <div
      style={{
        padding: '0 1rem',
        background: 'lightblue',
        border: '1px solid blue',
        borderRadius: '0.5rem',
      }}
    >
      {children}
    </div>
  );
}
This component adds a blue box around content that we want to call out for extra attention.
Send GraphQL Queries Using The Fetch API
It may not be obvious, but you don’t need a special library to send GraphQL queries! It’s possible to send a query to a GraphQL API using the browser’s built-in Fetch API.
Since we’ll be sending a few GraphQL queries in our site, let’s add a utility function that handles this so we don’t have to duplicate this code in a bunch of places.
Add a utility function to fetch Sanity data using the Fetch API at src/utils/sanity.js:
export async function getSanityContent({ query, variables = {} }) {
  const { data } = await fetch(
    'https://sqqecrvt.api.sanity.io/v1/graphql/production/default',
    {
      method: 'POST',
      headers: {
        'Content-Type': 'application/json',
      },
      body: JSON.stringify({
        query,
        variables,
      }),
    },
  ).then((response) => response.json());

  return data;
}
The first argument is the Sanity GraphQL URL that Sanity returned when we deployed the GraphQL API.
GraphQL queries are always sent using the POST method and the application/json content type header.
The body of a GraphQL request is a stringified JSON object with two properties: query, which contains the query we want to execute as a string; and variables, which is an object containing any query variables we want to pass into the GraphQL query.
The response will be JSON, so we need to handle that in the .then for the query result, and then we can destructure the result to get to the data inside. In a production app, we’d want to check for errors in the result as well and display those errors in a helpful way, but this is a post about MDX, not GraphQL, so #yolo.
Heads up! The Fetch API is great for simple use cases, but as your app becomes more complex you’ll probably want to look into the benefits of using a GraphQL-specific tool like Apollo or urql.
Create A Listing Of All Pages From Sanity In Next.js
To start, let’s make a list of all the pages published in Sanity, as well as a link to their slug (which won’t work just yet).
Create a new file at src/pages/index.js and put the following code inside:
import Link from 'next/link';
import { getSanityContent } from '../utils/sanity';

export default function Index({ pages }) {
  return (
    <div>
      <h1>This Site Loads MDX From Sanity.io</h1>
      <p>View any of these pages to see it in action:</p>
      <ul>
        {pages.map(({ title, slug }) => (
          <li key={slug}>
            <Link href={`/${slug}`}>
              <a>{title}</a>
            </Link>
          </li>
        ))}
      </ul>
    </div>
  );
}

export async function getStaticProps() {
  const data = await getSanityContent({
    query: `
      query AllPages {
        allPage {
          title
          slug {
            current
          }
        }
      }
    `,
  });

  const pages = data.allPage.map((page) => ({
    title: page.title,
    slug: page.slug.current,
  }));

  return {
    props: { pages },
  };
}
In getStaticProps we call the getSanityContent utility with a query that loads the title and slug of all pages in Sanity. We then map over the page data to create a simplified object with a title and slug property for each page and return that array as a pages prop.
The Index component to display this page receives that page’s prop, so we map over that to output an unordered list of links to the pages.
Start the site with npm run dev and open http://localhost:3000 to see the work in progress.

If we click a page link right now, we’ll get a 404 error. In the next section we’ll fix that!
Generate Pages Programatically In Next.js From CMS Data
Next.js supports dynamic routes, so let’s set up a new file to catch all pages except our home page at src/pages/[page].js.
In this file, we need to tell Next what the slugs are that it needs to generate using the getStaticPaths function.
To load the static content for these pages, we need to use getStaticProps, which will receive the current page slug in params.page.
To help visualize what’s happening, we’ll pass the slug through to our page and log the props out on screen for now.
import { getSanityContent } from '../utils/sanity';

export default function Page(props) {
  return <pre>{JSON.stringify(props, null, 2)}</pre>;
}

export async function getStaticProps({ params }) {
  return {
    props: {
      slug: params.page,
    },
  };
}

export async function getStaticPaths() {
  const data = await getSanityContent({
    query: `
      query AllPages {
        allPage {
          slug {
            current
          }
        }
      }
    `,
  });

  const pages = data.allPage;

  return {
    paths: pages.map((p) => `/${p.slug.current}`),
    fallback: false,
  };
}
If the server is already running this will reload automatically. If not, run npm run dev and click one of the page links on http://localhost:3000 to see the dynamic route in action.

Load Page Data From Sanity For The Current Page Slug In Next.js
Now that we have the page slug, we can send a request to Sanity to load the content for that page.
Using the getSanityContent utility function, send a query that loads the current page using its slug, then pull out just the page’s data and return that in the props.
  export async function getStaticProps({ params }) {
+   const data = await getSanityContent({
+     query: +       query PageBySlug($slug: String!) {
+         allPage(where: { slug: { current: { eq: $slug } } }) {
+           title
+           content
+         }
+       }
+,
+     variables: {
+       slug: params.page,
+     },
+   });
+
+   const [pageData] = data.allPage;

    return {
      props: {
-       slug: params.page,
+       pageData,
      },
    };
  }
After reloading the page, we can see that the MDX content is loaded, but it hasn’t been processed yet.

Render MDX From A CMS In Next.js With Next-mdx-remote
To render the MDX, we need to perform two steps:
-
For the build-time processing of MDX, we need to render the MDX to a string. This will turn the Markdown into HTML and ensure that the React components are executable. This is done by passing the content as a string into
renderToStringalong with an object containing the React components we want to be available in MDX content. -
For the client-side rendering of MDX, we hydrate the MDX by passing in the rendered string and the React components. This makes the components available to the browser and unlocks interactivity and React features.
While this might feel like doing the work twice, these are two distinct processes that allow us to both create fully rendered HTML markup that works without JavaScript enabled and the dynamic, client-side functionality that JavaScript provides.
Make the following changes to src/pages/[page].js to render and hydrate MDX:
+ import hydrate from 'next-mdx-remote/hydrate';
+ import renderToString from 'next-mdx-remote/render-to-string';
  import { getSanityContent } from '../utils/sanity';
+ import Callout from '../components/callout';

- export default function Page(props) {
-   return <pre>{JSON.stringify(props, null, 2)}</pre>;
+ export default function Page({ title, content }) {
+   const renderedContent = hydrate(content, {
+     components: {
+       Callout,
+     },
+   });
+
+   return (
+     <div>
+       <h1>{title}</h1>
+       {renderedContent}
+     </div>
+   );
  }

  export async function getStaticProps({ params }) {
    const data = await getSanityContent({
      query: `
          query PageBySlug($slug: String!) {
            allPage(where: { slug: { current: { eq: $slug } } }) {
              title
              content
            }
          }
        `,
      variables: {
        slug: params.page,
      },
    });

    const [pageData] = data.allPage;

+   const content = await renderToString(pageData.content, {
+     components: { Callout },
+   });

    return {
      props: {
-       pageData,
+       title: pageData.title,
+       content,
      },
    };
  }

  export async function getStaticPaths() {
    const data = await getSanityContent({
      query: `
          query AllPages {
            allPage {
              slug {
                current
              }
            }
          }
        `,
    });

    const pages = data.allPage;

    return {
      paths: pages.map((p) => `/${p.slug.current}`),
      fallback: false,
    };
  }
After saving these changes, reload the browser and we can see the page content being rendered properly, custom React components and all!

Use MDX With Sanity And Next.js For Flexible Content Workflows
Now that this code is set up, content editors can quickly write content using MDX to enable the speed of Markdown with the flexibility of custom React components, all from Sanity! The site is set up to generate all the pages published in Sanity, so unless we want to add new custom components we don’t need to touch the Next.js code at all to publish new pages.
What I love about this workflow is that it lets me keep my favorite parts of several tools: I really like writing content in Markdown, but my content also needs more flexibility than the standard Markdown syntax provides; I like building websites with React, but I don’t like managing content in Git.
Beyond this, I also have access to the huge amount of customization made available in both the Sanity and React ecosystems, which feels like having my cake and eating it, too.
If you’re looking for a new content management workflow, I hope you enjoy this one as much as I do!
What’s Next?
Now that you’ve got a Next site using MDX from Sanity, you may want to go further with these tutorials and resources:
- See the example repo used in this tutorial.
- Deploy a Next.js Site to Netlify.
- See this approach in action on Jamstack Explorers.
- Check out a production implementation of this in the Jamstack Explorers repo.
- Learn about Next from Cassidy Williams.
- Check out the Sanity documentation.
What will you build with this workflow? Let me know on Twitter!

How to Create a Simple Event Calendar with Sugar Calendar
Do you want to add an event calendar to your WordPress website?
There are lots of different plugins and calendar apps that can do this, but some are much too complicated or don’t work very well with WordPress.
In this article, we’ll show you how to easily create a simple event calendar in WordPress with Sugar Calendar.

How to Create a Simple Event Calendar with Sugar Calendar
Sugar Calendar is a simple and lightweight events calendar plugin for WordPress built by Pippin Williamson and the team behind Easy Digital Downloads.
Since we were looking for a lightweight event calendar plugin, we decided to give Sugar Calendar a try, and found it quite easy to use.
Here’s how to create an event calendar in WordPress with Sugar Calendar.
First thing you need to do is install and activate the Sugar Calendar plugin on your website. For more details, see our step by step guide on how to install a WordPress plugin.
Upon activation, go to the Calendar » Settings page in your WordPress admin. Here, you need to enter your license key. You will find this in your account area on the Sugar Calendar website.

Once you’re done, click the Save Changes button to make sure your license key is saved.
Creating a Calendar in Sugar Calendar
Sugar Calendar divides the functionality into two main sections: Calendars and Events.
You can create multiple calendars, and then add different events or actvities to each calendar accordingly.
To get started, click on the ‘Calendar’ menu item page in your WordPress admin sidebar. After that, you need to select the Calendar tab then click on the ‘Add New Calendar’ button to create a new calendar.

You will then see a popup box for adding your new calendar.
You need to give your calendar a name and a ‘slug‘ which will become the end part of the calendar’s URL (web address).

There’s a box where you can describe your calendar. The description is optional, and you can leave it blank if you want.
Below the description, you can select a color for your calendar. This is very useful if you’re creating multiple calendars because this will make it easier to identify different calendars on your WordPress website.
If you’re just creating one calendar, then you don’t need to set a color.
When you’re done, click the ‘Add New Calendar’ button to create your calendar.

Adding Events in Sugar Calendar
Now, it’s time to add some events to your calendar. Just click on the Events tab then click the ‘Add Event’ button to create your first event.

The ‘Add New Event’ screen has space for all the information about your event. Go ahead and enter the name for your event at the top.

Below this, you can set the start time and end time for your event.
Your event can be on a single day or across multiple days. If it’s an all-day event, then simply check the ‘All-day’ box.

Next, go ahead and add more information about your event in the Details box. If you would like to include images or photos here, go ahead and add those using the ‘Add Media’ buttons.

On the right-hand side of the screen, you need to click on the calendar that you want to add your event onto. You can also create a calendar here if you haven’t done so already.
When you’re ready, go ahead and click the Publish button.

You can repeat this process to add more events to your calendar.
Putting Your Events Calendar on Your Website
You can add your calendar to any page or post on your website. You can even use the Sugar Calendar widget to add it to your sidebar.
We’re going to add our calendar to a new page on our demo site.
First, go to Pages » Add New. Then, enter a title for your page and add a shortcode box to your page.

Next, copy the shortcode [sc_events_calendar] into the shortcode block.

Now, it’s time to preview or publish your page. You will then see the calendar of events on your website.

Visitors on your website can click on an event to see the full details.

Note: This events page will use the fonts, colors, etc from your theme. That means it will match the posts and pages on your blog.
We hope this article helped you learn how to create a simple event calendar with Sugar Calendar. You might also like our article on the best email marketing services and best push notification software, so you can keep your users updated about new events and activities.
If you liked this article, then please subscribe to our YouTube Channel for WordPress video tutorials. You can also find us on Twitter and Facebook.
The post How to Create a Simple Event Calendar with Sugar Calendar appeared first on WPBeginner.
Building A Conversational N.L.P Enabled Chatbot Using Google’s Dialogflow
Ever since ELIZA (the first Natural Language Processing computer program brought to life by Joseph Weizenbaum in 1964) was created in order to process user inputs and engage in further discussions based on the previous sentences, there has been an increased use of Natural Language Processing to extract key data from human interactions. One key application of Natural language processing has been in the creation of conversational chat assistants and voice assistants which are used in mobile and web applications to act as customer care agents attending to the virtual needs of customers.
In 2019, the Capgemini Research Institute released a report after conducting a survey on the impact which chat assistants had on users after being incorporated by organizations within their services. The key findings from this survey showed that many customers were highly satisfied with the level of engagement they got from these chat assistants and that the number of users who were embracing the use of these assistants was fast growing!
To quickly build a chat assistant, developers and organizations leverage SaaS products running on the cloud such as Dialogflow from Google, Watson Assistant from IBM, Azure Bot Service from Microsoft, and also Lex from Amazon to design the chat flow and then integrate the natural language processing enabled chat-bots offered from these services into their own service.
This article would be beneficial to developers interested in building conversational chat assistants using Dialogflow as it focuses on the Dialogflow itself as a Service and how chat assistants can be built using the Dialogflow console.
Note: Although the custom webhooks built within this article are well explained, a fair understanding of the JavaScript language is required as the webhooks were written using JavaScript.
Dialogflow
Dialogflow is a platform that simplifies the process of creating and designing a natural language processing conversational chat assistant which can accept voice or text data when being used either from the Dialogflow console or from an integrated web application.
To understand how Dialogflow simplifies the creation of a conversational chat assistant, we will use it to build a customer care agent for a food delivery service and see how the built chat assistant can be used to handle food orders and other requests of the service users.
Before we begin building, we need to understand some of the key terminologies used on Dialogflow. One of Dialogflow’s aim is to abstract away the complexities of building a Natural Language Processing application and provide a console where users can visually create, design, and train an AI-powered chatbot.
Dialog Flow Terminologies
Here is a list of the Dialogflow terminologies we will consider in this article in the following order:
-
Agent
An agent on Dialogflow represents the chatbot created by a user to interact with other end-users and perform data processing operations on the information it receives. Other components come together to form an agent and each time one of these components is updated, the agent is immediately re-trained for the changes to take effect.User’s who want to create a full-fledged conversational chatbot within the quickest time possible can select an agent from the prebuilt agents which can be likened to a template which contains the basic intents and responses needed for a conversational assistant.
Note: A conversational assistant on Dialogflow will now be referred to as an “agent” while someone else asides the author of the assistant who interacts with it would be referred to as an “end-user”.
-
Intent
Similar to its literal meaning, the intent is the user’s end goal in each sentence when interacting with an agent. For a single agent, multiple intents can be created to handle each sentence within a conversation and they are connected together using Contexts.From the intent, an agent is able to understand the end-goal of a sentence. For example, an agent created to process food orders from customers would be to recognize the end-goal of a customer to place an order for a meal or get recommendations on the available meals from a menu using the created intents.
-
Entity
Entities are a means by which Dialogflow processes and extracts specific data from an end-user’s input. An example of this is a Car entity added to an intent. Names of vehicles would be extracted from each sentence input as the Car entity.By default, an agent has some System entities which have predefined upon its creation. Dialogflow also has the option to define custom entities and add values recognizable within this entity.
-
Training Phrase
The training phrases is a major way in which an agent is able to recognize the intent of an end-user interacting with the agent. Having a large number of training phrases within an intent increases the accuracy of the agent to recognize an intent, in fact Dialogflow’s documentation on training phases recommends that “at least 10-20” training phrases be added to a created intent.To make training phrases more reusable, dialogflow gives the ability to annotate specific words within the training phrase. When a word within a phrase is annotated, dialogflow would recognize it as a placeholder for values that would be provided in an end-user’s input.
-
Context
Contexts are string names and they are used to control the flow of a conversation with an agent. On each intent, we can add multiple input contexts and also multiple output contexts. When the end-user makes a sentence that is recognized by an intent the output contexts become active and one of them is used to match the next intent.To understand contexts better, we can illustrate context as the security entry and exit door, while the intent as the building. The input context is used when coming into the building and it accepts visitors that have been listed in the intent while the exit door is what connects the visitors to another building which is another intent.
-
Knowledge base
A knowledge base represents a large pool of information where an agent can fetch data when responding to an intent. This could be a document in any format such astxt,pdf,csvamong other supported document types. In machine learning, a knowledge base could be referred to as a training dataset.An example scenario where an agent might refer to a knowledge base would be where an agent is being used to find out more details about a service or business. In this scenario, an agent can refer to the service’s Frequently Asked Questions as its knowledge base.
-
Fulfillment
Dialogflow’s Fulfillment enables an agent to give a more dynamic response to a recognized intent rather than a static created response. This could be by calling a defined service to perform an action such as creating or retrieving data from a database.An intent’s fulfillment is achieved through the use of a webhook. Once enabled, a matched intent would make an API request to the webhook configured for the dialogflow agent.
Now, that we have an understanding of the terminologies used with Dialogflow, we can move ahead to use the Dialogflow console to create and train our first agent for a hypothetical food service.
Using The Dialogflow Console
Note: Using the Dialogflow console requires that a Google account and a project on the Google Cloud Platform is created. If unavailable, a user would be prompted to sign in and create a project on first use.
The Dialogflow console is where the agent is created, designed, and trained before integrating with other services. Dialogflow also provides REST API endpoints for users who do not want to make use of the console when building with Dialogflow.
While we go through the console, we will gradually build out the agent which would act as a customer care agent for a food delivery service having the ability to list available meals, accept a new order and give information about a requested meal.
The agent we’ll be building will have the conversation flow shown in the flow chart diagram below where a user can purchase a meal or get the list of available meals and then purchase one of the meals shown.

Creating A New Agent
Within every newly created project, Dialogflow would prompt the first time user to create an agent which takes the following fields:
- A name to identify the agent.
- A language which the agent would respond in. If not provided the default of English is used.
- A project on the Google Cloud to associate the agent with.
Immediately after we click on the create button after adding the values of the fields above, a new agent would be saved and the intents tab would be shown with the Default fallback and Default Welcome intent as the only two available intents which are created by default with every agent on Dialogflow.
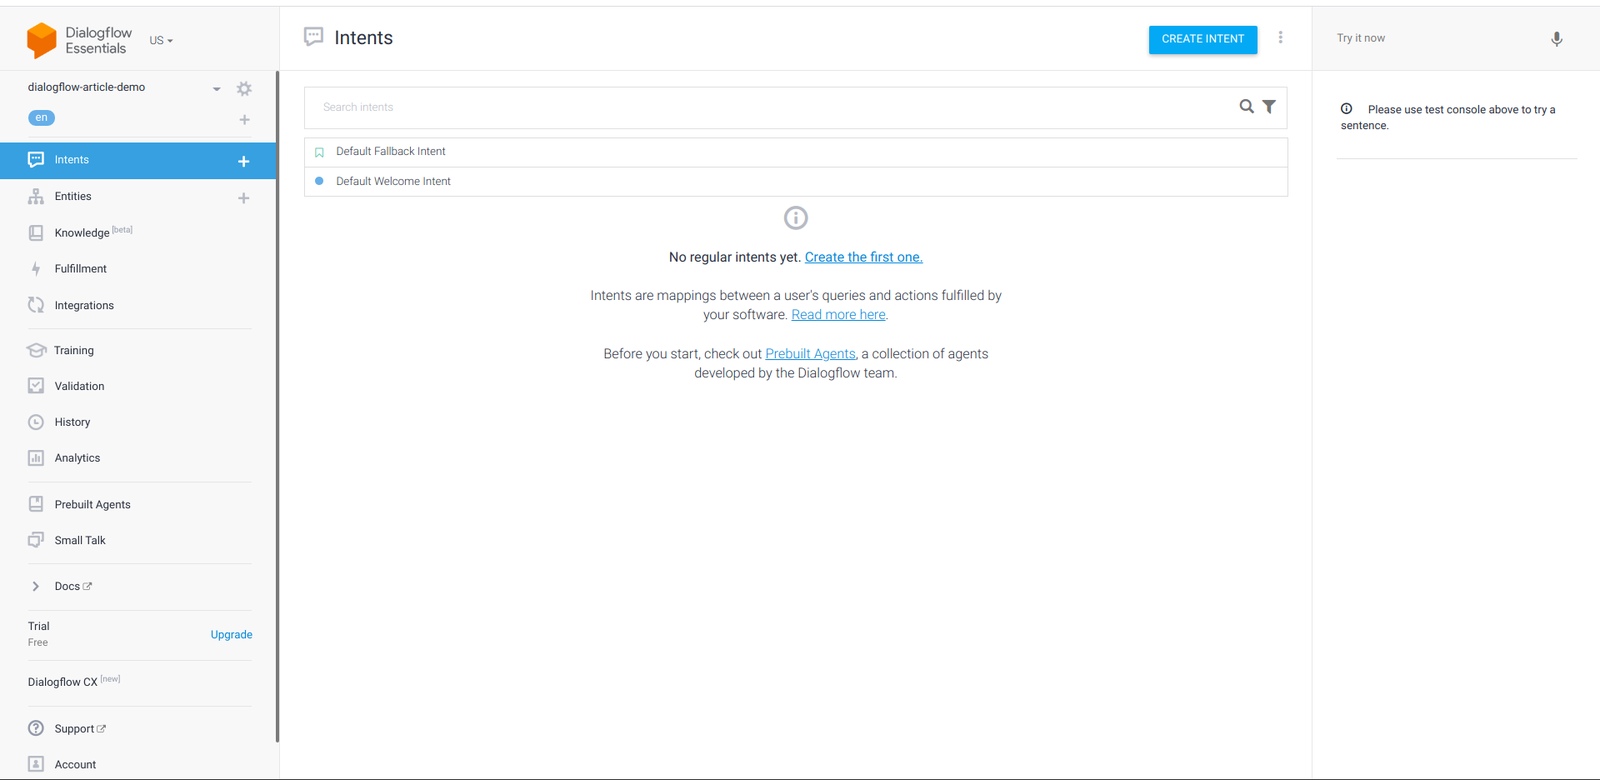
Exploring the Default fallback intent, we can see it has no training phrase but has sentences such as “Sorry, could you say that again?”, “What was that?”, “Say that one more time?” as responses to indicate that the agent was not able to recognize a sentence which has been made by an end-user. During all conversations with the agent, these responses are only used when the agent cannot recognize a sentence typed or spoken by a user.
While the sentences above are sufficient for indicating that agent does not understand the last typed sentence, we would like to aid the end-user by giving them some more information to hint the user on what the agent can recognize. To do this, we replace all the listed sentences above with the following ones and click the Save button for the agent to be retrained.
I didn't get that. I am Zara and I can assist you in purchasing or learning more about the meals from Dialogflow-food-delivery service. What would you like me to do?

I missed what you said. I'm Zara here and I can assist you in purchasing or learning more about the meals from Dialogflow-food-delivery service. What would you like me to do?

Sorry, I didn't get that. Can you rephrase it?  I'm Zara by the way and I can assist you in purchasing or learning more about the meals from Dialogflow-food-delivery service.

Hey, I missed that I'm Zara and I can assist you in purchasing or learning more about the meals from Dialogflow-food-delivery service.  What would you like me to do?
From each of the four sentences above, we see can observe that the agent could not recognize what the last sentence made was and also a piece of information on what the agent can do thus hinting the user on what to type next in order to continue the conversation.
Moving next to the Default Welcome Intent, the first section on the intent page is the Context section and expanding it we can see both the input and output contexts are blank. From the conversation flow of the agent shown previously, we want an end-user to either place a meal order or request a list of all available meals. This would require the two following new output contexts they would each become active when this intent is matched;
-
awaiting_order_request
This would be used to match the intent handling order requests when an end-user wants to place an order for a meal. -
awaiting_info_request
This would be used to match the intent that retrieves data of all the meals when an end-user wants to know the available meals.
After the context section is the intent’s Events and we can see it has the Welcome event type added to the list of events indicating that this intent will be used first when the agent is loaded.
Coming next are the Training Phrases for the intent. Due to being created by default, it already has 16 phrases that an end-user would likely type or say when they interact with the agent for the first time.

When an end-user types or makes a sentence similar to those listed in the training phrases above, the agent would respond using a picked response from the Responses list section shown below:

Each of the responses above is automatically generated for every agent on Dialogflow. Although they are grammatically correct, we would not use them for our food agent. Being a default intent that welcomes an end-user to our agent, a response from the agent should tell what organization it belongs to and also list its functionalities in a single sentence.
We would delete all the responses above and replace them with the ones below to better help inform an end-user on what to do next with the agent.
1.  Hello there, I am Zara and I am here to assist you to purchase or learn about the meals from the Dialogflow-food-delivery service. What would you like me to do?

2. Hi, I am Zara and I can assist you in purchasing or learning more about the meals from the Dialogflow-food-delivery service. What would you like me to do?
From the two responses above, we can see it tells an end-user what the name of the bot is, the two things the agent can do, and lastly, it pokes the end-user to take further action. Taking further action further from this intent means we need to connect the Default Welcome Intent to another. This is possible on Dialogflow using context.
When we add and save those two phrases above, dialogflow would immediately re-train the agent so I can respond using any one of them.
Next, we move on to create two more intents to handle the functionalities which we have added in the two responses above. One to purchase a food item and the second to get more information about meals from our food service.
Creating list-meals intent:
Clicking the + ( add ) icon from the left navigation menu would navigate to the page for creating new intents and we name this intent list-available-meals.
From there we add an output context with the name awaiting-order-request. This output context would be used to link this intent to the next one where they order a meal as we expect an end-user to place an order for a meal after getting the list of meals available.
Moving on to the Training Phrases section on the intent page, we will add the following phrases provided by the end-user in order to find out which meals are available.
Hey, I would like to know the meals available.
What items are on your menu?
Are there any available meals?
I would like to know more about the meals you offer.
Next, we would add just the single fallback response below to the Responses section;
Hi there, the list of our meals is currently unavailable. Please check back in a few minutes as the items on the list are regularly updated.From the response above we can observe that it indicates that the meal’s list is unavailable or an error has occurred somewhere. This is because it is a fallback response and would only be used when an error occurs in fetching the meals. The main response would come as a fulfillment using the webhooks option which we will set up next.
The last section in this intent page is the Fulfillment section and it is used to provide data to the agent to be used as a response from an externally deployed API or source. To use it we would enable the Webhook call option in the Fulfillment section and set up the fulfillment for this agent from the fulfillment tab.
Managing Fulfillment:
From the Fulfillment tab on the console, a developer has the option of using a webhook which gives the ability to use any deployed API through its endpoint or use the Inline Code editor to create a serverless application to be deployed as a cloud function on the Google Cloud. If you would like to know more about serverless applications, this article provides an excellent guide on getting started with serverless applications.

Each time an end-user interacts with the agent and the intent is matched, a POST) request would be made to the endpoint. Among the various object fields in the request body, only one is of concern to us, i.e. the queryResult object as shown below:
{
  "queryResult": {
    "queryText": "End-user expression",
    "parameters": {
      "param-name": "param-value"
    },
  },
}
While there are other fields in the queryResult such as a context, the parameters object is more important to us as it holds the parameter extracted from the user’s text. This parameter would be the meal a user is requesting for and we would use it to query the food delivery service database.
When we are done setting up the fulfillment, our agent would have the following structure and flow of data to it:

From the diagram above, we can observe that the cloud function acts as a middleman in the entire structure. The Dialogflow agent sends the parameter extracted from an end user’s text to the cloud function in a request payload and the cloud function, in turn, queries the database for the document using the received name and sends back the queried data in a response payload to the agent.
To start an implementation of the design system above, we would begin with creating the cloud function locally in a development machine then connect it to our dialogflow agent using the custom webhook option. After it has been tested, we can switch to using the inline editor in the fulfillment tab to create and deploy a cloud function to work with it. We begin this process by running the following commands from the command line:
# Create a new project and ( && ) move into it.
mkdir dialogflow-food-agent-server && cd dialogflow-food-agent-server

# Create a new Node project
yarn init -y

# Install needed packages
yarn add mongodb @google-cloud/functions-framework dotenv
After installing the needed packages, we modify the generated package.json file to include two new objects which enable us to run a cloud function locally using the Functions Framework.
// package.json
{
  "main": "index.js",
  "scripts": {
    "start": "functions-framework --target=foodFunction --port=8000"
  },
}
The start command in the scripts above tells the functions Framework to run the foodFunction in the index.js file and also makes it listen and serve connections through our localhost on port 8000.
Next is the content of the index.js file which holds the function; we’ll make use of the code below since it connects to a MongoDB database and queries the data using the parameter passed in by the Dialogflow agent.
require("dotenv").config();

exports.foodFunction = async (req, res) => {
  const { MongoClient } = require("mongodb");
  const CONNECTION_URI = process.env.MONGODB_URI;

  // initate a connection to the deployed mongodb cluster
  const client = new MongoClient(CONNECTION_URI, {
    useNewUrlParser: true,
  });

  client.connect((err) => {
    if (err) {
      res
        .status(500)
        .send({ status: "MONGODB CONNECTION REFUSED", error: err });
    }
    const collection = client.db(process.env.DATABASE_NAME).collection("Meals");
    const result = [];
    const data = collection.find({});
    const meals = [
      {
        text: {
          text: [
            We currently have the following 20 meals on our menu list. Which would you like to request for?,
          ],
        },
      },
    ];
    result.push(
      data.forEach((item) => {
        const { name, description, price, image_uri } = item;
        const card = {
          card: {
            title: ${name} at $${price},
            subtitle: description,
            imageUri: image_uri,
          },
        };
        meals.push(card);
      })
    );

    Promise.all(result)
      .then((_) => {
        const response = {
          fulfillmentMessages: meals,
        };
        res.status(200).json(response);
      })
      .catch((e) => res.status(400).send({ error: e }));
    client.close();
  });
};
From the code snippet above we can see that our cloud function is pulling data from a MongoDB database, but let’s gradually step through the operations involved in pulling and returning this data.
-
First, the cloud function initiates a connection to a MongoDB Atlas cluster, then it opens the collection storing the meal category documents within the database being used for the food-service on the cluster.
-
Next, using the parameter passed into the request from the user’s input, we run a find method on the collection to get which then returns a cursor which we further iterate upon to get all the MongoDB documents within the collection containing the data.
- We model the data returned from MongoDB into Dialogflow’s Rich response message object structure which displays each of the meal items to the end-user as a card with an image, title, and a description.
- Finally, we send back the entire data to the agent after the iteration in a JSON body and end the function’s execution with a
200status code.
Note: The Dialogflow agent would wait for a response after a request has been sent within a frame of 5 seconds. This waiting period is when the loading indicator is shown on the console and after it elapses without getting a response from the webhook, the agent would default to using one of the responses added in the intent page and return a DEADLINE EXCEEDED error. This limitation is worth taking note of when designing the operations to be executed from a webhook. The API error retries section within the Dialogflow best practices contains steps on how to implement a retry system.
Now, the last thing needed is a .env file created in the project directory with the following fields to store the environment variables used in the index.js.
#.env
MONGODB_URI = "MONGODB CONNECTION STRING"
DATABASE_NAME = ""
At this point, we can start the function locally by running yarn start from the command line in the project’s directory. For now, we still cannot make use of the running function as Dialogflow only supports secure connections with an SSL certificate, and where Ngrok comes into the picture.
Using Ngrok, we can create a tunnel to expose the localhost port running the cloud function to the internet with an SSL certificate attached to the secured connection using the command below from a new terminal;
ngrok http -bind-tls=true 8000This would start the tunnel and generate a forwarding URL which would be used as an endpoint to the function running on a local machine.
Note: The extra -bind-tls=true argument is what instructs Ngrok to create a secured tunnel rather than the unsecured connection which it creates by default.
Now, we can copy the URL string opposite the forwarding text in the terminal and paste in the URL input field which is found in the Webhook section, and then save it.
To test all that has been done so far, we would make a sentence to the Dialogflow agent requesting the list of meals available using the Input field at the top right section in the Dialogflow console and watch how it waits for and uses a response sent from the running function.

Starting from the center placed terminal in the image above, we can the series of POST requests made to the function running locally and on the right-hand side the data response from the function formatted into cards.
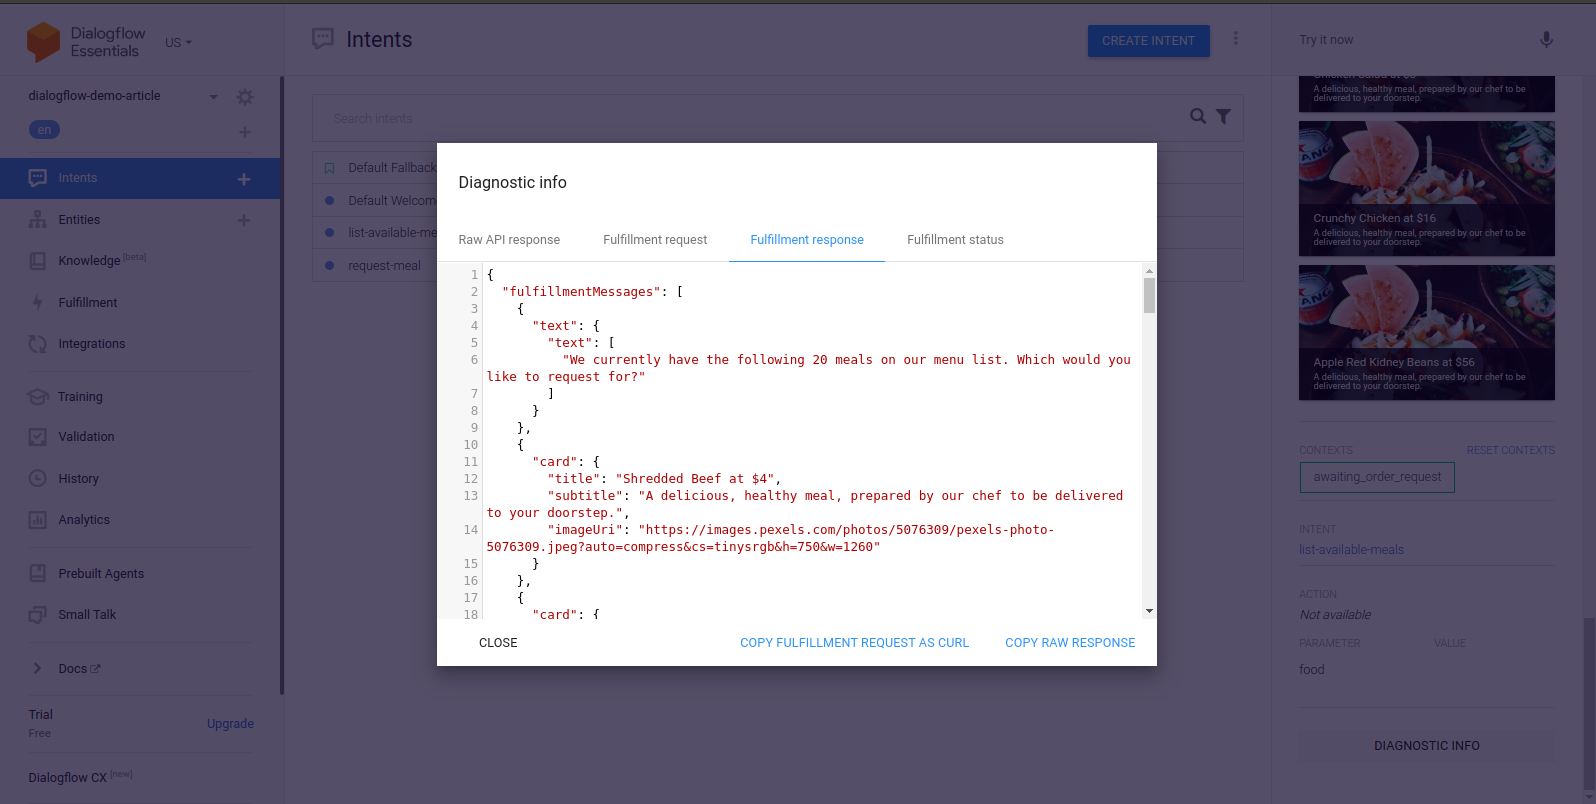
If for any reason a webhook request becomes unsuccessful, Dialogflow would resolve the error by using one of the listed responses. However, we can find out why the request failed by using the Diagnostic Info tool updated in each conversation. Within it are the Raw API response, Fulfillment request, Fulfillment response, and Fulfillment status tabs containing JSON formatted data. Selecting the Fulfillment response tab we can see the response from the webhook which is the cloud function running on our local machine.
At this point, we expect a user to continue the conversation with an order of one of the listed meals. We create the last intent for this demo next to handle meal orders.
Creating Request-meal Intent:
Following the same steps used while creating the first intent, we create a new intent using the console and name it request-meal and add an input context of awaiting_order_request to connect this intent from either the Default Welcome intent or the list-available meals intent.
Within the training phrase section, we make use of the following phrases,
Hi there, I'm famished, can I get some food?

Yo, I want to place an order for some food.

I need to get some food now.

Dude, I would like to purchase $40 worth of food.

Hey, can I get 2 plates of food?
Reading through the phrases above, we can observe they all indicate one thing — the user wants food. In all of the phrases listed above, the name or type of food is not specified but rather they are all specified as food. This is because we want the food to be dynamic value, if we were to list all the food names we certainly would need to have a very large list of training phrases. This also applies to the amount and price of the food being ordered, they would be annotated and the agent would be able to recognize them as a placeholder for the actual values within an input.
To make a value within a phrase dynamic, dialogflow provides entities. Entities represent common types of data, and in this intent, we use entities to match several food types, various price amounts, and quantity from an end user’s sentence to request.
From the training phrases above, dialogflow would recognize $40 as `@sys.unit-currencywhich is under the amounts-with-units category of the [system entities list](https://cloud.google.com/dialogflow/es/docs/entities-system) and **2** as@numberunder the number category of the [system entities list](https://cloud.google.com/dialogflow/es/docs/entities-system). However,food` is not a not a recognized system entity. In a case such as this, dialogflow gives developers the option to create a custom entity to be used.
Managing Entities
Double-clicking on food would pop up the entities dropdown menu, at the bottom of the items in the dropdown we would find the Create new entity button, and clicking it would navigate to the Entities tab on the dialogflow console, where we can manage all entities for the agent.
When at the entities tab, we name this new entity as food then at the options dropdown located at the top navigation bar beside the Save button we have the option to switch the entities input to a raw edit mode. Doing this would enable us to add several entity values in either a json or csv format rather than having to add the entities value one after the other.
After the edit mode has been changed, we would copy the sample JSON data below into the editor box.
// foods.json

[
    {
        "value": "Fries",
        "synonyms": [
            "Fries",
            "Fried",
            "Fried food"
        ]
    },
 {
        "value": "Shredded Beef",
        "synonyms": [
            "Shredded Beef",
            "Beef",
            "Shredded Meat"
        ]
    },
    {
        "value": "Shredded Chicken",
        "synonyms": [
            "Shredded Chicken",
            "Chicken",
            "Pieced Chicken"
        ]
    },

    {
        "value": "Sweet Sour Sauce",
        "synonyms": [
            "Sweet Sour Sauce",
            "Sweet Sour",
            "Sauce"
        ]
    },
    {
        "value": "Spring Onion",
        "synonyms": [
            "Spring Onion",
            "Onion",
            "Spring"
        ]
    },
    {
        "value": "Toast",
        "synonyms": [
            "Toast",
            "Toast Bread",
            "Toast Meal"
        ]
    },
    {
        "value": "Sandwich",
        "synonyms": [
            "Sandwich",
            "Sandwich Bread",
            "Sandwich Meal"
        ]
    },
    {
        "value": "Eggs Sausage Wrap",
        "synonyms": [
            "Eggs Sausage Wrap",
            "Eggs Sausage",
            "Sausage Wrap",
            "Eggs"
        ]
    },
    {
        "value": "Pancakes",
        "synonyms": [
            "Pancakes",
            "Eggs Pancakes",
            "Sausage Pancakes"
        ]
    },
    {
        "value": "Cashew Nuts",
        "synonyms": [
            "Cashew Nuts",
            "Nuts",
            "Sausage Cashew"
        ]
    },
    {
        "value": "Sweet Veggies",
        "synonyms": [
            "Sweet Veggies",
            "Veggies",
            "Sweet Vegetables"
        ]
    },
    {
        "value": "Chicken Salad",
        "synonyms": [
            "Chicken Salad",
            "Salad",
            "Sweet Chicken Salad"
        ]
    },
    {
        "value": "Crunchy Chicken",
        "synonyms": [
            "Crunchy Chicken",
            "Chicken",
            "Crunchy Chickens"
        ]
    },
    {
        "value": "Apple Red Kidney Beans",
        "synonyms": [
            "Apple Red Kidney Beans",
            "Sweet Apple Red Kidney Beans",
            "Apple Beans Combination"
        ]
    },
]
From the JSON formatted data above, we have 15 meal examples. Each object in the array has a “value” key which is the name of the meal and a “synonyms” key containing an array of names very similar to the object’s value.
After pasting the json data above, we also check the Fuzzy Matching checkbox as it enables the agent to recognize the annotated value in the intent even when incompletely or slightly misspelled from the end user’s text.
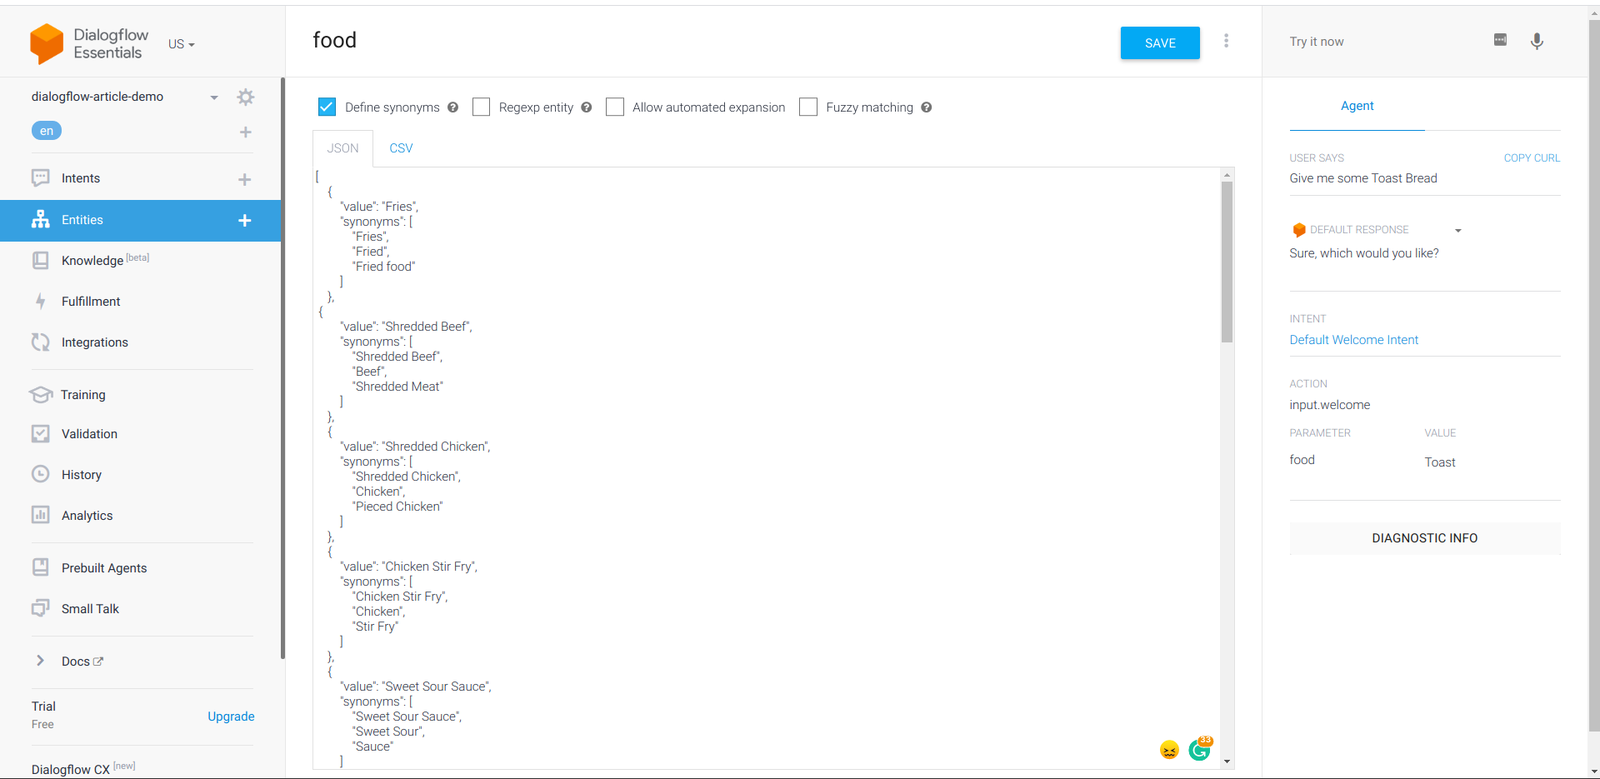
After saving the entity values above, the agent would immediately be re-trained using the new values added here and once the training is completed, we can test by typing a text in the input field at the right section.
Responses within this intent would be gotten from our previously created function using the intent’s fulfillment webhook, however, we add the following response to serve as a fallback to be used whenever the webhook is not executed successfully.
I currently can't find your requested meal. Would you like to place an order for another meal?We would also modify the code of the existing cloud function to fetch a single requested as it now handles requests from two intents.
require("dotenv").config();

exports.foodFunction = async (req, res) => {
  const { MongoClient } = require("mongodb");
  const CONNECTION_URI = process.env.MONGODB_URI;

  const client = new MongoClient(CONNECTION_URI, {
    useNewUrlParser: true,
  });

  // initate a connection to the deployed mongodb cluster
  client.connect((err) => {
    if (err) {
      res
        .status(500)
        .send({ status: "MONGODB CONNECTION REFUSED", error: err });
    }

    const collection = client.db(process.env.DATABASE_NAME).collection("Meals");
    const { displayName } = req.body.queryResult.intent;
    const result = [];

    switch (displayName) {
      case "list-available-meals":
        const data = collection.find({});
        const meals = [
          {
            text: {
              text: [
                We currently have the following 20 meals on our menu list. Which would you like to request for?,
              ],
            },
          },
        ];
        result.push(
          data.forEach((item) => {
            const {
              name,
              description,
              price,
              availableUnits,
              image_uri,
            } = item;
            const card = {
              card: {
                title: ${name} at $${price},
                subtitle: description,
                imageUri: image_uri,
              },
            };
            meals.push(card);
          })
        );
        return Promise.all(result)
          .then((_) => {
            const response = {
              fulfillmentMessages: meals,
            };
            res.status(200).json(response);
          })
          .catch((e) => res.status(400).send({ error: e }));

      case "request-meal":
        const { food } = req.body.queryResult.parameters;

        collection.findOne({ name: food }, (err, data) => {
          if (err) {
            res.status(400).send({ error: err });
          }
          const { name, price, description, image_uri } = data;
          const singleCard = [
            {
              text: {
                text: [The ${name} is currently priced at $${price}.],
              },
            },
            {
              card: {
                title: ${name} at $${price},
                subtitle: description,
                imageUri: image_uri,
                buttons: [
                  {
                    text: "Pay For Meal",
                    postback: "htts://google.com",
                  },
                ],
              },
            },
          ];
          res.status(200).json(singleCard);

      default:
        break;
    }

    client.close();
  });
};
From the highlighted parts above, we can see the following new use cases that the function has now been modified to handle:
- Multiple intents
the cloud function now uses a switch statement with the intent’s name being used as cases. In each request payload made to a webhook, Dialogflow includes details about the intent making the request; this is where the intent name is being pulled from to match the cases within the switch statement. - Fetch a single meal
the Meals collection is now queried using the value extracted as a parameter from the user’s input. - A call-to-action button is now being added to the card which a user can use to pay for the requested meal and clicking it opens a tab in the browser. In a functioning chat assistant, this button’s
postbackURL should point to a checkout page probably using a configured third-party service such as Stripe checkout.
To test this function again, we restart the function for the new changes in the index.js file to take effect and run the function again from the terminal by running yarn start.
Note: You don’t have to restart the terminal running the Ngrok tunnel for the new changes to take place. Ngrok would still forward requests to the updated function when the webhook is called.
Making a test sentence to the agent from the dialogflow console to order a specific meal, we can see the request-meal case within the cloud function being used and a single card getting returned as a response to be displayed.

At this point, we can be assured that the cloud function works as expected. We can now move forward to deploy the local function to the Google Cloud Functions using the following command;
gcloud functions deploy "foodFunction" --runtime nodejs10 --trigger-http --entry-point=foodFunction --set-env-vars=[MONGODB_URI="MONGODB_CONNECTION_URL", DATABASE_NAME="DATABASE_NAME"] --allow-unauthenticatedUsing the command above deploys the function to the Google Cloud with the flags explained below attached to it and logs out a generated URL endpoint of deployed cloud function to the terminal.
-
NAME
This is the name given to a cloud function when deploying it and is it required. In our use case, the name of the cloud function when deployed would befoodFunction. -
trigger-http
This selects HTTP as the function’s trigger type. Cloud functions with an HTTP trigger would be invoked using their generated URL endpoint. The generated URLs are secured and use thehttpsprotocol. -
entry-point
This the specific exported module to be deployed from the file where the functions were written. -
set-env-vars
These are the environment variables available to the cloud function at runtime. In our cloud function, we only access ourMONGODB_URIandDATABASE_NAMEvalues from the environment variables.The MongoDB connection string is gotten from a created MongoDB cluster on Atlas. If you need some help on creating a cluster, the MongoDB Getting started section provides great help.
-
allow-authenticated
This allows the function to be invoked outside the Google Cloud through the Internet using its generated endpoint without checking if the caller is authenticated.
Dialogflow Integrations
Dialogflow gives developers the feature to integrate a built agent into several conversational platforms including social media platforms such as Facebook Messenger, Slack, and Telegram. Asides from the two integration platforms which we used for our built agent, the Dialogflow documentation lists the available types of integrations and platforms within each integration type.
Integrating With Google Actions
Being a product from Google’s ecosystem, agents on Dialogflow integrate seamlessly with Google Assistant in very few steps. From the Integrations tab, Google Assistant is displayed as the primary integration option of a dialogflow agent. Clicking the Google Assistant option would open the Assistant modal from which we click on the test app option. From there the Actions console would be opened with the agent from Dialogflow launched in a test mode for testing using either the voice or text input option.

Integrating a dialogflow agent with the Google Assistant is a huge way to make the agent accessible to millions of Google Users from their Smartphones, Watches, Laptops, and several other connected devices. To publish the agent to the Google Assistant, the developers docs provides a detailed explanation of the process involved in the deployment.
Integrating With A Web Demo
The Web Demo which is located in the Text-based sections of the Integrations Tab in the Dialogflow console allows for the use of the built agent in a web application by using it in an iframe window. Selecting the web Demo option would generate a URL to a page with a chat window that simulates a real-world chat application.
Note: Dialogflow’s web demo only supports text responses and does not support the display of Rich messages and images. This worth noting when using a webhook that responds with data in the Rich response format.
Conclusion
From several surveys, we can see the effect of chat assistants on customer satisfaction when incorporated by organizations into their services. These positive metrics are expected to grow up in the next coming years thus placing greater importance on the use of these chat assistants.
In this article, we have learned about Dialogflow and how it is providing a platform for organizations and developers to build Natural Language processing conversational chat assistants for use in their services. We also moved further to learn about its terminologies and how these terminologies apply when building a chat assistant by building a demo chat assistant using the Dialogflow console.
If a chat assistant is being built to be used at a production level, it is highly recommended that the developer(s) go through the Dialogflow best practices section of the documentation as it contains standard design guidelines and solutions to common pitfalls encountered while building a chat assistant.
The source code to the JavaScript webhook built within this article has been pushed to GitHub and can be accessed from this repository.
References

How to Easily Save a Blog Post to Your Computer (5 Methods)
Do you want to save your WordPress blog posts to your computer?
Normally, you can make a WordPress backup and save it on your computer. However, these backups are not readable or easy to share without installing WordPress again.
In this article, we’ll show you how to easily save a copy of your blog content that you can read, share, or even convert to an eBook.

Why Save Your Blog Posts to Your Computer
There are several reasons to save your blog posts to your computer.
The most common reason is to create a back up of your blog, so that you can restore it later. You may want to move it to a new WordPress website or just keep it safe as a security precaution.
Or you may want to close and delete your WordPress website, but want to preserve your blog content in a readable format. Instead of saving them as back up files, you can save all of your blog posts as PDF or an eBook, so you can easily read or share your articles.
Another common reason is to move from another blogging platform to WordPress. To do this you’ll need to save your blog posts and then import them into WordPress.
There are multiple ways to save and download your blog posts. Depending on your needs, you can choose the method that best suits you.
- Creating a backup of your entire blog
- Creating a PDF or ebook of your blog posts
- Printing a book of your blog posts
- Saving your blog to migrate
- Saving your WordPress.com blog posts
Creating a Backup of Your Blog
This method is recommended if you just want to make a backup of your blog posts for safekeeping.
It allows you to restore your blog posts on any other WordPress website. However, it does not save your blog posts in a readable or shareable format.
WordPress has a built-in feature to export your blog posts. Simply go to Tools » Export. page inside your WordPress admin area. Here, you can choose to download your entire site, or only your blog posts.
After that, you can click on the Download Export File button and WordPress will download all your blog posts in XML format. This file can be used to restore your site, or to migrate to another domain or a different web host.

You can also download your entire media library and save your images and videos separately.
However, if you want to keep a backup of your entire WordPress site, then the export tool is not the ideal method. It will not save any other website data, settings, your WordPress theme, or plugins.
For that, you will need to use a proper WordPress backup plugin. These plugins allow you to make a complete WordPress website backup which you can then save on your computer or upload to cloud storage like Google Drive or Dropbox.
You can also set them up, so they automatically take backups at regular intervals and save them remotely.
We recommend using UpdraftPlus, which is easy to use and supports multiple cloud storage options. For more details, see our guide on setting up WordPress backups using UpdraftPlus.
Creating a PDF or eBook of Your Blog
The problem with WordPress backup plugins or the default export method is that your blog posts will not be readable outside WordPress.
This is why many users prefer to save blog posts as PDF because it makes it easy to read, share, or republish the blog post as an eBook.
Let’s take a look at how to easily save your blog posts as PDF to your computer.
If you’re only looking to save a single blog post, then the easiest way is to open it in a browser and use the keyboard shortcut CTRL + P (for Windows) or CMD + P (for Mac). This will open the browser’s print settings window.
You can now change the Destination to ‘Save as PDF’ and click on the ‘Save’ button to download it to your computer.

Now, if you want to save all your blog posts as PDF at once, then the easiest way to do that is by using a WordPress plugin.
First, you need to install and activate the Print My Blog plugin. For more details, see our step by step guide on how to install a WordPress plugin.
Upon activation, you need to visit Print My Blog » Print Now page to configure settings. From here, you can choose to print a physical copy, save a PDF file, create an eBook, or save it in HTML format.

You can select Digital PDF to create and save a readable PDF file on your computer. Alternatively, you can choose eBook if you want to create a digital book that you can publish online.
After that, click to expand the ‘Show More Print Options’ menu to customize your blog copy.
In most cases, the default settings are good enough. But you may want to go through them just to make sure the blog copy is exactly what you need.
From the drop-down menu, you can apply a number of filters. For instance, you can choose to save only posts or only pages of your WordPress site.
You can also select what order you want the posts to appear, whether you want the oldest or the newest posts first.

Another option is to filter the posts by their status. You can choose to download only the published posts, or include drafts and deleted posts that are in your Trash folder.

You can also filter your posts by categories, tags, authors, and dates. This is handy if you want to download only particular categories for a project, or if you want a document of every article written by a single author.

The plugin also allows you to choose what header and post content you wish to appear in your saved copy. By default, the date and the plugin’s branding is selected, but you can unselect this if you don’t want this information to appear in your PDF.
You can apply these filters to every post and choose what information you want to appear for each post such as the published date, comments, URL, and author.

Lastly, you can determine your page layout. Print My Blog basically creates a single PDF file for all your blog content. You can choose to have each new post start on a new page to ensure there is proper separation.

You can also customize the font size, image size, and choose whether you want to include hyperlinks.

Once you are satisfied with the settings, click on the ‘Prepare Print-Page’ button to continue. To print an eBook, you need to use the dotepub extension.
To save a PDF file, click on the ‘Print to PDF’ button to save the file.

This will bring up your browser’s print settings. Select Save as PDF option and then click on the save button to save the PDF file to your computer.
Note: The save to PDF functionality works best with Google Chrome and Microsoft Edge browsers.
If you’ve created an eBook, you might find our guide on how to add an eBook download to your WordPress site helpful.
Printing your Blog Posts as a Book
You can also convert your blog into a physical book for distributing it among friends or at an event. You could also make an online store to sell it from your website.
Blog2Print converts your blog on WordPress, Tumblr, Typepad and Blogger into professionally bound books.
They also let you turn your Instagram feed into a book!
Blog2Print automatically formats your content. You can select what content you want to include, customize your book cover, add photos and supplemental text to make the book seem more like a published book rather than a series of blog posts.

Another platform you can use is Into Real Pages. They have four formats you can choose from, along with 8 wonderful themes. You get to design your own cover and add additional text and photos. They also offer good deals on bulk printing.
Saving Your Blog Posts to Migrate Platforms
A lot of folks want to save their blog posts, so they can move to them elsewhere. Now there are two common types of blog migrations.
- Moving a WordPress blog to another WordPress blog. This happens when a user is changing their WordPress hosting company or domain name, and they need to move their WordPress files to the new location.
- Moving from a third-party platform to WordPress. A lot of folks start with other blogging platforms and later on want to move their blogs to WordPress.
We will talk about both user cases and will show you how to properly save your blog posts and move them over.
1. Migrating a WordPress Blog
To move to a new domain, a different host, or another top blogging platform, you need to create a copy of your blog. This copy can then be used to migrate over.
You can use a migration plugin that automatically makes a backup for you and lets you move to a new domain or new host.
There are plenty of migration plugins to choose from, out of which Duplicator Pro is one of the best on the market.

If you want to move your site from one domain to another, but you’re worried about losing your blog content, see our guide on how to move WordPress to a new domain. This guide also ensures you don’t lose any of your SEO efforts.
If you’ve been blogging on a subdomain and want to merge it with your main domain, the process is fairly simple. But you need to follow it step by step to make sure you don’t face errors. See our guide on moving subdomain to root domain in WordPress.
You can also move between hosts and servers but there’s a risk of downtime. Our guide on how to move WordPress to a new host or server shows you how to switch over without losing any content or having downtime.
2. Migrating a Third-Party Blog to WordPress
A lot of users want to save their blog posts, so they can move all their content to WordPress.
There are two types of WordPress blogs. WordPress.com which is a hosting service and WordPress.org which is also called self-hosted WordPress. For more details, see our guide on the difference between WordPress.com vs Wordress.org with detailed pros and cons.
You’ll need WordPress.org because it gives you instant access to all WordPress features out of the box.
To get started, you’ll need a domain name and a WordPress hosting account. The domain name is your website’s address (e.g. wpbeginner.com), and the hosting account is where all your website files are stored.
We recommend using Bluehost. They are one of the top hosting companies in the world and an officially recommended WordPress hosting provider.
They are offering WPBeginner users, a generous discount on hosting with a free domain name and SSL certificate.
→ Click Here to Claim This Exclusive Bluehost Offer ←
Once you have signed up for a hosting account, you can follow our step by step tutorial on how to start a WordPress blog for the complete setup.
After the set up, you’ll reach your WordPress admin dashboard.

WordPress powers over 38% of all websites on the internet. This is why many users want to switch blogging platforms and use WordPress.
You can easily import your blog posts from other blogging platforms to your WordPress blog. Depending on which platform you are moving from, you can follow the step by step instructions from our guides below.
- Moving your blog from WordPress.com to WordPress.org
- Moving your blog from Blogger to WordPress
- Moving a website from Weebly to WordPress
- Moving a website from Wix to WordPress
- Moving a website from Joomla to WordPress
- Moving a website from Squarespace to WordPress
- Move articles from Medium to WordPress
- Moving your blog posts from Tumblr to WordPress
- Moving your blog from LiveJournal to WordPress
- Moving from GoDaddy Website Builder to WordPress
Saving Your WordPress.com Blog Posts
If you are using WordPress.com, then you can still save your WordPress.com blog posts to your computer. You can also move to WordPress.org or use the downloaded file as a backup that you can restore at any time.
First, you need to login to your blog and then go to the Tools » Export » Export all. WordPress.com will then create an XML file and your browser will download it to your computer.

This file uses the same format as WordPress.org, which means you can easily use it to move your blog from WordPress.com to a WordPress.org blog.
We hope this article helped you learn how to save blog posts to your computer. You may also want to see our guide on how to increase your blog traffic by 406%, and over 30 proven ways make money blogging using WordPress.
If you liked this article, then please subscribe to our YouTube Channel for WordPress video tutorials. You can also find us on Twitter and Facebook.
The post How to Easily Save a Blog Post to Your Computer (5 Methods) appeared first on WPBeginner.

Ethical Considerations In UX Research: The Need For Training And Review
We rely on UX research, collecting data from our users, to inform our UX process. As the Nielsen Norman Group aptly states “UX without user research is not UX”. That doesn’t mean that all UX teams conduct research the same way, or have specific roles dedicated to UX research. This means everyone on a UX team has the potential to play a role in collecting and analyzing data. For example, designers might need to conduct their own usability testing. PMs and developers might assist with analyzing interview data to identify themes.
We benefit from greater involvement of our team members and other organizational stakeholders in the research process. They increase empathy and understanding of what users truly experience and need out of a product when they experience research first hand. However, as we push to democratize UX research in organizations, we need to keep in mind potential perils associated with poorly planned and conducted research. I don’t mean this only to the untrained team members we advocate taking part in research, I’m also talking about the need for those with UX researcher in their title to have a level of understanding of how to identify and avoid research that might take advantage of vulnerable populations, research that causes harm or is misleading, and poorly done research with no potential use for the outcomes.
We can have a false sense UX research is purely benign. After all, aren’t we collecting data to fight on behalf of our users and their experience? While usability testing seems harmless on the surface and interviews are only words, we need to be intentional in knowing why we are conducting research, the potential negative effects our research might have on participants, and what we can do to mitigate the potential for conducting unethical research.
We are asking a lot of our team to include research along with their many other duties. That’s why it is important to best prepare everyone on the team for the potential to encounter unexpected situations that might cross over ethical lines. Researchers by training and trade have often been required to take courses and pass exams to reflect an awareness of potential ethical issues in research. We can best prepare our colleagues to avoid these situations through similar training and standards.
Academia identified the need decades ago for researchers to have training and submit their research protocols to an Institutional Review Board (IRB). This didn’t happen accidentally — it was after decades or centuries of examples of improperly carried-out research. Medical and psychological research across the globe has a history of unethical research which led to withholding potential treatment or negative outcomes on the mental health of participants. UX research, particularly in health fields, stands to recreate some of these harmful scenarios, even if inadvertently.

What Are The Problems And Potentials With UX Research Done Poorly
You might wonder how your research could potentially cause harm or be unethical. Perhaps you are just conducting interviews in exploration of a concept you have for a new banking application. Or you are testing updated designs for a new workflow you’ve created allowing people to submit forms to your organization; things that seem harmless on the surface.
Defining Ethics
Dictionary.com provides one definition of ethics as “the rules of conduct recognized in respect to a particular class of human actions or a particular group, culture, etc.” I am using the word ethics as it applies to a class of human actions (UX Research) and specifically, I am defining the rules of conduct we need to consider in UX research as:
- UX Research should be respectful and compassionate to study participants.
- UX Research should respect our stakeholders and colleagues, and the resources and trust they give our work.
- UX Research should respect the norms associated with social science and research using human subjects, including all studies using methods that have defined protocols providing informed consent.
Any research involving human participants has the potential to cross over ethical boundaries if done poorly. I’ve identified six common issues we need to watch out for regardless of the topic or focus of our research:
- Vulnerable populations,
- Misleading Users/Deception,
- Inadvertent sensitive topics/extreme experiences,
- False expectations,
- No idea how to use/interpret the findings,
- Information misuse.
I’ll cover each of these issues in detail and then offer some potential solutions UX practitioners should advocate across all organizations.
Vulnerable Populations
Researchers studying human subjects have a higher bar to pass in justifying research with populations often labeled vulnerable. You can consider any population that cannot make their own decisions vulnerable (and likely off-limits) if you are not a highly trained and experienced researcher.
The Children’s Hospital of Philadelphia Institutional Review Board provides this definition of vulnerable populations: “those who are ill (dependent on clinician for care), ethnic or racial minorities, non-English speakers, children, the economically disadvantaged, adults with diminished capacity.”
Additionally, they offer the following “Special justification is required for inviting vulnerable individuals to serve as research subjects and, if they are selected, the means of protecting their rights and welfare must be strictly applied.” While this guidance is being directed towards potential medical studies, there is no reason UX research should hold itself to lower standards when it comes to working with potentially vulnerable populations (in English speaking countries).
You should not be recruiting children, those experiencing illness, the homeless, or prisoners without seeking guidance and having appropriate conditions met. I’ll explore this more in the solutions section.

Misleading Users
Researchers in psychological fields are familiar with the concept of deception. These researchers need to justify any attempt to deceive or distract research participants from the true purpose of the research or that they are participating in research that is potentially meant to examine. Think of the often referenced Milgram’s shock experiment in which participants were instructed to administer what they thought were real electric shocks to another human. The person receiving the shocks wasn’t, in real life, being shocked, however, this was unknown to the participants administering the shock until after they completed the experiment. Participants experienced visibly stress during the experiment, reflecting the likelihood the situation was causing them mental duress as well. Milgram felt the need to deceive research participants was essential to collecting valid data. He also didn’t clear his protocol with any ethical review board. Milgram’s experiment would hopefully encounter much more rigorous review, and be required to adopt projections for participants, had it occurred today.
While we are likely not attempting to have our users shock another human, or cause any obvious harm to another using our design, we do need to give some thought into how we are conducting our UX research. Critical questions we need to answer and be comfortable we are not being deceptive include:
- What role am I asking the user to play in this study and why?
- Am I able to adequately explain the purpose of the research in a way that justifies the need?
- What expectations am I creating in the participant through their participation in the research?
- What, if any, mental harm or stress could come from someone participating in this study?
- If there is the potential for harm or stress, how will I deal with this?
- How honest and open will I be with participants?
- Will I share the timeline for creating the product? If no, why?
- Will I share the company that is sponsoring the research? If no, why?
- Am I creating false expectations exposing design concepts or ideas that might never see the light of day?
- Have I accounted for diversity and how diverse populations might respond to the research?
- Is there a logical connection between the research participants and the topic of the research?
- Will I compensate participants upon completion of the study?
- How might this compensation influence both participation and responses during the research.
- How will I respond to a participants’ request to end the research? There is a correct answer to this one — you will stop immediately.
You need to answer these questions and feel comfortable you are taking due diligence in reducing/removing deception or misleading information in your research. I recommend answering these questions with your full product team and documenting the responses prior to undertaking your study.

Inadvertent Sensitive Topics/Extreme Experiences
Those engaged in research need to maintain an awareness that even seemingly benign topics can take a quick turn into sensitive areas, risking confrontation or emotional encounters during an interview. I could share dozens or perhaps hundreds of experiences where I walked into a conversation with a research participant who already had an axe to grind with the company I was researching on behalf of.
You need to be prepared for defusing these situations. It is impossible to define all the potential sensitive topics that exist, what’s more important is for a trained researcher to understand how to respond when a situation becomes intense. For example, you are researching on behalf of an electric power generation company and you speak with someone who states they just had their electricity shut off and they were glad to finally get ahold of someone they could ask to resolve an issue with their billing statements. How will you respond in a way that will make things better, not worse, knowing it is outside of your power to do anything about this participant’s electricity bill?
Other topics are naturally sensitive. For example, if you are conducting research for a digital voters education platform, you can expect people will come to your interview prepared to share their political beliefs. How will you respond?
You need to be prepared for how you will deal with emotional responses. This includes letting people have emotional outbursts and giving them time to recover. This includes you (the researcher) needing to reflect proper empathy. I’m not suggesting you need to expose yourself to situations you aren’t comfortable with, I’m stating the opposite — don’t conduct the research if you cannot handle situations involving human emotions and unpredictable responses.
We have an opportunity to involve our colleagues with less experienced research in observing us when we do conduct research that might broach sensitive topics. We can model response (or non-response) to emotional or provocative reactions from research participants. We can also role-play with our colleagues prior to engaging in research to practice how we might respond to unexpected reactions.
False Expectations
Research participants often have expectations about the purpose of the research, who will be conducting the research, and how their information might be used. We need to be prepared to address inaccurate expectations and redirect the conversation in a sensitive way that will still allow us to have a rapport with the participant and gain valuable insights. These scenarios are similar to inadvertent sensitive topics in that it is difficult to account for all of the potential scenarios you might encounter. One example of a scenario I’ve frequently encountered is a participant shows up expecting to discuss a specific experience they’ve recently had with my client, while I’m looking to cover a broader topic, such as their overall attitudes and behaviors towards products in an entire industry or set of services.
You might not be the one directly recruiting people for your study. Your ability to account for participant expectations prior to research is reduced if you don’t have direct access to recruiting the participants. You will need to provide the person/organization recruiting your participants’ detailed guidelines for who you are trying to reach, and the importance of getting a diverse, non-convenience sample. You need to provide them with a script that lays out the details of what participants will need to know prior to agreeing to engage in the study. I often draft emails explaining the purpose and details of a study for clients to use when communicating with potential research participants on my behalf.
You are likely to encounter bumps even when you set the expectations clearly to research participants or those recruiting on your behalf. I often find, no matter how clear I am in my recruiting instructions, people show up to one on one interviews expecting it will be a group interview. You can account for and reset expectations in the opening of your study’s protocol. I inform participants of the purpose of the study and give them a general outline of what we will review, along with the format. For example:
Today I’d like to spend the next 30 minutes speaking with you about your experience with XYZ digital product. I want to learn from you, so I’ll ask some specific questions about your experience and spend most of the time listening. I’d also like your feedback on some updated designs for XYZ digital product. After my initial questions, I’ll start sharing my screen and control of my mouse with you so you can show me how you’d use this design. Does that align with what you thought we’d be doing today? [address any concerns or comments]. Do you have any questions for me based on what I’ve shared so far? [address any concerns or questions]
No Idea How To Use The Findings/Misinterpreted Findings
UX practitioners engaged in research should understand the overall questions they are trying to answer (purpose of the research), how they will answer this (methods), the type or types of data the methods they will use will generate, and how to convert this data into findings and recommendations (analysis). This potential issue reflects the rule of conduct I noted above that UX Research should respect our stakeholders and colleagues, and the resources and trust they give to our work. We are wasting everyone’s time if we are simply asking questions because we can, or because we think the insights might be interesting. We respect our research participants and our colleagues when we create studies that are purposeful and focused.
You need to answer the following questions to ensure that you’re able to collect the correct data, and interpret your findings appropriately:
- What are the question(s) your study is trying to answer?
- If relevant, what hypotheses do you have about the answer to these questions?
- What specific questions will you ask on your interview, survey, usability test, etc?
- How does each of these questions tie back to answering the overall questions and hypotheses?
- What type(s) of data will your study generate?
- How will you analyze this data?
- How will your findings and recommendations be used?
As a researcher, I want research to flourish and grow in all organizations. However, I don’t want to see organizations conducting research without a purpose. We already fight survey fatigue, screen fatigue, and millions of other opportunities vying for our potential research participants’ time. If you cannot clearly state why you are conducting research, and how your organization will use the research, you should reconsider conducting the research.
Information Misuse
We are often in a position of asking research participants for their personal information. How will you use the information you collect from individuals? This includes what data you might collect through forms or on-screen fields if you are having users test a prototype of a design that includes collecting personal information. We are all familiar with End User License Agreements (EULA) that instruct us on our rights and the right of the company whose software we are using on how they will use any data we provide through our use of the software. Researchers should similarly make participants aware of any agreement they are entering into with providing you their data.
Are you having users enter potential sensitive information? For example, I’ve had users enter personal information into systems in order to generate accurate, real-life results for them to give feedback on. We made participants aware this would be a requirement for participating in the research, and gained their consent prior to scheduling the sessions. You shouldn’t present participants with a screen requesting their social security number with the expectation they will use their real information if you haven’t previously made them aware they should have an expectation of providing personal information.
We need to inform users prior to their participation on whether their information will be kept or destroyed. Researchers must consider how information will be kept and stored for future access. Academic researchers are required to submit a data storage plan when they submit a study proposal. This includes addressing how data will be stored and protected, who will have access to the data, the length of time the data will be stored, and what is the potential for others to gain access to this information.
We often ask our clients or team members to listen in or observe our research. You are obligated to make participants aware of the presence of observers. If you have a situation where there is an observer with an imbalance of power (for example a supervisor listening in on calls with their staff) you need to make your participants aware of this — including if the observation will take place post-participation through the sharing of a recording of the session. We need to avoid situations that might cause repercussions to our participants based on their responses or perceptions of their responses by others in power.
There is no one size fits all solution for data storage and access. It might seem logical to destroy data once a study is complete. However, what would you do if someone challenges your findings a year or two from now and you have no way to show your work? On the other hand, the longer you store data the more risk you take on. Who should have access to the data isn’t always clear, either. If a client or internal authority figure is requesting access to raw data, we lose our ability to accurately say how data will be used in the future. Researchers need a plan for how we will address these issues.
Potential Solutions And Ways To Avoid Ethical Issues
I’ve discussed six potential ethical pitfalls when it comes to conducting UX research. I’ve noted these pitfalls are more likely to occur if untrained researchers are designing and conducting studies. You might not be surprised that my solutions focus on proper training and governance of research activities.
I’ll cover the following potential solutions in this section:
- Participant experience focused protocols with informed consent script (immediate).
- Peer review of research protocols (immediate).
- Ethical research and sensitivity training (near term — as soon as reasonable).
- Data analysis training (near term — as soon as reasonable).
- Mentoring/Modeling (near term to midterm for formalized mentoring programs).
- IRB review (long-term/aspirational).
I’ve organized these solutions in terms of how soon you can begin to implement them from immediate to longer-term. Participant experience focused protocols and peer review require little or no cost and can be done immediately. Training-based solutions require some cost and need to be scheduled in advance, so I’ve listed them as shorter term to allow time, but still should be considered urgent. IRB review is something as a field we should promote and reward, but there are costs and time commitments that would alter plans, and therefore I consider this more aspiration for widespread adoption.
Participant Experience Focused Protocols With Informed Consent Script
When you engage in research, you need to create a protocol, documented procedures including the purpose of the research and questions you will ask, prior to engaging in research. Your protocol should reflect thoughtfulness and be thorough. The guidance I’ve received in the past is that your protocol should reflect enough detail that if you needed to call out sick for a day you are meant to collect data, another researcher would have the ability to successfully understand the study and administer the data collection.
You need to ask participants to provide informed consent at the beginning of the research. You need to inform participants they have the ability to withdraw participation at any time, and how their data will be used. If you intend to collect audio or video recording data from the session you need to gain permission to record. You also need to provide contact information for the participant in case they have a need to follow up post-participation.
The University of Michigan’s Office of Research Ethics & Compliance provides detailed guidelines for their researchers, which includes advice to write your consent targeting an 8th-grade reading level, and to have other people read through the consent to make sure it’s easy to understand.
The key to making informed consent worth anything is you, the researcher, understand it and what it obligates you to do and then you follow through on those obligations. You are telling the research participant they have the right to stop the research, you need to respect that should it happen. You are promising to safeguard their data. You are entrusted to use their data as you’ve told them and not for other means without seeking additional permission.
Peer Review Of Research Protocols
UX practitioners are a community of peers. We are obligated to support our peers and this includes offering to review protocols and research proposals for potential ethical pitfalls. You can formalize peer review as a part of your process if you have a large team of UX colleagues. Even better, have colleagues from other teams or departments review your protocols to flag potential issues.
Informally, we should be comfortable asking our fellow colleagues outside of our organization to review our protocols. We should consider peer review sessions or opportunities as part of our gatherings or conferences. We all stand to grow and improve when we share our perspectives and experiences. We also provide a good example of being vulnerable when we allow other researchers to review our work.
Ethical Training And Sensitivity Training
Anyone collecting data from human subjects needs to complete training that covers at least the potential ethics-related topics I’ve noted in this article. I don’t advocate any specific vendor for training. You can do your own research to find a quality organization providing training on social science research with human subjects. We should require researchers to take ethics-related training before engaging in research and then have continuous refresher courses.
Those who engage in ongoing research need continuous training and refreshers on how to deal with sensitive issues. Today’s benign issues are tomorrow’s sensitive issues as we grow as a society and in our understanding of appropriate research techniques. Additionally, you should understand the unique characteristics or cultures of the populations you are working with. This is critical to both avoid being insensitive, but to also understand the sample providing the data you are collecting. Sensitivity training should also touch on topics of unconscious bias and attempting to reduce bias through effective protocols for both data collection and analysis.

Data Analysis Training
UX researchers and team members potentially assisting in data analysis need training in effective data analysis. How can we expect people to make sense of the data collected if they don’t have an understanding of how to use the data? We need to require our research teams to continue to train formally and informally with each other. There is no substitute for experience when it comes to data analysis, which is why we should all participate in data analysis as frequently as possible, and with supervision from trained researchers whenever possible.
Mentoring/Modeling Good Research
I noted in the brief background section that we need to best prepare our team members for engaging in ethical research. Those of us with more experience conducting research have a responsibility for modeling good research practice to our less experienced colleagues. You can operationalize this in many ways, through formalized mentorship relationships, or through informally having colleagues observe sessions and participate in supervised protocol design and data analysis.
We should be willing to take on a role to educate others and serve as examples for others on conducting ethical research. Specific to two of the issues I’ve raised, this includes:
- Sensitive Topics
We have an opportunity to involve our colleagues with less experienced research in observing us when we do conduct research that might broach sensitive topics. We can model response (or non-response) to emotional or provocative reactions from research participants. We can also role-play with our colleagues prior to engaging in research to practice how we might respond to unexpected reactions. - Misinterpret Findings
We can involve our less experienced colleagues in the upfront discussion on what questions we are asking and why. We can show how we are tying the questions to our hypotheses in the beginning, and discuss what type of data we expect to collect and how we will analyze this data. We can involve our colleagues in sense-making sessions (some folks lovingly refer to these as data jam sessions) where we analyze our data and interpret our findings. This helps model how research goes from the messy stage of collected data to the more refined and presentable stage of findings and recommendations.
We have another powerful research method our colleagues can use to help ensure ethical high-quality research: observation. Having colleagues observe your process and take notes is valuable to both you and them. You can review their notes together and point out what you were thinking at specific times during a session and why you reacted the way you did. You can also use their observations as a lesson for yourself and reflect on your own performance.
IRB Review
Institutional Review Boards exist for a reason. We should use them. I saved this idea for last because I think it is the most difficult to realize. I acknowledge using an IRB would cost money and add time to the process of engaging in research. However, I’d argue that any research conducted under the authority of an IRB would align with what we could consider the gold standard for ethical research.
I wouldn’t realistically expect UX teams to incorporate IRB review as part of their process for running usability testing with six users for your online banking app. I would expect the use of an IRB for the following situations:
- You want to publish your research as academically valid.
- You intend to work with vulnerable populations, including children.
- You have aspects of mental or physical health to your research (e.g., you are testing a device that includes a heart rate monitor and you intend to ask participants to engage in a physical activity).

Putting It In Place
As we push to increase awareness and participation in research-related activities, we need to be mindful of potential ethical pitfalls in allowing inexperienced team members to collect and analyze data. I’m not the authority on ethics, and most likely neither are you. That’s why we need to take steps to safeguard our research from venturing into unethical territory. We stand to damage the reputation of UX and UX research if we move forward with conducting potentially unethical research.
I’ve presented six potential areas ethical issues might arise, as well as some potential solutions. Moving forward, you can start with the easiest and most accessible solution of running your protocols by other UX practitioners for review or requiring your UX team members to do this. Additionally, you should codify the language that needs to be included in your informed consent and ensure it covers the minimum requirements to make participants aware of their rights and how their data will be used and stored.
| Pitfall | Solutions | Comments |
|---|---|---|
| Vulnerable populations | Ethical training and sensitivity training,Peer Review of Research Protocols,Mentoring/Modeling, IRB review, Participant experience focused protocols with informed consent script | IRB is the ultimate authority on vulnerable populations and protocols for studies that might include vulnerable populations. Guidance is to avoid vulnerable populations without IRB approval/oversight |
| Misleading Users/Deception | Ethical training and sensitivity training, Peer Review of Research Protocols,Mentoring/Modeling, IRB review, Participant experience focused protocols with informed consent script | Solutions focus on avoiding misleading users through education, effective protocol, and review of protocol. IRB approval/oversight is recommended if you intend to intentionally mislead users as part of a study |
| Inadvertent sensitive topics/extreme experiences | Ethical training and sensitivity training, Peer Review of Research Protocols,Mentoring/Modeling, Participant experience focused protocols with informed consent script | Solutions focus on gaining education, experience and comfort in handling unexpected issues as they arise. Effective protocols include carefully worded questions and prompts for potential responses if they arise. |
| False expectations | Peer Review of Research Protocols,Mentoring/Modeling, Participant experience focused protocols with informed consent script | Solutions focus on clarifying the purpose of the research in the protocol and all communication, while gaining experience and comfort in handling participant concerns and expectations, and responding to unexpected situations as they arise |
| No idea how to use/interpret the findings | Data Analysis Training, Mentoring/Modeling | Training and experience are key for effective data interpretation. Effective protocols will tie questions back to hypotheses which will assist in data analysis. |
| Information misuse | Ethical training and sensitivity training, Peer Review of Research Protocols, Mentoring/Modeling, IRB | Protocols need to account for how data will be used and kept secure, peer review and IRB are outside sources we can use to screen our protocols for ethical data use and storage |
We should push our peers toward more formal efforts to review any protocols intended for use with vulnerable or protected populations. We should explore and demand a budget for training and refresher courses for both experienced and new UX practitioners. We should also explore a standard of requiring IRB approval for any research findings researchers share in a more public forum such as publishing in journal articles or presenting findings at conferences if these findings are intended to be generalizable and considered gathered under valid research conditions.


Subscribe to MarketingSolution.
Receive web development discounts & web design tutorials.
Now! Lets GROW Together!