
Think about a room stuffed with accountants, bookkeepers, and invoicing brokers billing your shoppers, gathering, processing, and immediately depositing their funds into your checking account. That’s what WPMU DEV’s Shopper Billing does.
Shopper Billing is an built-in resolution that’s straightforward to arrange, straightforward to make use of…and utterly free!
On this article, we’ll discover the total gamut of top-notch options and present you how you can arrange and automate your shopper billing by integrating your companies, pricing, and shoppers, along with your cost processor account.
“Simply now I enter all of my web sites and hooked it as much as shopper billing, to see my MRR proper there motivates me a lot I believe I’ll improve to the company plan and push exhausting with enterprise.” – Net Host Wizards (WPMU DEV Member)
Listed below are the matters we’ll cowl:
Characteristic-packed: Purchasers & Billing is Loaded
Configuring The Parts of Purchasers & Billing
Connecting Your Stripe Account
Preliminary Setup of Purchasers & Merchandise
Understanding Shopper Roles & Entry Permissions
Customizing Your Emails
Branding and Your Enterprise Profile
Creating and Customizing Invoices
Repairs and Administration of Purchasers & Billing in The Hub
Overview Abstract
Managing Purchasers
Managing Merchandise & Providers
Managing Invoices
Shopper Billing by WPMU DEV is the Keeper of All Issues Accounting
There’s lots to cowl, so let’s dive proper in.
Characteristic-packed: Purchasers & Billing is Loaded
We weren’t kidding after we got down to make an elevated expertise out of the client billing and cost course of.
Have a look at all of the options included in Shopper Billing:
Invoice Purchasers Quick – Create worthwhile subscription plans, and observe your recurring income.
Bill with a Click on – Professionally branded invoices, automated and able to ship in minutes.
Intelligent Shopper Administration – Consists of every part you’ll want to monitor shoppers, invoices, and subscriptions.
Worthwhile Plans & Subscriptions – Create tiered plans distinctive to your online business, and maximize income.
Personalised Shopper Portal – Branded, user-friendly entry for shoppers to remit funds securely.
Streamlined Funds – One-time or recurring funds, the latter of which auto-charge shoppers after the primary bill is permitted.
Per-Shopper Web site Billing – Hyperlink subscriptions and invoices to site-specific services or products.
The above options are all a part of The Hub, our all-in-one WordPress web site administration instrument.
In the event you’re a member, you’ve already acquired entry to this energy performer. And for those who’re not, enroll – it’s free – and The Hub & Shopper Billing are included.
Configuring The Parts in Purchasers & Billing
As a result of there’s a lot you are able to do within the Shopper Billing module, I wished to put out how we’ll undergo the touchpoints.
Join your Stripe account.
Preliminary setup of shoppers and merchandise.
Branding and your online business profile.
Create and customise invoices.
There’s lots of nice materials to unpack, so let’s have at it. 🙂
Connecting To Your Stripe Account
Shopper funds in The Hub are at the moment made by means of the Stripe cost platform. Further cost choices (comparable to PayPal) are on the desk for future inclusion, so keep tuned.
To start out accepting funds in Purchasers & Billing, you’ll want to attach your Stripe account, in order that’s our first order of enterprise. And don’t fear; for those who don’t but have a Stripe account, you may simply create one by means of the Hub’s integration wizard.
Login to your WPMU DEV account, then navigate to The Hub > Purchasers & Billing.
From the Getting Began wizard, click on the Join with Stripe button.
Enter the E mail and Password fields, utilizing these you need related along with your Stripe account, then click on the Log in button.
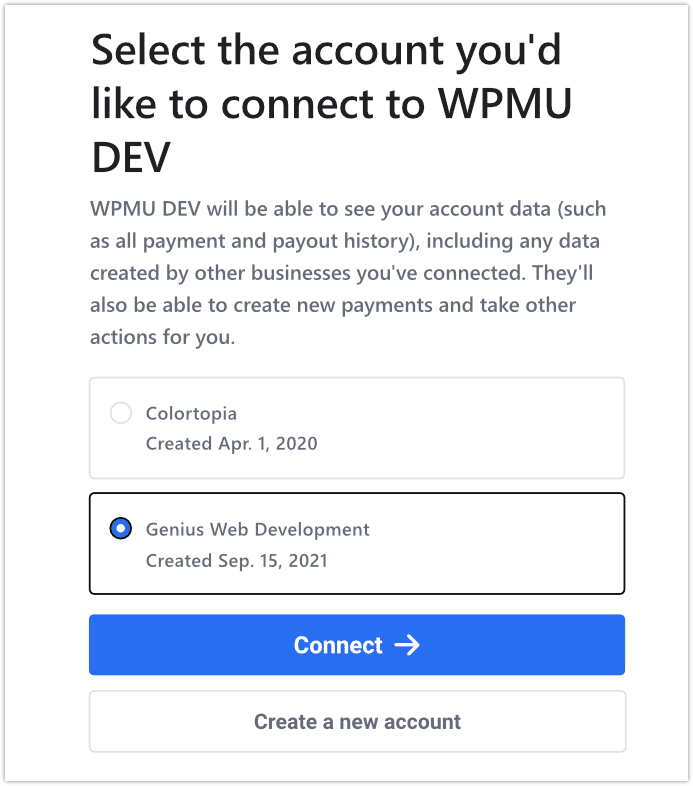
In the event you occur to have multiple Stripe account related to the e-mail tackle you’ve entered, they’ll be introduced right here.
Account choice in Stripe setup.
Choose the account you need from the listed choices, then click on the Join button.
Proceed with any extra steps within the setup wizard. (If you’ll want to begin over at any level, simply click on Return to WPMU DEV on the left facet of the display.)
Upon finishing the wizard, you’ll be directed again to the Getting Began display in your Hub, and prompted to pick the foreign money you need to use in your Shopper Billing portal.
Click on on the field denoting consciousness of foreign money not being changeable later, then you definitely’ll be capable of hit End Setup.
Your related Stripe account will mechanically import after you choose foreign money.
The purple dot is for a Shopper Billing popup tour, which you’ll select to skip.
In the event you don’t don’t have already got an account with Stripe, the Getting Began wizard will immediate you to create one. It’s a fast and easy course of, which places you proper again in The Hub upon completion.
Making a Stripe account by means of The Hub integration.
In the event you favor you may go on to Stripe’s web site, arrange your account there, then return to the wizard within the Hub and full the connection there.
Creating an account immediately on Stripe’s web site.
Word that you may solely join one platform to any Stripe account at anyone time. (This is because of Stripe’s insurance policies.)
Preliminary Setup of Purchasers & Merchandise
The entire instruments you’ll want to handle the Stripe account related to your Purchasers & Billing, comparable to your online business profile, your customized branding, the importing of merchandise and shoppers, and extra, are housed right here.
Let’s have a look at them now.
Managing Your Billing Account
From the Hub’s Purchasers & Billing web page, below Configuration > Billing Account, you’ll see the data related along with your Stripe account (identify, e-mail, and connection date).
Stripe account settings in The Hub’s Purchasers & Billing.
The Fee Preferences part beneath reveals the foreign money you chose, in addition to the enterprise identify that may seem in your shoppers’ financial institution or bank card statements.
If you wish to change the assertion descriptor, simply click on on the identify or arrow to the proper of this row, and edit as desired.
Stripe cost preferences and extra instruments.
Lastly you’ll see Further Instruments on the backside, which is the place you may import prospects or merchandise & companies out of your related Stripe account, if there are any related to it.
To import shoppers or merchandise & companies, click on on Import or the arrow to the proper of the row.
From the resultant popup, choose any shoppers you’d wish to import, by checking the field previous their e-mail tackle. (Or, click on the checkbox to the left of the e-mail tackle header to pick all of them.) Then click on the Import button on the backside, which can replicate the whole variety of shoppers you’ve chosen.
Shopper importing in Stripe.
The shoppers you imported can be listed below the Purchasers tab, the place you may handle all exercise related to your Hub enterprise. You can too Add New Purchasers from the Purchasers tab. (See Including Purchasers Manually for particulars.)
Lather, rinse, repeat for Importing merchandise.
Product importing in Stripe.
Pricing plans related to an imported product can be imported mechanically.
You can too create new pricing plans from the Merchandise & Providers tab. (See Including Merchandise Manually for particulars.)
Understanding Shopper Roles & Entry Permissions
There’s one other ingredient we should always have a look because it pertains to our shoppers: assigning roles.
It’s vital to outline and perceive what the aim of a shopper’s web site entry can be.
For some shoppers, you’ll need to enable entry to billing solely. For others, you could need to give entry to a few totally different sections, however not full run of the home.
And others nonetheless, you could need to enable them to view and edit every part.
Assigning roles provides you full management over what views and actions shoppers can have in your branded Hub. This has the next advantages:
Omits pointless distractions and litter; shoppers see solely what you want them to see.
Protects towards unintentional actions with probably dire penalties. (They will’t break what they’ll’t contact.) This provides you and your shopper nice peace-of-mind.
Permits shoppers to really feel related to their account info, and see the worth of what they’re getting by means of you.
For illustrative functions, we’ll goal three arbitrary sorts:
Common Shopper = wants entry to billing solely (to view & pay on-line)
Internet hosting Shopper = wants entry to billing and internet hosting
search engine optimisation Buyer = wants entry to billing and search engine optimisation for his or her web site
Instance #1 – Common Shopper
Common shoppers are those you’ll be doing the entire WordPress growth for. You’ll present studies, do web site edits, and run your complete present. The one factor these shoppers will want is entry to billing info.
Subsequently, you simply need them to have the ability to pay their invoices.
Purchasers & Billing within the Hub comes with three pre-established system roles, that are:
View All & Entry Billing: shopper can entry and handle their billing and think about web site knowledge.
Edit All & Entry Billing: shopper can view, edit, and take motion relating to something on their web site and handle their very own billing.
Entry Billing Solely: shopper can view and handle their very own billing.
These preset roles can’t be edited or altered; that’s the place customized roles come into play (which we’ll get into later).
Navigate to The Hub > Purchasers & Billing > Purchasers > Roles, and choose Entry Billing Solely.
Entry Billing Solely is one among three predefined roles.
Based mostly on the premise that our Common Shopper sort might want to Entry Billing Solely, we’re going to pick that as our default by clicking the Make default textual content in its row.
Now if you add new shoppers, it’s already established that that is their position. After all that is editable ought to we have to change it at any time.
Instance #2 – Internet hosting Shopper
This shopper plans on focusing a few of their enterprise on internet hosting along with billing. For this case, the shopper would wish entry to the next 4 areas:
Websites — to view the record of websites
Internet hosting — to view the internet hosting choices
Web site Billing – to view billing at web site degree
Entry Billing – to view the Billing tab and pay invoices from both the positioning billing or the worldwide billing tab
Begin by clicking on + Create New Position.
It’s only a few clicks away from creating a brand new position.
Give it a Identify (on this instance, we’ll name it ‘Internet hosting’) and choose what entry the shopper can have. We’ll allow the 4 areas as listed above.
An instance of a Internet hosting Shopper, and the roles you’d allow for them.
Customise even additional when clicking on every class dropdown. You possibly can choose View & Edit, View Solely, or Customized.
If you choose Customized, right here’s a have a look at all of the choices you might choose for the shopper to have entry to in customized position creation, pertaining to Internet hosting.
Choose any internet hosting choices you need.
Customise additional by clicking the dropdown in every particular class (Staging, Analytics, Logs, Emails, and many others), and deciding on any/the entire choices.
Right here’s what Staging appears like:
There are many choices for Staging.
Upon getting every part custom-made, click on Save – and that’s it! You now have a brand new, custom-made position you may assign to any shopper.
As you may see, Internet hosting is now a shopper position.
Instance #3 – search engine optimisation Buyer
This shopper desires to view search engine optimisation particulars, along with billing. We are able to take the identical strategy we simply took with our internet hosting shoppers: create a brand new position, identify it, and choose search engine optimisation as an choice out there to the shopper.
Particularly for this case, entry to the next 4 areas would must be enabled:
Websites — to view the record of websites
search engine optimisation — to view the search engine optimisation choices
Web site Billing – to view billing at web site degree
Entry Billing – to view the Billing tab and pay invoices from both the positioning billing or the worldwide billing tab
In our search engine optimisation shopper instance, we would choose the search engine optimisation choice (as an alternative of Internet hosting), together with the opposite 3 choices talked about above.
In the event you select to customise your search engine optimisation choices on your shopper, they’ll be capable of view search engine optimisation info, run new search engine optimisation Crawl, Apply config – mainly something you choose right here in permissions.
Select any choices you’d like.
Hit Save, and the brand new position is now out there.
After all, this was only a demo of three random shopper sorts. You possibly can arrange ANY shopper sort and customise it to suit your enterprise wants.
For extra info on organising Customers & Roles in The Hub, see The way to Merely Set Up Customers & Roles in The Hub for You and Your Purchasers.
Customizing Your Emails
Previous to inviting our shoppers to the portal, let’s customise the emails we’ll be sending.
In the event you’d like, you may configure an SMTP plugin that lets you allow your personal area tackle because the sender e-mail. That might lead to a from tackle like this: admin@yoursitename.com
Whereas your personal area because the from tackle is essentially the most skilled, it isn’t required. With none modifications, your from addresses can be one thing like these:
Despatched from a web site with out our internet hosting: wordpress@yoursitename.com
Ship from a web site with our internet hosting: noreply@yourwpsite.e-mail
You need to use any SMTP plugin of your alternative; we advocate our (free!) Branda plugin, which handles this job with ease, and comes absolutely loaded with extra white-labeling options. Try this how-to information on activating SMTP mode in Branda, and this useful walk-through on SMTP setup by means of Gmail.
There are a variety of various emails which are despatched from The Hub Shopper to you and to your shoppers, relying on varied triggers.
Emails that come to you can be branded with WPMU DEV, whereas emails that go to your shoppers can be branded with the brand & colours arrange in your Enterprise Profile.
Branding and footer settings on your Hub emails.
Two extra informational items could be included or excluded out of your e-mail notifications:
Enterprise Branding – toggle on your brand & model shade (from Enterprise Profile).
Emails Footer Word – add a customized message on the backside of all emails.
Right here is an instance of an e-mail your shoppers may get:
A pattern e-mail shoppers may get for a cost processing subject.
After all any of the placeholder textual content in double brackets can be auto populated by the related knowledge in your hub earlier than it’s despatched to you or your shopper.
Alright, roles have been thought of and created accordingly, emails have been formatted… let’s put the ending touches on our enterprise profile.
Branding and Your Enterprise Profile
Escape the logos and shade codes! We’re going to make these billing supplies our personal.
From the Configure display, click on on the Enterprise Profile tab.
Within the Branding part, you’ll determine on the branding that may seem in your online business invoices, emails, and billing receipts. It takes only some seconds and minimal clicks.
Click on on the proper facet of the Model Emblem row to add your visible id; likewise on Model Colour, to pick your shade match through shade selector field or hex code.
Branding your online business paperwork.
The emblem you choose can even seem within the high proper nook of your shoppers’ profile menu after they log into your Hub through WPMU DEV.
Now we’ll add our enterprise coordinates within the Enterprise Data part – which can seem in any shopper paperwork you produce.
Merely click on on Add or the arrow to the proper of any row, and also you’ll be capable of enter each out there discipline. (This data can have been imported if it was arrange in your Stripe account, however is all the time absolutely editable.)
Including your online business info for inclusion on shopper docs.
In the event you created customized fields on your Enterprise Profile, they’ll seem beneath the principle Enterprise Data, below Further Data.
Customized fields enable for added info you deem pertinent.
So as to add or edit customized fields, click on on the Customized Fields tab, and enter as many extra gadgets as you’d like in Enterprise, and/or Shopper Profiles.
Including Customized Fields is so simple as click on, sort/choose, save.
Creating and Customizing Invoices
Now that we’ve acquired our documentation branding in place, let’s create an bill that makes use of it.
That is what you’ll ship to your precise shoppers, and there’s lots you may personalize.
Below Configurations, click on on Customise Invoices. Click on on any of the arrows or toggle buttons from the right-side menu column.
You’ll be capable of choose your numbering format, add a footer observe, select default language, add a brand, model shade, enterprise identify, and shopper info, in addition to any customized fields you might have added.
While you’ve acquired the content material the way in which you need it, click on on the Preview Pattern button for a fast look-see, and it’ll open in PDF format.
A pattern buyer bill simply produced in Purchasers & Billing.
With an Bill template created, let’s make one for a particular shopper.
Click on on the + Invoice Shopper button on the high of the web page.
Billing a shopper in The Hub’s Purchasers & Billing part.
From the modal popup, take the next actions:
Choose the Shopper from the dropdown.
Choose the Web site from the dropdown (optionally available).
Choose a Product/Plan from the dropdown, and alter the amount if desired.
Creating an bill, steps 1-3.
Add one other Product/Plan if desired; repeat this step as wanted.
Add a Tax if desired, and repeat this step as wanted.
Click on the blue Proceed button.
Creating an bill, steps 4-6.
It will open the bill that you simply’ve created to date. You possibly can test and see if the content material is as you’d prefer it to be, and add a observe if desired.
At this level, you may Preview the bill, Save as Draft, or Ship Bill.
Confirming an bill previous to sending.
Click on Ship Bill, and we’ll ship a white-labeled e-mail to the shopper you chose. From the Invoices tab, you’ll be capable of see it listed now, with standing Fee Due.
The record abstract of shoppers billed in Invoices.
Right here is the e-mail your shopper will see:
Shopper e-mail for a billed bill.
The shopper can merely click on on the Pay Bill hyperlink within the e-mail, and it’ll take them to your branded hub, the place they’ll rapidly & simply remit cost to you.
That’s a wrap on the preliminary arrange and configurations in Purchasers & Billing. Now we’ll transfer on to…
Repairs and Administration of Purchasers and Billing in The Hub
We’ve accomplished the entire preliminary steps in Purchasers & Billing! Now you may rapidly and simply invoice shoppers, acquire funds, and handle your prospects, all from one handy space.
After all you’ll need to regularly handle this content material – from shopper contact data modifications, to invoicing and cost standing modifications, and your personal enterprise particulars as nicely.
We’ll have a look at what’s concerned within the continued administration of those options, so we are able to hold all of our info present.
Overview Abstract
The Overview part in Purchasers & Billing lets you see a collective abstract of key knowledge and settings in your portal.
One of many coolest issues about Shopper Billing within the Hub, in my view, is the flexibility to get to every part you need nearly immediately.
The Overview part provides you an at-a-glance, sectioned view of an important particulars, in addition to a path to entry these components on the spot. Income, merchandise & companies, shoppers, account configs, billing actions – it’s all right here.
It is a intelligent comfort that makes it a stand-out.
The Purchasers & Billing Overview display is an in depth dynamo.
Let’s take a better have a look at the displayed sections within the Overview.
Income
Month-to-month Recurring Income (MRR) – the mixed whole month-to-month income from all energetic subscriptions, no matter billing durations
Energetic Subscriptions – the whole variety of energetic subscriptions from all shoppers
Web Billing – the mixed whole quantity billed for all subscriptions and different merchandise (excluding refunds)
Purchasers
This module shows three gadgets:
Whole Purchasers – the whole of all energetic, inactive, & pending shoppers
Common Billing per Shopper – Web Billing divided by whole variety of shoppers
Purchasers with Energetic Subscriptions– the whole variety of shoppers with energetic subs
The entire abstract totals above don’t embrace any taxes.
To see the total record of Purchasers in your billing portal, click on View All.
Merchandise & Providers
This module shows three gadgets:
Whole Merchandise/Providers – the whole variety of merchandise & companies mixed, together with these with no pricing plans connected
One Time Plans – the whole variety of energetic one-time pricing plans
Recurring Plans – the whole variety of energetic recurring pricing plans
To see the Merchandise & Providers part in your billing portal, click on View All.
Configurations
This module shows the identify of the Stripe account you’ve related to your Purchasers & Billing portal, and its standing. A inexperienced test mark verifies that the account is energetic.
Click on any of the configuration line gadgets to see/edit the related info.
Managing Stripe Configurations from the Purchasers & Billing Overview.
Managing Purchasers
As mentioned prior, shoppers should affirm your invitation to have the ability to entry their billing portal in your Hub.
There are three alternative ways you may ship shoppers an invite: 1) if you’re initially including them; 2) from the dropdown menu in the principle shopper display; or 3) of their particular person shopper overview display. In all instances, simply click on Invite/Invite Shopper.
Considered one of 3 ways to ask a shopper to your branded portal – from the shopper abstract record.
It will generate a white-labeled invitation e-mail to that shopper, which can appear like this:
A branded shopper invite to hitch your portal, despatched in a proper however pleasant e-mail.
The Purchasers tab will populate with abstract data about every shopper, after you have added a number of to The Hub.
Right here is the knowledge you will note within the Shopper overview part in The Hub:
Shopper Data – the shopper’s identify, e-mail, and Gravatar (if out there)
Account Standing – standing of shopper e-mail invite acceptance (Energetic/Pending), or if invite e-mail has not been despatched (Inactive)
Websites – the whole variety of websites managed by this shopper
MRR (Month-to-month Recurring Income) – this shopper’s common month-to-month income for all subscriptions (excluding taxes)
Web Billing – the whole quantity this shopper has been billed up to now, together with taxes
A abstract record of your shoppers, with billing particulars related to every.
You possibly can entry shopper administration choices by clicking on the ellipsis icon to the proper of any shopper row.
If you choose Handle Shopper from this dropdown menu, you’ll go to the Overview display for that shopper. From right here you may view and handle all features of the shopper’s account and subscriptions.
Particular person shopper overview.
Managing Merchandise & Providers
Now we’ll look extra carefully on the Merchandise & Providers part.
That is the place you’ll handle all of the merchandise & companies that you simply provide to your shoppers inside the Hub.
In the event you hadn’t but imported merchandise within the Configure module, you’d be prompted so as to add your first one – both manually, or as an import from Stripe.
We already did that, however I’ll present you how you can manually add a product right here.
Click on the + New Product/Service button, and enter the shape fields data within the popup.
Below Pricing Plans, you’ll need to create no less than one plan to affiliate with the product.
Making a services or products, major modal.
There are two billing sorts: Recurring and One Time.
Invoice Each and No. of Billing Cycles solely seem for those who’ve chosen Recurring as the sort.
Invoice Each is the time period that repeated billing will happen; choices are: Day, Week, Month, and Yr.
No of Billing Cycles is what number of occasions a shopper can be billed for a recurring plan earlier than their subscription expires. (Go away this discipline clean if you need the plan to auto-renew till it’s canceled).
One time billing companies are used for making a single occasion of a service rendered, comparable to a arrange price, or a web site creation.
After you’ve added your first plan, click on + Add One other Plan for every extra one you’d wish to create. You may make as many as you need.
You possibly can add as many pricing plans as you’d like below every service.
As soon as no less than one product has been created, you’ll see it on the Merchandise & Providers display, together with its standing and the variety of pricing plans related to it.
Within the beneath instance, we created a single product – Assist Solely – with 2 recurring pricing plans – Yearly and Month-to-month.
Click on Present Plans to view or edit Providers nested below Merchandise within the abstract record view.
Accessing menus is a click on away within the Product abstract.
To handle choices for any product, click on the ellipsis icon and choose any choice from the dropdown menu: View/Edit, Add a Pricing Plan, Duplicate plan, or Archive Product.
Modifying a Product or Service couldn’t be simpler.
As earlier than, you may handle choices for any pricing plan by clicking the ellipsis icon and deciding on the specified motion from the dropdown menu.
The Plans abstract presents barely totally different menu choices.
The Archive choice will deactivate a product or plan, making it unavailable for choice when billing a shopper. It received’t have an effect on any current shopper subscriptions.
When enhancing a product or plan, solely the identify & picture of a product/plan could be modified. (It is a limitation of the Stripe API, so we’re unable to change it.)
There’s a simple workaround although. If you wish to make a change to non-editable settings in an current plan, simply make a replica, then edit the specified fields of the duplicate earlier than saving it. Afterward, you may archive the unique.
A observe about deletions: You can’t delete a pricing plan from the Hub. That motion should be finished immediately by means of your Stripe account, with the caveat that the plan hasn’t been utilized in a transaction. If it has, then archiving is your sole choice.
Subscriptions
Due to the fluid method of subscriptions, retaining observe of them is a necessity. Fortunately, managing subscriptions is a bit of cake in Purchasers & Billing.
Subscriptions are viewable by shopper. To see them, click on on any shopper, then from the highest menu sections – Overview, Merchandise & Providers, Invoices – click on on Merchandise & Providers.
This web page will show three Subscription Varieties, damaged out into tabbed subsections, as follows:
Present Subscriptions
One Time
Inactive Subscriptions
Subscription abstract in Merchandise & Providers.
Present Subscriptions
That is the place you’ll see any present subscriptions for this shopper. The standing column will present as Energetic or Pending.
One Time
Typically the necessity to invoice a shopper for a one time service will come up once more. Say, for instance, you do one other web site arrange, and have to bill them for it once more.
When this occurs, you don’t have to recreate your complete services or products. Simply click on Invoice Once more from the ellipsis dropdown menu on the specified line merchandise. It will mechanically invoice the shopper once more for a similar one-time product.
Inactive Subscriptions are any subscriptions that have been at one time energetic, however aren’t any extra. The standing column will present as Canceled or Expired.
Hover your mouse over the row quantity beneath the Merchandise column for a popup itemizing of all merchandise contained in that subscription.
You possibly can simply reactivate any subscription for a shopper.
Reactive subscriptions in a snap.
Click on the ellipsis on the finish of the specified row, and choose Reactivate Subscription from the dropdown menu. While you reactivate a subscription, it’s going to ship a brand new bill to the shopper and create a brand new subscription, which turns into energetic upon the shopper paying that bill.
Managing Invoices
The extra your online business grows, the extra invoices you can be sending out, and the extra they’ll accumulate for document retaining.
Whereas this might create a cluttered mess of paperwork and file folders, it’s rigorously and neatly organized in The Hub’s Shopper Billing.
Every thing is discovered within the Invoices tab of every shopper, and the content material included is straight ahead.
For a fast evaluation, a pink notifier icon on the Invoices tab header signifies the variety of at the moment unpaid invoices for that shopper.
On the principle Invoices web page, you’ll see a abstract record of the entire invoices for this shopper.
Click on anyplace on a row to view the precise bill, or, click on on the ellipsis icon at rows’ finish to indicate the dropdown menu for different actions. Relying on the standing of a given bill, the choices out there will range.
Bill record abstract.
In the event you’d wish to learn extra about Purchasers & Billing in The Hub, see these articles on Price Free Shopper Billing, and Getting The Most Out of Shopper Billing.
Shopper Billing by WPMU DEV is the customized labeled, cost making, subscription managing, e-mail automating, keeper of all issues within the accounting realm of your online business.
Okay, it received’t file your taxes, however it does enable for together with them on a shopper bill.
From branding, to invoicing, to automated emails, and in-app, trusted cost strategies, the options you may provide your shoppers (and your self) in Purchasers & Billing are exhausting to match.
Providing each in-depth and at-a-glance views, you get to current visually custom-made components to your shoppers, and keep them by means of your skilled companies (whereas we deal with every part behind-the-scenes).
All that and extra is constructed into the Hub’s Purchasers & Billing expertise. And it’s included at no further value in your WPMU DEV membership, together with our 5-star, skilled assist.
Embody our fast-growing, highly-rated internet hosting, or go for the membership solely – both manner, you’d be exhausting pressed to discover a higher worth. (Plus, full refunds are given for those who’re not thrilled.)
Set your websites on essentially the most pleasing billing expertise you’ve doubtless ever had!


Subscribe to MarketingSolution.
Receive web development discounts & web design tutorials.
Now! Lets GROW Together!