
Logging, by itself, is a key facet of any utility. Logging helps builders comprehend what it’s that their code is doing. It additionally helps save builders hours of debugging work. This tutorial is about implementing logging in a Node.js utility utilizing Pino-logger.
With logging, you possibly can retailer each little bit of details about the move of the appliance. With Pino as a dependency for a Node.js utility, it turns into easy to implement logging, and even storing these logs in a separate log file. And its 7.8K stars on GitHub are a testomony to that.
On this information:
You’ll examine how one can configure logging companies with completely different logging ranges.You’ll learn to prettify the logs in your terminal in addition to whether or not or to not embody the JSON response in your logs.You will notice how one can save these logs in a separate log file.
If you’re performed, you’ll be capable of implement logging with coding-best practices in your Node.js utility utilizing Pino-logger.
Stipulations
Earlier than following this tutorial ensure you have:
Familiarity with utilizing Categorical for a server.Familiarity with organising a REST API with none authentication.An understanding of command-line instruments or built-in terminals in code editors.
Downloading and putting in a instrument like Postman is beneficial for testing API endpoints.
Step 1: Establishing the undertaking
On this step, you arrange a primary Node.js CRUD utility utilizing Categorical and Mongoose. You do that as a result of it’s higher to implement logging performance in a codebase that mimics a real-world utility.
Since this text is about implementing the logger, you possibly can comply with “How To Carry out CRUD Operations with Mongoose and MongoDB Atlas” to create your primary CRUD utility in Node.js.
After finishing that tutorial, try to be prepared with a Node.js utility that features create, learn, replace, and delete routes.
Additionally, at this level. You may obtain nodemon so that every time you save modifications in your codebase, the server routinely restarts and also you don’t should manually begin it once more with node server.js.
So, write this command in your terminal:
npm set up -g –force nodemon
The -g flag depicts that the dependency is put in globally and, to carry out one thing globally, you might be including the –force flag within the command.
Step 2: Putting in Pino
On this step, you put in the most recent variations of dependencies required for the logging. These embody Pino, Categorical-Pino-logger, and Pino-pretty. You want the next command in your command-line instrument from the undertaking’s root listing.
npm set up pino@6.11.3 express-pino-logger@6.0.0 pino-pretty@5.0.2
At this level, you might be able to create a logger service with Pino.
Step 3: Creating the logger service
On this step, you create a Pino-logger service with completely different ranges of logs, like warning, error, information, and many others.
After that, you configure this logger-service in your app utilizing Node.js middleware. Begin by creating a brand new companies listing within the root folder:
mkdir companies
Within this new listing, create a brand new loggerService.js file and add the next code:
const pino = require(‘pino’)
module.exports = pino({})
This code defines probably the most primary logger service you could create utilizing Pino-logger. The exported pino perform takes two optionally available arguments, choices, and vacation spot, and returns a logger occasion.
Nonetheless, you aren’t passing any choices at the moment as a result of you’ll configure this logger service within the later steps. However, this will create a bit downside with this logger-service: the JSON log that you will note in a minute shouldn’t be readable. So, to alter it into the readable format, you point out the prettyPrint choice within the exported pino perform and, after that, your loggerService.js file ought to look one thing like this:
const pino = require(‘pino’)
module.exports = pino(
{
prettyPrint: true,
},
)
Configuring your loggerService is roofed in later steps.
The following step to finish this logger service is so as to add the next traces of code in your server.js file within the root listing:
const expressPinoLogger = require(‘express-pino-logger’);
const logger = require(‘./companies/loggerService’);
On this code, you might be importing the logger service that you simply simply made in addition to the express-pino-logger npm package deal that you simply put in earlier.
The final step is to configure the express-pino-logger with the logger service that you simply made. Add this piece of code after const app = specific(); in the identical file:
// …
const loggerMidlleware = expressPinoLogger({
logger: logger,
autoLogging: true,
});
app.use(loggerMidlleware);
// …
This code establishes a loggerMiddleware creation utilizing the expressPinoLogger. The primary choice handed within the perform is the logger itself that depicts the loggerService that you simply created earlier. The second choice is autoLogging that may take both true or false as worth. It specifies whether or not you need the JSON response in your logs or not. That’s developing.
Now, lastly, to check the loggerService, revisit your foodRoutes.js file. Import the loggerService with this code on the high:
const logger = require(‘../companies/loggerService’)
Then, within the GET route controller technique that you simply created earlier, put this line of code at first of the callback perform:
// …
app.get(“/meals”, async (request, response) => {
logger.information(‘GET route is accessed’)
// …
});
// …
The data technique is likely one of the default ranges that comes with Pino-logger. Different strategies are: deadly, error, warn, debug, hint or silent.
You should utilize any of those by passing a message string because the argument in it.
Now, earlier than testing the logging service, right here the whole code for the server.js file up so far:
const specific = require(“specific”);
const expressPinoLogger = require(‘express-pino-logger’);
const logger = require(‘./companies/loggerService’);
const mongoose = require(“mongoose”);
const foodRouter = require(“./routes/foodRoutes.js”);
const app = specific();
// …
const loggerMidleware = expressPinoLogger({
logger: logger,
autoLogging: true,
});
app.use(loggerMidleware);
// …
app.use(specific.json());
mongoose.join(
“mongodb+srv://madmin:<password>@clustername.mongodb.internet/<dbname>?retryWrites=true&w=majority”,
{
useNewUrlParser: true,
useFindAndModify: false,
useUnifiedTopology: true
}
);
app.use(foodRouter);
app.pay attention(3000, () => {
console.log(“Server is working…”);
});
Additionally, don’t neglect to restart your server:
nodemon server.js
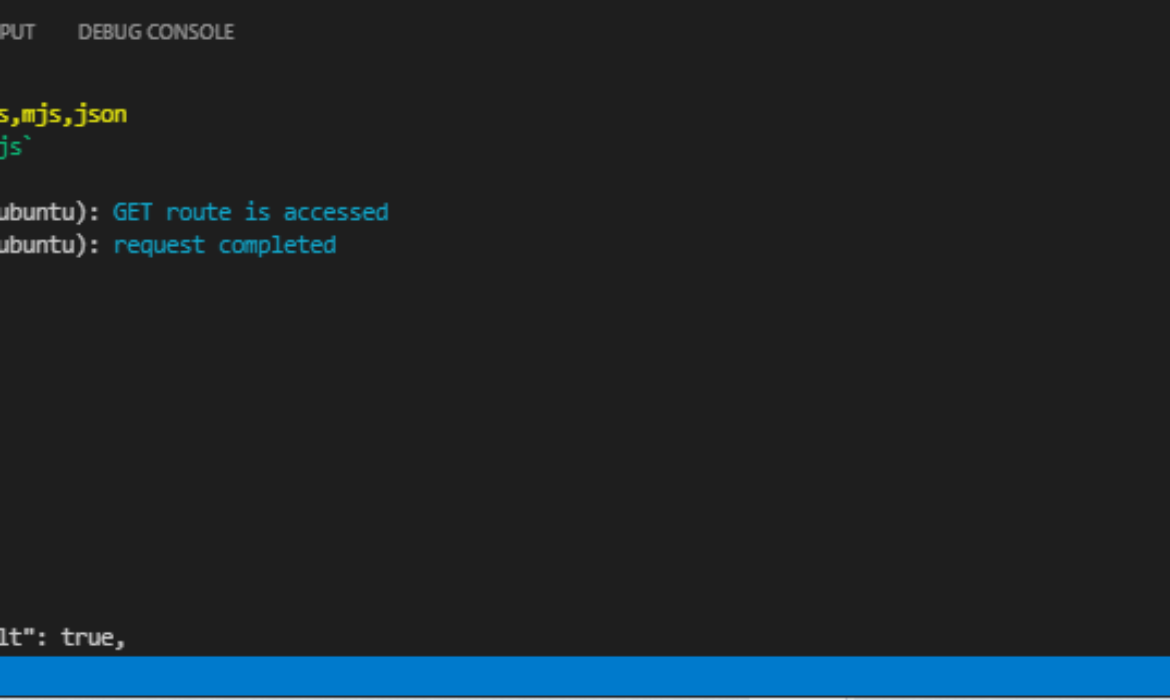
Now, you possibly can see the log in your terminal. Take a look at this API route endpoint in Postman, or one thing like that to see it. After testing the API, you need to see one thing like this in your terminal:
This gives a number of info:
The primary piece of the data is the log’s timestamp, which is displayed within the default format, however we are able to change it into one thing extra readable in later steps.Subsequent is the data which is likely one of the default ranges that comes with Pino-logger.Subsequent is a bit message saying that the request has been accomplished.Finally, you possibly can see the entire JSON response for that specific request within the very subsequent line.
Step 4: Configuring the logs
On this step, you learn to configure the Logger service and how one can prettify the logs in your terminal utilizing pino-pretty together with built-in choices from the pino package deal you put in earlier.
Customized ranges
At this level, you already know that the pino-logger comes with default ranges of Logging that you need to use as strategies to show Logs.
You used logger.information within the earlier step.
However, pino-logger provides you the choice to make use of customized ranges. Begin by revisiting the loggerService.js file in your companies listing. Add the next traces of code after you’ve got imported the pino package deal on the high:
// …
const ranges = {
http: 10,
debug: 20,
information: 30,
warn: 40,
error: 50,
deadly: 60,
};
// …
This code is a plain JavaScript object defining extra logging ranges. The keys of this object correspond to the namespace of the log stage, and the values needs to be the numerical worth of that stage.
Now, to make use of this, you need to specify all that within the exported Pino perform that you simply outlined earlier. Do not forget that the primary argument it takes is an object with some built-in choices.
Rewrite that perform like this:
module.exports = pino({
prettyPrint: true,
customLevels: ranges, // our outlined ranges
useOnlyCustomLevels: true,
stage: ‘http’,
})
Within the above code:
The primary choice, customLevels: ranges, specifies that our customized log ranges needs to be used as extra log strategies.The second choice, useOnlyCustomLevels: true, specifies that you simply solely wish to use your customLevels and omit Pino’s ranges.
/clarification To specify second choice, useOnlyCustomLevels, Logger’s default stage should be modified to a price in customLevels. That’s the reason you specified the third choice.
Now, you possibly can once more take a look at your loggerService and take a look at utilizing it with certainly one of your customLevels. Attempt it with one thing like this in your foodRoutes.js file:
// …
app.get”/meals”, async (request, response) => {
logger.http(‘GET route is accessed’)
});
// …
/clarification Don’t neglect to make the autoLogging: false in your server.js file as a result of there isn’t any precise want for the irrelevant JSON response that comes with it.
const pino = require(‘pino’)
const ranges = {
http: 10,
debug: 20,
information: 30,
warn: 40,
error: 50,
deadly: 60,
};
module.exports = pino(
{
prettyPrint: true,
customLevels: ranges, // our outlined ranges
useOnlyCustomLevels: true,
stage: ‘http’,
},
)
You must get one thing like this in your terminal:
And, all of the pointless info needs to be gone.
Fairly printing the Logs
Now you possibly can transfer forward and prettify the logs. In different phrases, you might be including some fashion to the terminal output that makes it simpler (or “prettier”) to learn.
Begin by passing an alternative choice within the exported pino perform. Your pino perform ought to look one thing like this as soon as that choice is added:
module.exports = pino({
customLevels: ranges, // our outlined ranges
useOnlyCustomLevels: true,
stage: ‘http’,
prettyPrint: {
colorize: true, // colorizes the log
levelFirst: true,
translateTime: ‘yyyy-dd-mm, h:MM:ss TT’,
},
})
You could have added an alternative choice, prettyPrint, which is a JavaScript object that allows pretty-printing. Now, inside this object, there are different properties as nicely:
colorize: This provides colours to the terminal logs. Completely different ranges of logs are assigned completely different colours.levelFirst: This shows the log stage title earlier than the logged date and time.translateTime: This interprets the timestamp right into a human-readable date and time format.
Now, strive the API endpoint once more, however earlier than that, make sure that to place a couple of logging assertion to try several types of logs in your terminal.
// …
app.get(“/meals”, async (request, response) => {
logger.information(‘GET route is accessed’)
logger.debug(‘GET route is accessed’)
logger.warn(‘GET route is accessed’)
logger.deadly(‘GET route is accessed’)
// …
You must see one thing like this in your terminal:
At this level, you’ve got configured your logger service sufficient for use in a production-grade utility.
Step 5: Storing logs in a file
On this final step, you learn to retailer these logs in a separate log file. Storing logs in a separate file is fairly straightforward. All you need to do is make use of the vacation spot choice in your exported pino-function.
You can begin by modifying the pino-function by passing the vacation spot choice to it like this:
module.exports = pino(
{
customLevels: ranges, // the outlined ranges
useOnlyCustomLevels: true,
stage: ‘http’,
prettyPrint: {
colorize: true, // colorizes the log
levelFirst: true,
translateTime: ‘yyyy-dd-mm, h:MM:ss TT’,
},
},
pino.vacation spot(`${__dirname}/logger.log`)
)
pino.vacation spot takes the trail for the log file because the argument. The __dirname variable factors to the present listing, which is the companies listing for this file.
/clarification You added the logger.log file in your path although it doesn’t exist but. That’s as a result of the file is created routinely when saving this file. If, for some cause, it doesn’t create the file, you possibly can create one manually and add it to the folder.
Right here is the whole loggerService.js file:
const pino = require(‘pino’)
const ranges = {
http: 10,
debug: 20,
information: 30,
warn: 40,
error: 50,
deadly: 60,
};
module.exports = pino(
{
customLevels: ranges, // our outlined ranges
useOnlyCustomLevels: true,
stage: ‘http’,
prettyPrint: {
colorize: true, // colorizes the log
levelFirst: true,
translateTime: ‘yyyy-dd-mm, h:MM:ss TT’,
},
},
pino.vacation spot(`${__dirname}/logger.log`)
)
Take a look at your API once more, and you need to see your logs in your log file as a substitute of your terminal.
Conclusion
On this article, you realized how one can create a logging service that you need to use in production-grade purposes. You realized how one can configure logs and how one can retailer these logs in a separate file to your future reference.
You may nonetheless experiment with varied configuring choices by studying the official Pino-logger documentation.
Listed here are a couple of greatest practices you possibly can be mindful when creating a brand new logging service:
Context: A log ought to all the time have some context concerning the information, the appliance, the time, and many others.Goal: Every log ought to have a particular function. For instance, if the given log is used for debugging, then you can also make certain to delete it earlier than making a commit.Format: The format for all of the logs ought to all the time be straightforward to learn.
The put up The right way to Implement Logging in a Node.js Utility With Pino-logger appeared first on CSS-Tips. You may help CSS-Tips by being an MVP Supporter.


Subscribe to MarketingSolution.
Receive web development discounts & web design tutorials.
Now! Lets GROW Together!