
Many enterprise web sites want a multilingual setup. As with something development-related, implementing one in a simple, environment friendly, and maintainable approach is fascinating. Designing and growing to be prepared for a number of languages, whether or not it occurs proper at launch or is anticipated to occur at any level sooner or later, is sensible.
Altering the language and content material is the simple half. However if you try this, typically the language you’re altering to has a distinct course. For instance, textual content (and thus format) in English flows left-to-right whereas textual content (and thus format) in Arabic goes right-to-left.
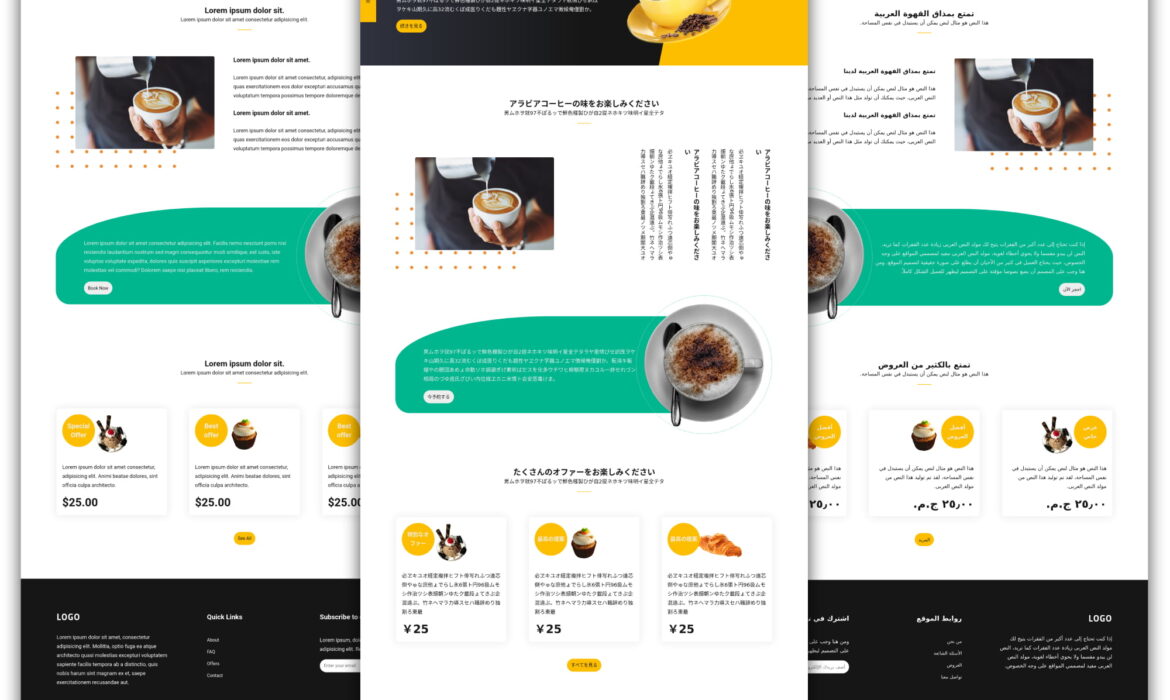
On this article, I need to construct a multilingual touchdown web page and share some CSS strategies that make this course of simpler. Hopefully the subsequent time you’ll have to do the identical factor, you’ll have some implementation strategies to attract from.
We’ll cowl six main factors. I consider that the primary 5 are easy. The sixth consists of a number of choices that you must take into consideration first.
1. Begin with the HTML markup
The lang and dir attributes will outline the web page’s language and course.
<!– English, left-to-right –>
<html lang=”en” dir=”ltr”>
<!– Arabic, right-to-left –>
<html lang=”ar” dir=”rtl”>
Then we are able to use these attributes in selectors to do the the styling. lang and dir attributes are on the HTML tag or a selected ingredient wherein the language varies from the remainder of the web page. These attributes assist enhance the web site’s search engine optimization by displaying the web site in the precise language for customers who seek for it in case that every language has a separate HTML doc.
Additionally, we have to make sure that the charset meta tag is included and its worth is UTF-8 because it’s the one legitimate encoding for HTML paperwork which additionally helps all languages.
<meta charset=”utf-8″>
I’ve ready a touchdown web page in three completely different languages for demonstration functions. It consists of the HTML, CSS, and JavaScript we’d like.
2. CSS Customized Properties are your buddy
Altering the course might result in inverting some properties. So, when you used the CSS property left in a left-to-right format, you most likely want proper within the right-to-left format, and so forth. And altering the language might result in altering font households, font sizes, and many others.
These a number of adjustments might trigger unclean and tough to keep up code. As a substitute, we are able to assign the worth to a customized property, then change the worth when wanted. That is additionally nice for responsiveness and different issues that may want a toggle, like darkish mode. We will change the font-size, margin, padding, colours, and many others., within the blink of a watch, the place the values then cascade to wherever wanted.
Listed here are a few of the CSS customized properties that we’re utilizing on this instance:
html {
/* colours */
–dark-color: #161616;
–light-color: #eee;
–primary-text-color: var(–dark-color);
–primary-bg-color: #fff;
–shadow-color: var(–light-color);
–hero-bg-gradient: linear-gradient(90deg, #30333f, #161616, #161616);
/* font sizes */
–logo-font-size: 2rem;
–lang-switcher-font-size: 1.02em;
–offers-item-after-font-size: 1.5rem;
/* margin and padding */
–btn-padding: 7px;
–sec-padding-block: 120px;
/* peak and width */
–hero-height: 500px;
–cta-img-width: 45.75%;
}
Whereas styling our web page, we might add/change a few of these customized properties, and that’s completely pure. Though this text is about multi-directional web sites, right here’s a fast instance that exhibits how we are able to re-assign customized property values by having one set of values on the <physique>, then one other set when the <physique> incorporates a .darkish class:
physique {
background-color: var(–primary-bg-color);
shade: var(–primary-text-color);
}
physique.darkish {
–primary-bg-color: #0f0f0f;
–primary-text-color: var(–light-color);
/* different adjustments */
–shadow-color: #13151a;
–hero-bg-gradient: linear-gradient(90deg, #191b20, #131313, #131313);
}
That’s the overall thought. We’re going to make use of customized properties in the identical type of approach, although for altering language instructions.
3) CSS pseudo-classes and selectors
CSS has just a few options that assist with writing instructions. The next two pseudo-classes and attribute are good examples that we are able to put to make use of on this instance.
The :lang() pseudo-class
We will use :lang() pseudo-class to focus on particular languages and apply CSS property values to them individually, or collectively. For instance, on this instance, we are able to change the font measurement when the :lang pseudo-class switches to both Arabic or Japanese:
html:lang(ar),
html:lang(jp){
–offers-item-after-font-size: 1.2rem;
}
As soon as we try this, we additionally want to alter the writing-mode property from its horizontal left-to-right default course to vertical right-to-left course account:
html:lang(jp) .about__text {
writing-mode: vertical-rl;
}
The :attr() pseudo-class
The :attr() pseudo-class helps makes the “content material” of the pseudo-elements like ::earlier than or ::after “dynamic” in a way, the place we are able to drop the dir HTML attribute into the CSS content material property utilizing the attr() operate. That approach, the worth of dir determines what we’re choosing and styling.
<div dir=”ltr”></div>
<div dir=”rtl”></div>
div::after {
content material: attr(dir);
}
The ability is the flexibility to make use of any customized information attribute. Right here, we’re utilizing a customized data-name attribute whose worth is used within the CSS:
<div data-name=”English content material” dir=”ltr”></div>
<div data-name=”محتوى عربي” dir=”rtl”></div>
div::after {
content material: attr(data-name);
}
This makes it comparatively straightforward to alter the content material after switching that language with out altering the fashion. However, again to our design. The three-up grid of playing cards has a yellow “particular” or “finest” off mark beside a picture.
That is the HTML for every card:
<div class=”offers__item relative” data-attr=”data-offer” data-i18n_attr=”special_offer”>
<determine class=”offers__item_img”>
<img src=”./property/pictures/offer1.png” data-attr=”alt” data-i18n_attr=”image_alt” alt=”” class=”w-100″>
</determine>
<div class=”offer-content_item-text”>
<p class=”para” data-i18n=”offer_item_text”></p>
<span class=”worth bolder” data-i18n=”offer_item_price”></span>
</div>
</div>
JavaScript’s function is to:
Set an attribute known as data-offer on every card.Assign a “particular provide” or “finest provide” worth to it.
Lastly, we are able to use the data-offer attribute in our fashion:
.offers__item::after {
content material: attr(data-offer);
/* and many others. */
}
Choose by the dir attribute
Many languages are left-to-right, however some will not be. We will specify what needs to be completely different within the [dir=’rtl’]. This attribute should be on the ingredient itself or we are able to use nesting to achieve the needed ingredient. Since we’ve already added the dir attribute to our HTML tag, then we are able to use it in nesting. We are going to use it afterward our pattern web page.
4. Put together the online fonts
In a multilingual web site, we may need to change the font household between languages as a result of maybe a specific font is extra legible for a specific language.
Fallback fonts
We will profit from the fallback by writing the right-to-left font after the default one.
font-family: ‘Roboto’, ‘Tajawal’, sans-serif;
This helps in instances the place the default font doesn’t assist right-to-left. That snippet above is utilizing the Roboto font, which doesn’t assist Arabic letters. If the default font helps right-to-left (just like the Cairo font), and the design wants it to be modified, then this isn’t an ideal resolution.
font-family: ‘Cairo’, ‘Tajawal’, sans-serif; /* will not work as anticipated */
Let’s take a look at one other approach.
Utilizing CSS variables and the :lang() pseudo-class
We will combine the earlier two method the place we modify the font-family property worth utilizing customized properties which are re-assigned by the :lang pseudo class.
html {
–font-family: ‘Roboto’, sans-serif;
}
html:lang(ar){
–font-family: ‘Tajawal’, sans-serif;
}
html:lang(jp){
–font-family: ‘Noto Sans JP’, sans-serif;
}
5. CSS Logical Properties
In CSS days previous, we used to make use of left and proper to outline offsets alongside the x-axis, and the highest and backside properties to to outline offsets alongside the y-axis. That makes course switching a headache. Thankfully, CSS helps logical properties that outline course‐relative equivalents of the older bodily properties. They assist issues like positioning, alignment, margin, padding, border, and many others.
If the writing mode is horizontal (like English), then the logical inline course is alongside the x-axis and the block course refers back to the y-axis. These instructions are flipped in a vertical writing mode, the place inline travels the y-axis and and block flows alongside the x-axis.
Writing Modex-axisy-axishorizontalinlineblockvertical blockinline
In different phrases, the block dimension is the course perpendicular to the writing mode and the inline dimension is the course parallel to the writing mode. Each inline and block ranges have begin and finish values to outline a selected course. For instance, we are able to use margin-inline-start as an alternative of margin-left. This imply the margin course robotically inverts when the web page course is rtl. It’s like our CSS is direction-aware and adapts when altering contexts.
There’s one other article on CSS-Tips, Constructing Multi-Directional Layouts from Ahmad El-Alfy, that goes into the usefulness of constructing web sites in a number of languages utilizing logical properties.
That is precisely how we are able to deal with margins, padding and borders. We’ll use them within the footer part to alter which border will get the rounded edge.
The highest-tight fringe of the border is rounded in a default ltr writing mode.
So long as we’re utilizing the logical equal of border-top-right-radius, CSS will deal with that change for us.
.footer {
border-start-end-radius: 120px;
}
Now, after switching to the rtl course, it’ll work positive.
The “name to motion” part is one other great spot to use this:
.cta__text {
border-start-start-radius: 50%;
border-end-start-radius: 50px;
}
.cta__img {
border: 1px dashed var(–secondary-color);
border-inline-start-color: var(–light-color);
}
Now, in Arabic, we get the proper format:
You is perhaps questioning precisely how the block and inline dimensions reverse when the writing mode adjustments. Again to the Japanese model, the textual content is from vertical, going from top-to-bottom. I added this line to the code:
/* The “About” part when langauge is Japanese */
html:lang(jp) .about__text {
margin-block-end: auto;
width: max-content;
}
Though I added margin to the “block” degree, it’s utilized it to the left margin. That’s as a result of the textual content rotated 90 levels when the language switched and flows in a vertical course.
6. Different format issues
Even in any case this prep, typically the place components transfer to when the course and language change is approach off. There are a number of components at play, so let’s have a look.
Place
Utilizing an absolute or fastened place to maneuver components might have an effect on how components shift when altering instructions. Some designs want it. However I’d nonetheless advocate asking your self: do I actually need this?
Fro instance, the e-newsletter subscription type within the footer part of our instance could be carried out utilizing place. The shape itself takes the relative place, whereas the button takes absolutely the place.
<type id=”newsletter-form” class=”relative”>
<enter kind=”electronic mail” data-attr=”placeholder” data-i18n_attr=”footer_input_placeholder” class=”w-100″>
<button class=”btn btn–tertiary footer__newsletter_btn bolder absolute” data-i18n=”footer_newsLetter_btn”></button>
</type>
html[dir=”ltr”] .footer__newsletter_btn {
proper: 0;
}
html[dir=”rtl”] .footer__newsletter_btn {
left: 0;
}
This works positive in a rtl writing mode.
Within the “hero” part, I made the background utilizing a ::earlier than pseudo-class with an absolute place:
<header class=”hero relative”>
<!– and many others. –>
</header>
.hero {
background-image: linear-gradient(90deg, #30333f, #161616, #161616);
}
.hero::earlier than {
content material: ”;
show: block;
peak: 100%;
width: 33.33%;
background-color: var(–primary-color);
clip-path: polygon(20% 0%, 100% 0, 100% 100%, 0% 100%);
place: absolute;
prime: 0;
proper: 0;
}
Right here’s the HTML for our hero ingredient:
<header class=”hero relative”>
<!– and many others. –>
<div class=”hero__social absolute”>
<div class=”d-flex flex-col”>
<!– and many others. –>
</div>
</div>
</header>
Word that an .absolute class is in there that applies place: absolute to the hero part’s social widget. In the meantime, the hero itself is comparatively positioned.
How we transfer the social widget midway down the y-axis:
.hero__social {
left: 0;
prime: 50%;
remodel: translateY(-50%);
}
Within the Arabic, we are able to repair the ::earlier than pseudo-class place that’s used within the background utilizing the identical method we use within the footer type. That stated, there are a number of points we have to repair right here:
The clip-path directionThe background linear-gradientThe coffee-cup picture directionThe social media field’s place
Let’s use a easy flip trick as an alternative. First, we wrap the hero content material, and social content material in two distinct wrapper components as an alternative of 1:
<header class=”hero relative”>
<div class=”hero__content”>
<!– and many others. –>
</div>
<div class=”hero__social absolute”>
<div class=”d-flex flex-col”>
<!– and many others. –>
</div>
</div>
</header>
Then we rotate each of the hero wrappers—the social field interior wrapper and the picture—180 levels:
html[dir=”rtl”] .hero,
html[dir=”rtl”] .hero__content,
html[dir=”rtl”] .hero__img img,
html[dir=”rtl”] .hero__social > div {
remodel: rotateY(180deg);
}
Yeah, that’s all. This easy trick can also be useful if the hero’s background is a picture.
remodel: translate()
This CSS property and worth operate helps transfer the ingredient on a number of axes. The distinction between ltr and rtl is that the x-axis is the inverse/adverse worth of the present worth. So, we are able to retailer the worth in a variable and alter it in line with the language.
html {
–about-img-background-move: -20%;
}
html[dir=’rtl’]{
–about-img-background-move: 20%;
}
We will do the identical factor for the background picture within the one other part:
<determine class=”about__img relative”>
<img src=”picture.jpg” data-attr=”alt” data-i18n_attr=”image_alt” class=”w-100″>
</determine>
.about__img::after {
content material: ”;
place: absolute;
z-index: -1;
remodel: translateY(-75%) translateX(var(–about-img-background-move));
/* and many others. */
}
Margins
Margins are used to increase or scale back areas between components. It accepts adverse values, too. For instance, a constructive margin-top worth (20%) pushes the content material down, whereas a adverse worth (e.g. -20%) pulls the content material up.
If margins values are adverse, then the highest and left margins transfer the merchandise up or to the left. Nonetheless, the precise and backside margins don’t. As a substitute, they pull content material that’s situated in the precise of the merchandise in the direction of the left, and the content material beneath the merchandise up. For instance, if we apply a adverse prime margin and adverse backside margin collectively on the identical merchandise, the merchandise is moved up and pull the content material under it up into the merchandise.
Right here’s an instance:
<part>
<div id=”d1″></div>
<div id=”d2″></div>
<div id=”d3″></div>
</part>
div {
width: 100px;
peak: 100px;
border: 2px strong;
}
#d1 {
background-color: yellow;
border-color: crimson;
}
#d2 {
background-color: lightblue;
border-color: blue;
}
#d3 {
background-color: inexperienced;
border-color: crimson;
}
The results of the above code needs to be one thing like this:
Let’s add these adverse margins to the #d2 ingredient:
#d2 {
margin-top: -40px;
margin-bottom: -70px;
}
Discover how the second field within the diagram strikes up, because of a adverse margin-top worth, and the inexperienced field additionally strikes up an overlaps the second field, because of a adverse margin-bottom worth.
The subsequent factor you is perhaps asking: However what’s the distinction between remodel: translate and the margins?
When transferring a component with a adverse margin, the preliminary area that’s taken by the ingredient is not there. However within the case of translating the ingredient utilizing a remodel, the other is true. In different phrases, a adverse margin leads pulls the ingredient up, however the remodel merely adjustments its place, with out dropping the area reserved for it.
Let’s stick with utilizing margin in a single course:
#d2 {
margin-top: -40px;
/* margin-bottom: -70px; */
}
Now let’s substitute the margin with the remodel:
#d2 {
/* margin-top: -40px;*/
remodel: translateY(-40px);
}
You may see that, though the ingredient is pulled up, its preliminary area continues to be there in line with the pure doc movement.
Flexbox
The show: flex offers a fast approach to management the how the weather are aligned of their container. We will use align-items and justify-content to align little one components on the mother or father degree.
In our instance, we are able to use flexbox in virtually each part to make the column format. Plus, we are able to use it within the “presents” part to middle the set of these yellow “particular” and “finest” marks:
.offers__item::after {
content material: attr(data-offer);
show: flex;
align-items: middle;
justify-content: middle;
text-align: middle;
}
The identical could be utilized to the hero part to middle textual content vertically.
<div class=”d-lg-flex align-items-center”>
<div class=”hero__text d-xl-flex align-items-center”>
<div>
<!– textual content –>
</div>
</div>
<determine class=”hero__img relative”>
<img src=”/picture.jpg” data-attr=”alt” data-i18n_attr=”image_alt” class=”w-100″>
</determine>
</div>
If the flex-direction worth is row, then we are able to profit from controlling the width for every ingredient. Within the “hero” part, we have to set the picture on the angled slope of the background the place the colour transitions from darkish grey to yellow.
.hero__text {
width: 56.5%;
}
.hero__img {
width: 33.33%;
}
Each components take up a a complete of 89.83% of the mother or father container’s width. Since we didn’t specify justify-content on the mother or father, it defaults to start out, leaving the remaining width on the finish.
We will mix the flexbox with any of the earlier strategies we’ve seen, like transforms and margins. This might help us to cut back what number of place cases are in our code. Let’s use it with a adverse margin within the “name to motion” part to find the picture.
<part class=”cta d-xl-flex align-items-center”>
<div class=”cta__text w-100″>
<!– and many others. –>
</div>
<determine class=”cta__img”>
<img src=”picture.jpg” data-attr=”alt” data-i18n_attr=”image_alt” class=”w-100″>
</determine>
</part>
As a result of we didn’t specify the flex-wrap and flex-basis properties, the picture and the textual content each match within the mother or father. Nonetheless, since we used a adverse margin, the picture is pulled to the left, together with its width. This protects additional area for the textual content. We additionally need to use a logical property, inline-start, as an alternative of left to deal with switching to the rtl course.
Grid
Lastly, we are able to use a grid container to positing the weather. CSS Grid is highly effective (and completely different than flexbox) in that it lays issues alongside each the x-axis and the y-axis versus solely certainly one of them.
Suppose that within the “presents” part, the function of the “see all” button is to get additional information that to show on the web page. Right here’s JavaScript code to repeat the present content material:
// presents part ==> “see all” btn performance
(operate(){
doc.querySelector(‘.presents .btn’).addEventListener(‘click on’, operate(){
const offersContent = doc.querySelector(‘.offers__content’);
offersContent.innerHTML += offersContent.innerHTML;
offersContent.classList.take away(‘offers__content–has-margin’);
this.take away();
})
})();
Then, let’s use show: grid within the CSS for this part. First, right here’s our HTML, with our grid container highlighted.
<div class=”offers__content offers__content–has-margin d-grid”>
<div class=”offers__item relative” data-attr=”data-offer” data-i18n_attr=”special_offer”>
<!– and many others. –>
</div>
<div class=”offers__item relative” data-attr=”data-offer” data-i18n_attr=”best_offer”>
<!– and many others. –>
</div>
<div class=”offers__item relative” data-attr=”data-offer” data-i18n_attr=”best_offer”>
<!– and many others. –>
</div>
</div>
We implement CSS Grid on the .offers__content ingredient:
html {
/* customized properties */
–offers-content-column: repeat(3, 1fr);
–offers-content-gap: 5vw;
}
.offers__content {
show: grid;
grid-template-columns: var(–offers-content-column);
hole: var(–offers-content-gap);
}
.offers__content–has-margin {
margin-block-end: 60px;
}
That is the outcome after clicking the button:
Our web page is way from being one of the best instance of how CSS Grid works. Whereas I used to be looking the designs on-line, I discovered a design that makes use of the next construction:
Discover how CSS Grid makes the responsive format with out media queries. And as you would possibly anticipate, it really works nicely for altering writing modes the place we regulate the place components go on the grid based mostly on the present writing mode.
Wrapping up
Right here is the ultimate model of the web page. I ensured to implement the responsiveness with a mobile-first method to indicate you the ability of the CSS variables. You should definitely open the demo in full web page mode as nicely.
I hope these strategies assist make creating multilingual designs simpler for you. We checked out a bunch of CSS properties we are able to use to use kinds to particular languages. And we checked out completely different approaches to do this, like choosing the :lang pseudo-class and information attributes utilizing the attr() operate. As a part of this, we coated what logical properties are in CSS and the way they adapt to a doc’s writing mode—which is a lot nicer than having to write down extra CSS rulesets to swap out bodily property items that in any other case are unaffected by the writing mode.
We additionally checked out quite a lot of completely different positioning and format strategies, trying particularly at how completely different strategies are extra responsive and maintainable than others. For instance, CSS Grid and Flexbox are geared up with options that may re-align components inside a container based mostly on altering circumstances.
Clearly, there are many transferring items when working with a multilingual web site. There are most likely different necessities you must take into account when optimizing a web site for particular languages, however the stuff we coated right here collectively ought to provide you with all the layout-bending superpowers you must create sturdy layouts that accommodate any variety of languages and writing modes.
The put up Management Structure in a Multi-Directional Web site appeared first on CSS-Tips. You may assist CSS-Tips by being an MVP Supporter.


Subscribe to MarketingSolution.
Receive web development discounts & web design tutorials.
Now! Lets GROW Together!