
Discover ways to give your purchasers a straightforward {and professional} white label portal expertise the place they will entry their account, websites, and pay you by way of a safe and self-hosted checkout.
Think about having your individual distinctive portal the place your purchasers can login, entry their billing accounts, even make funds – all hosted by yourself web site, with your individual branding.
Properly, excellent news, with WPMU DEV it’s potential and easy! And on this article we’re displaying you the way to create the consumer portal of your desires.
You’ll study:
Tips on how to create {custom} login pages for purchasers,
Tips on how to invite purchasers to your portal utilizing branded emails,
How purchasers could make funds to you shortly and simply.
By the top of this text you’ll have arrange a glossy portal below your individual model that purchasers can use to entry details about their websites and make safe funds to your providers.
Listed here are the part breakouts:
What You Will Want To Create Your Portal
How To Create and Model Your Shopper Portal
Configuring Menu Navigation Objects
Setting Up a Assist Button
Integrating Reside Chat
Inviting Shoppers To Your Customized Portal
What Your Shoppers Will See Inside Their Portal
The Shopper Dashboard
Shopper Profile
Shoppers Can Pay Invoices by way of The Shopper Portal
Shoppers Can Entry Invoices Immediately in The Billing Modal
Giving Your Shoppers a Extra Personalized Expertise with The Hub Shopper
And we’re off!
What You Will Want To Create Your Portal
Earlier than we get began, right here’s what you’re gonna want if you wish to comply with alongside, or ultimately create your individual portal:
1. The Hub, to ascertain the bottom of your portal and combine billing instruments
The Hub is your central interface as a WPMU DEV consumer, and it’s the place our internet developer members handle each side of their consumer websites.
You may study extra about the way it works in our the way to get essentially the most out of The Hub article.
This all-in-one web site interface additionally features a built-in consumer administration and billing dashboard – the place you’ll be able to bill purchasers, arrange subscriptions, monitor month-to-month recurring income (MRR), and extra.
And most significantly and related to this text… you’ll be able to invite your purchasers to have custom-made entry to your billing dashboard (and particular areas of your general Hub), the place they will view their account and subscription information, and even pay invoices instantly by way of a built-in Stripe checkout.
The entire above lays the groundwork to your white label consumer portal. But it surely’s nonetheless all below WPMU DEV’s branding up till this level.
That’s the place this subsequent instrument comes into the equation…
2. The Hub Shopper, to model your portal as your individual
The Hub Shopper means that you can take your Hub interface, together with billing instruments and checkout, and white label the complete factor with your individual branding, logos, and so forth.
This occasion will probably be by yourself web site at your individual area, so when your purchasers login they see your model, not ours.
3. A Hosted Website For Your Portal
Lastly, you’ll additionally want a hosted web site to host your consumer portal…
This may be both a Third-party hosted web site, or there’s all the time our personal devoted WordPress internet hosting, which it’s also possible to handle proper out of your Hub dashboard.
The entire above instruments are included with the WPMU DEV Company plan, which it’s also possible to trial free of charge proper now.
Okay, now that you recognize what’s wanted, we’ll get right down to it!
How To Create and Model Your Shopper Portal
Okay, first issues first… for the reason that white label consumer expertise comes courtesy of The Hub Shopper, we need to set up and configure that immediately.
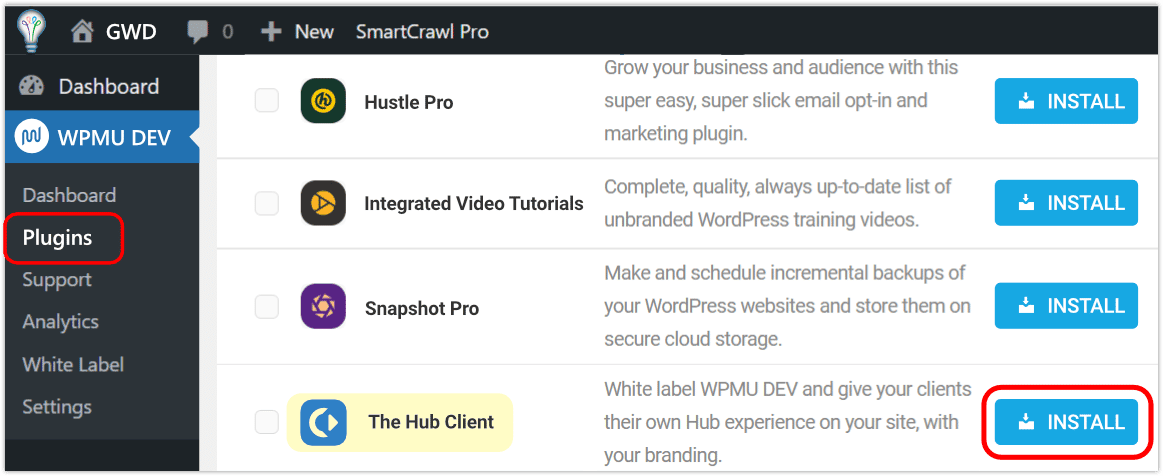
When you’ve signed up for a paid WPMU DEV membership, The Hub Shopper plugin will probably be accessible to put in free of charge by way of the plugin touchdown web page, The Hub plugin supervisor, or the WPMU DEV dashboard plugin (proven under).
Putting in The Hub Shopper from the WPMU DEV WordPress dashboard.
As soon as activated, click on on it to see the Welcome display, then click on on Get Began. This places you instantly into Settings.
By default, your Hub Shopper will inherit the Model Identify and Brand you could have set in your individual Hub, however you’ll be able to customise it to be no matter you want.
The Hub Shopper settings in WordPress, default view.
We’ll shortly arrange our first three model customizations below Website Profile.
Click on the arrow icon for Model title, kind what you’d wish to name it, and Save Adjustments.
Subsequent, click on the arrow icon for Your Brand, add your graphic, and Save Adjustments.
Beneath Colour Scheme, click on the arrow icon for Navigation Background, choose desired shade from the colour picker, then Save Adjustments. It’s also possible to choose your Navigation textual content and Navigation textual content chosen & hover colours right here, to match your totally branded colour scheme.
You may see all your adjustments in real-time by way of the Preview strip on the prime of the Settings web page.
The Hub Shopper Settings fundamental display, custom-made to your model.
Configuring Menu Navigation Objects
We need to make getting round in our branded portal a satisfying, wise expertise for our purchasers.
We are able to simply accomplish this by means of the Hub Shopper’s settings.
Let’s take a look at personalizing the remainder of the branded portal to your purchasers.
First up, we’re going to arrange what will probably be displayed as the principle menu of your branded portal.
From the principle display in The Hub Shopper; scroll right down to Configuration, and click on the chevron arrow to the appropriate of Navigation.
Choose from the dropdown choices, or create a web site particular menu in WordPress’ Look > Menus, then come again to this web page and choose it.
Deciding on the Navigation menu in your consumer portal.
Now we’ll set the consumer web page because the hub.
Click on the chevron arrow to the appropriate of Shopper Web page, and from the resultant popup, choose as desired from the dropdown choices, then Save.
Deciding on the Shopper Web page to get replaced along with your consumer hub.
Now you’ll see this extra linked textual content – View Web page, subsequent to Shopper Web page, together with the title of the web page you chose to the appropriate. On this case, “hub”.
We’ve set the consumer web page because the hub.
Click on on View Web page and it’ll open this occasion of the Hub in a brand new webpage, the place you’ll see the web page you chose, with the menu you chose on the prime of the positioning.
The Shopper’s view of your branded hub.
It’s also possible to customise the hyperlink used for the Again textual content in your Shopper Login web page. We’ll knock that out proper now.
From the WP Dashboard > The Hub Shopper > Settings > Configurations > House Website URL, click on Add to open the configuration module.
Enter the positioning URL and web site title (Title), and Save adjustments. (It’s also possible to click on the checkbox to Open in a brand new tab previous to saving, in the event you favor.)
Customizing the positioning house URL for the again button within the Hub Shopper.
Word: if no customizations are made right here, the again button will direct to the default house web page for that web site.
In case you ever need to revert again to the default state, merely click on the Reset button.
Setting Up a Assist Button
Having assist sources available to your purchasers is a giant plus. It goes an extended technique to making them really feel calm and picked up, realizing solutions are only a click on away.
“Present sufficient customization choices in order that we are able to tweak the appear and feel of the interface to a point. And the power to place in our personal information, akin to contact information and hyperlinks to our personal assist pages/buyer assist and issues like that.” – Julian (WPMU DEV member)
Getting the Assist Button in The Hub Shopper is a cinch. I’ll stroll you thru how to do this now.
From the WP Dashboard > The Hub Shopper > Settings > Configuration; to the appropriate of the Assist Button, click on Add.
Enter the URL to your Assist web page, then Save Adjustments.
Tada! You’ll now have a floating assist bubble in your Hub web page that when clicked, will direct the consumer to your chosen URL. By default, the Assist web page will probably be opened in a brand new tab.
When you’ve arrange your Assist Button, it should show within the decrease proper nook of The Hub fundamental web page, prepared for motion.
Including a Assist button to your websites in The Hub.
Integrating Reside Chat
Reside Chat is a implausible function to supply to your purchasers. And The Hub Shopper affords three highly-rated chat platform integrations to select from.
In case you head over to the WordPress dashboard, The Hub Shopper > Settings > Integrations, you’ll be able to configure a Reside Chat widget in your Hub Shopper.
Three of the preferred third-party providers can be found: LiveChat, Tawk.To, and HubSpot.
Reside Chat within the Hub Shopper, logging in for Tawk.to.
Tawk.to’s stay chat look settings and preview.
Relying on which stay chat service you select, the setup will range.
In case you’d like a fundamental walkthrough on setting these up in The Hub Shopper, learn Tips on how to Set Up Reside Chat on WordPress. Or get the complete rundown in our Integrations assist docs.
Inviting Shoppers To Your Customized Portal
Time to roll out the pink carpet! With customizations set, we’re able to deliver our purchasers inside.
Let’s begin by manually including a brand new consumer.
Navigate to The Hub > Shoppers & Billing, and click on + New Shopper.
Getting a consumer arrange takes only some clicks.
Enter all of the consumer’s required (and non-compulsory, as desired) data within the kind fields.
Consumer Roles play a really vital half in Shopper setup. Mainly, these determine what every consumer may have entry to in your hub, when it comes to viewing and taking motion. You’ve got full management on these by choosing permissions.
We’ll take a deep dive into Consumer Roles in our upcoming Shoppers & Billing article. For now, click on on the dropdown arrow below Consumer Position, and choose View All & Entry billing.
You determine what your consumer has entry to by making use of a consumer function.
In case you go for a Customized Position – you may make one on the spot by clicking on + Create {custom} consumer function.
This may deliver up the display the place you’ll be able to choose choices from the principle and nested menus. Identify your new function, and reserve it.
Now in the event you return to that consumer, you’ll be able to assign this tradition function to them.
Whereas including a consumer, additionally, you will decide what Major Hub they’re related to.
If in case you have multiple Hub, it is going to be accessible within the dropdown. If you’re utilizing The Hub Shopper on a web site, and choose it because the Major Hub, when that consumer clicks on a Affirm Invitation or Pay Bill hyperlink out of your Shopper & Billing automated electronic mail, they’ll be taken to the your white labeled Hub web site as an alternative of wpmudev.com.
No matter Major Hub you select will sync the communication preferences that can happen from that Hub (e.g. emails, invoices, and so forth.).
On the backside, swap the Invite Shopper toggle to on, then click on Add.
Invite a consumer from the Add consumer window.
Growth! Shopper has been added, and despatched a white-labeled invitation to your consumer portal, which can appear like this:
As soon as the consumer confirms by clicking the Affirm Invitation hyperlink in your electronic mail, they’ll have entry to your branded portal.
In the event that they already had an present Hub account with you, it should take them on to the login web page of the Hub they have been invited from.
In the event that they’re new to your account, they’ll be taken to the account creation web page of that Hub occasion.
From the account creation web page, they’ll get a popup modal with their electronic mail handle already within the kind subject. They’ll simply have to create a password, then click on the Create Account button.
Shopper account creation in your Hub.
What Your Shoppers Will See Inside Their Portal
Each consumer expertise in your portal will probably be distinctive to them.
Your branding will probably be prevalent all through, and what your purchasers will be capable of view and entry depends on the permissions you’ve granted them by means of Consumer Roles.
It’s a implausible technique to {custom} serve every consumer an ideal match to your mixed enterprise pursuits and desires.
The Shopper Dashboard
As soon as your purchasers have logged into your consumer portal, they’ll be greeted by a dashboard with entry to any content material you’ve given them permissions for.
A consumer’s-eye view of your {custom} branded portal.
Shoppers can set up single or a number of websites in your portal, and set up them of their dashboard space as they see match.
Shoppers can favourite websites, colour labels, and extra in your branded Hub.
The roles you’ve assigned to a consumer are editable by you and will be modified at any time within the administration and billing platform.
For instance, if we assign Billing permissions to a consumer, he/she may have the power to view and edit something in that part, however they’ll be lower off from another pages/screens in Shopper Billing.
Shoppers will be given entry to change and think about, or view solely, making it potential to cover screens like Plugins fully.
Learn this submit for a more in-depth take a look at Consumer Roles and Permissions.
Letting your purchasers view and handle their very own billing particulars saves you the effort and time you’d in any other case spend on their admin actions, and permits them to really feel linked to their account.
There’s a lot your purchasers can accomplish right here. For instance, managing their billing information and account particulars, viewing their providers and subscriptions, filtering on fee standing (due or paid), assessing what their common spend is, and rather more.
The Billing Overview part offers purchasers a fast however informative top-level view of their account(s).
Within the billing part, purchasers can see all the particulars by drilling down by means of the assorted menu choices.
The Merchandise & Companies web page permits views by breakout sections for subscriptions, each energetic & inactive, and one-time providers as properly.
Any line merchandise right here will be clicked on for full particulars, and/or to take sure actions. For instance, canceling a subscription.
Particulars on a selected consumer subscription, with an choice to cancel it.
Invoices may also be examined in full element.
The consumer bill abstract listing, with simply seen standing and quantities for every.
The built-in filter performance is nice, providing distillation choices for date, fee standing, and web site.
Even archived invoices will be situated quick utilizing the sturdy filter.
In case you’ve given them permissions to take action, purchasers can view particulars and take motion on providers and payments, akin to making funds or downloading PDF variations of invoices.
Each line merchandise has fast actions by way of the popup menu, akin to making a fee or viewing a subscription.
Shopper Profile
Shoppers can freely edit their private content material – profile information (together with their profile pic, if they’ve one set in Gravatar), make a password change, setup 2FA (requires an authenticator app), or signal out, all by means of the cog icon menu within the higher proper nook.
Shoppers can simply edit their very own profile data.
All the pieces updates in actual time. For instance, if the consumer adjustments the e-mail addy of their profile, it should additionally replace of their billing profile, for the reason that Hub and Shoppers & Billing profiles are synced. Straightforward peasy!
Shoppers Can Pay Invoices by way of The Shopper Portal
With the Shoppers & Billing modal, your consumer may have the comfort of paying you instantly by means of your branded consumer portal (with safe Stripe checkout totally built-in)!
As talked about earlier, all consumer administration actions together with funds happen securely inside your individual area and totally custom-branded screens.
All the pieces occurs at your chosen area URL.
All through the course of their work trip with you, purchasers are stored within the loop with automated emails, which mirror your {custom} model and firm particulars.
E mail communications and invoices are triggered routinely and stay on-brand, taking that activity off your plate.
Shoppers can readily make funds by clicking on the invoiced electronic mail hyperlink, taking them to the fee portal.
Shoppers give a remaining test to their bill particulars, then click on the Make Fee button.
The consumer can enter their fee data, then click on the Pay button, which may have particular data on it relating to the sum of money and repair they’re approving.
Word, in the event that they beforehand added a fee technique, it should auto populate right here, with an possibility to alter it if desired.
Shopper fee course of in The Hub, continued.
The consumer can test all of their information on the following web page, then click on to pay.
Shopper fee course of in The Hub; one final visible test, pre-pay.
With the fee made, the bill will load up, reflecting the small print and paid standing.
Shopper bill particulars; standing: paid.
Now in the event you go to the Invoices tab, you’ll see all present and excellent invoices.
Shopper bill abstract listing within the Hub.
Within the Standing column, pink signifies fee is due, and inexperienced signifies fee has been made.
The highest-level Invoices menu has a notifier icon (a quantity in a pink circle), indicating the amount of excellent invoices – for fast visible reference.
The consumer can obtain a duplicate of any paid bill by clicking the PDF Bill button on the top-right of the bill display.
Shoppers Can Entry Invoices Immediately in The Billing Modal of The Hub
Your purchasers can simply view and handle billing actions from any websites of their Hub, associated to particular billing. It is going to be almost an identical to what you see in your Hub Billing space, in fact particular solely to their web site(s).
Shoppers can use the left sidebar menu to navigate to their billing part.
Shoppers want solely click on the Billing hyperlink within the sidebar menu of any web site they’re viewing to get began. Any invoices you’ve despatched to them will probably be accessible to them right here.
Shopper overview display in your branded Hub.
Shoppers who you’ve added an internet site for however haven’t but despatched an bill to will nonetheless see the positioning, it simply gained’t have any particular billing information.
As soon as the primary site-specific bill has been paid, knowledge will instantly populate within the Abstract part, together with the Merchandise & Companies and Invoices sections’ Standing, which can mirror as Lively and Paid.
In case you’ve caught with us by means of the complete breakdown, congrats! You’re now very properly versed in lots of the nice options within the Shopper Portal – ie your branded Hub. We’ve little doubt you’re going to do superb issues.
In case you do ever want an help, attain out to our highly-trained (and top-rated) assist crew. They’re all the time on, 24/7/365.
For a whole information to every thing on the consumer portal, see The Hub Shopper documentation.
Giving Your Shoppers a Extra Personalized Expertise with The Hub Shopper from WPMU DEV
The Hub Shopper allows you to run WPMU DEV by yourself area as a 100% white label expertise to your purchasers.
You may totally customise your branding, colours, hyperlinks, logins, emails, and customers entry…even permit purchasers to edit sure areas at your discretion.
“It’s like giving your purchasers backstage entry, however as a VIP expertise.” – Josh Corridor (JoshHall.co)
Take a look at our Hub Shopper plugin by means of a trial of one among our paid plans, or our Internet hosting – totally devoted and optimized for WordPress. We provide a 100% satisfaction assure, and our assist crew helps with all issues WordPress, not simply our services and products.
See you on the within!


Subscribe to MarketingSolution.
Receive web development discounts & web design tutorials.
Now! Lets GROW Together!