
I lately found the enjoyment of making CSS-only video games. It’s at all times fascinating how HTML and CSS are able to dealing with the logic of a complete on-line recreation, so I needed to attempt it! Such video games normally depend on the ol’ Checkbox Hack the place we mix the checked/unchecked state of a HTML enter with the :checked pseudo-class in CSS. We are able to do a whole lot of magic with that one mixture!
In reality, I challenged myself to construct a complete recreation with out Checkbox. I wasn’t positive if it could be potential, nevertheless it undoubtedly is, and I’m going to point out you the way.
Along with the puzzle recreation we are going to research on this article, I’ve made a set of pure CSS video games, most of them with out the Checkbox Hack. (They’re additionally obtainable on CodePen.)
Need to play earlier than we begin?
I personally choose enjoying the sport in full display mode, however you’ll be able to play it under or open it up over right here.
Cool proper? I do know, it’s not the Greatest Puzzle Recreation You Ever Noticed™ nevertheless it’s additionally not dangerous in any respect for one thing that solely makes use of CSS and some strains of HTML. You possibly can simply regulate the dimensions of the grid, change the variety of cells to manage the problem degree, and use no matter picture you need!
We’re going to remake that demo collectively, then put somewhat additional sparkle in it on the finish for some kicks.
The drag and drop performance
Whereas the construction of the puzzle is pretty simple with CSS Grid, the power to pull and drop puzzle items is a bit trickier. I needed to counting on a mix of transitions, hover results, and sibling selectors to get it carried out.
For those who hover over the empty field in that demo, the picture strikes inside it and stays there even in the event you transfer the cursor out of the field. The trick is so as to add a giant transition period and delay — so massive that the picture takes plenty of time to return to its preliminary place.
img {
remodel: translate(200%);
transition: 999s 999s; /* very sluggish transfer on mouseout */
}
.field:hover img {
remodel: translate(0);
transition: 0s; /* prompt transfer on hover */
}
Specifying solely the transition-delay is sufficient, however utilizing massive values on each the delay and the period decreases the prospect {that a} participant ever sees the picture transfer again. For those who await 999s + 999s — which is roughly half-hour — then you will note the picture transfer. However you received’t, proper? I imply, nobody’s going to take that lengthy between turns except they stroll away from the sport. So, I contemplate this an excellent trick for switching between two states.
Did you discover that hovering the picture additionally triggers the adjustments? That’s as a result of the picture is a part of the field ingredient, which isn’t good for us. We are able to repair this by including pointer-events: none to the picture however we received’t be capable to drag it later.
Which means we’ve to introduce one other ingredient contained in the .field:
That additional div (we’re utilizing a category of .a) will take the identical space because the picture (because of CSS Grid and grid-area: 1 / 1) and would be the ingredient that triggers the hover impact. And that’s the place the sibling selector comes into play:
.a {
grid-area: 1 / 1;
}
img {
grid-area: 1 / 1;
remodel: translate(200%);
transition: 999s 999s;
}
.a:hover + img {
remodel: translate(0);
transition: 0s;
}
Hovering on the .a ingredient strikes the picture, and since it’s taking over all house contained in the field, it’s like we’re hovering over the field as an alternative! Hovering the picture is now not an issue!
Let’s drag and drop our picture contained in the field and see the end result:
Did you see that? You first seize the picture and transfer it to the field, nothing fancy. However when you launch the picture you set off the hover impact that strikes the picture, after which we simulate a drag and drop function. For those who launch the mouse outdoors the field, nothing occurs.
Hmm, your simulation isn’t good as a result of we will additionally hover the field and get the identical impact.
True and we are going to rectify this. We have to disable the hover impact and permit it provided that we launch the picture contained in the field. We’ll play with the dimension of our .a ingredient to make that occur.
Now, hovering the field does nothing. However in the event you begin dragging the picture, the .a ingredient seems, and as soon as launched contained in the field, we will set off the hover impact and transfer the picture.
Let’s dissect the code:
.a {
width: 0%;
transition: 0s .2s; /* add a small delay to verify we catch the hover impact */
}
.field:lively .a { /* on :lively improve the width */
width: 100%;
transition: 0s; /* prompt change */
}
img {
remodel: translate(200%);
transition: 999s 999s;
}
.a:hover + img {
remodel: translate(0);
transition: 0s;
}
Clicking on the picture fires the :lively pseudo-class that makes the .a ingredient full-width (it’s initially equal to 0). The lively state will stay lively till we launch the picture. If we launch the picture contained in the field, the .a ingredient goes again to width: 0, however we are going to set off the hover impact earlier than it occurs and the picture will fall contained in the field! For those who launch it outdoors the field, nothing occurs.
There’s a little quirk: clicking the empty field additionally strikes the picture and breaks our function. At the moment, :lively is linked to the .field ingredient, so clicking on it or any of its youngsters will activate it; and by doing this, we find yourself exhibiting the .a ingredient and triggering the hover impact.
We are able to repair that by enjoying with pointer-events. It permits us to disable any interplay with the .field whereas sustaining the interactions with the kid parts.
.field {
pointer-events: none;
}
.field * {
pointer-events: preliminary;
}
Now our drag and drop function is ideal. Except yow will discover the right way to hack it, the one approach to transfer the picture is to pull it and drop it contained in the field.
Constructing the puzzle grid
Placing the puzzle collectively goes to really feel simple peasy in comparison with what we simply did for the drag and drop function. We’re going to depend on CSS grid and background methods to create the puzzle.
Right here’s our grid, written in Pug for comfort:
– let n = 4; /* variety of columns/rows */
– let picture = “https://picsum.images/id/1015/800/800”;
g(fashion=`–i:url(${picture})`)
– for(let i = 0; i < n*n; i++)
z
a
b(draggable=”true”)
The code could look unusual nevertheless it compiles into plain HTML:
<g fashion=”–i: url(https://picsum.images/id/1015/800/800)”>
<z>
<a></a>
<b draggable=”true”></b>
</z>
<z>
<a></a>
<b draggable=”true”></b>
</z>
<z>
<a></a>
<b draggable=”true”></b>
</z>
<!– and many others. –>
</g>
I guess you’re questioning what’s up with these tags. None of those parts have any particular which means — I simply discover that the code is way simpler to put in writing utilizing <z> than a bunch of <div class=”z”> or no matter.
That is how I’ve mapped them out:
<g> is our grid container that comprises N*N <z> parts.<z> represents our grid objects. It performs the function of the .field ingredient we noticed within the earlier part.<a> triggers the hover impact.<b> represents a portion of our picture. We apply the draggable attribute on it as a result of it can’t be dragged by default.
Alright, let’s register our grid container on <g>. That is in Sass as an alternative of CSS:
$n : 4; /* variety of columns/rows */
g {
–s: 300px; /* dimension of the puzzle */
show: grid;
max-width: var(–s);
border: 1px stable;
margin: auto;
grid-template-columns: repeat($n, 1fr);
}
We’re really going to make our grid youngsters — the <z> parts — grids as properly and have each <a> and <b> inside the similar grid space:
z {
aspect-ratio: 1;
show: grid;
define: 1px dashed;
}
a {
grid-area: 1/1;
}
b {
grid-area: 1/1;
}
As you’ll be able to see, nothing fancy — we created a grid with a selected dimension. The remainder of the CSS we want is for the drag and drop function, which requires us to randomly place the items across the board. I’m going to show to Sass for this, once more for the comfort of with the ability to loop by way of and elegance all of the puzzle items with a perform:
b {
background: var(–i) 0/var(–s) var(–s);
}
@for $i from 1 to ($n * $n + 1) {
$r: (random(180));
$x: (($i – 1)%$n);
$y: flooring(($i – 0.001) / $n);
z:nth-of-type(#{$i}) b{
background-position: ($x / ($n – 1)) * 100% ($y / ($n – 1)) * 100%;
remodel:
translate((($n – 1) / 2 – $x) * 100%, (($n – 1)/2 – $y) * 100%)
rotate($r * 1deg)
translate((random(100)*1% + ($n – 1) * 100%))
rotate((random(20) – 10 – $r) * 1deg)
}
}
You will have observed that I’m utilizing the Sass random() perform. That’s how we get the randomized positions for the puzzle items. Keep in mind that we are going to disable that place when hovering over the <a> ingredient after dragging and dropping its corresponding <b> ingredient contained in the grid cell.
z a:hover ~ b {
remodel: translate(0);
transition: 0s;
}
In that very same loop, I’m additionally defining the background configuration for every bit of the puzzle. All of them will logically share the identical picture because the background, and its dimension needs to be equal to the dimensions of the entire grid (outlined with the –s variable). Utilizing the identical background-image and a few math, we replace the background-position to point out solely a chunk of the picture.
That’s it! Our CSS-only puzzle recreation is technically carried out!
However we will at all times do higher, proper? I confirmed you the right way to make a grid of puzzle piece shapes in one other article. Let’s take that very same concept and apply it right here, we could?
Puzzle piece shapes
Right here’s our new puzzle recreation. Similar performance however with extra real looking shapes!
That is an illustration of the shapes on the grid:
For those who look carefully you’ll discover that we’ve 9 completely different puzzle-piece shapes: the 4 corners, the 4 edges, and one for every little thing else.
The grid of puzzle items I made within the different article I referred to is a bit more simple:
We are able to use the identical method that mixes CSS masks and gradients to create the completely different shapes. In case you might be unfamiliar with masks and gradients, I extremely suggest checking that simplified case to higher perceive the method earlier than shifting to the following half.
First, we have to use particular selectors to focus on every group of parts that shares the identical form. We now have 9 teams, so we are going to use eight selectors, plus a default selector that selects all of them.
z /* 0 */
z:first-child /* 1 */
z:nth-child(-n + 4):not(:first-child) /* 2 */
z:nth-child(5) /* 3 */
z:nth-child(5n + 1):not(:first-child):not(:nth-last-child(5)) /* 4 */
z:nth-last-child(5) /* 5 */
z:nth-child(5n):not(:nth-child(5)):not(:last-child) /* 6 */
z:last-child /* 7 */
z:nth-last-child(-n + 4):not(:last-child) /* 8 */
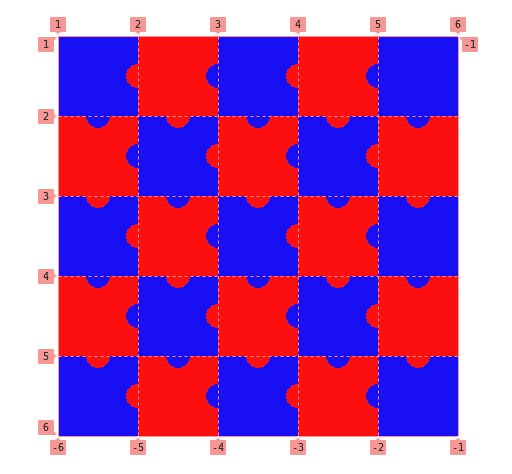
Here’s a determine that exhibits how that maps to our grid:
Now let’s sort out the shapes. Let’s give attention to studying only one or two of the shapes as a result of all of them use the identical method — and that method, you’ve got some homework to continue learning!
For the puzzle items within the heart of the grid, 0:
masks:
radial-gradient(var(–r) at calc(50% – var(–r) / 2) 0, #0000 98%, #000) var(–r)
0 / 100% var(–r) no-repeat,
radial-gradient(var(–r) at calc(100% – var(–r)) calc(50% – var(–r) / 2), #0000 98%, #000)
var(–r) 50% / 100% calc(100% – 2 * var(–r)) no-repeat,
radial-gradient(var(–r) at var(–r) calc(50% – var(–r) / 2), #000 98%, #0000),
radial-gradient(var(–r) at calc(50% + var(–r) / 2) calc(100% – var(–r)), #000 98%, #0000);
The code could look advanced, however let’s give attention to one gradient at a time to see what’s occurring:
Two gradients create two circles (marked inexperienced and purple within the demo), and two different gradients create the the slots that different items connect with (the one marked blue fills up a lot of the form whereas the one marked pink fills the highest portion). A CSS variable, –r, units the radius of the round shapes.
The form of the puzzle items within the heart (marked 0 within the illustration) is the toughest to make because it makes use of 4 gradients and has 4 curvatures. All of the others items juggle fewer gradients.
For instance, the puzzle items alongside the highest fringe of the puzzle (marked 2 within the illustration) makes use of three gradients as an alternative of 4:
masks:
radial-gradient(var(–r) at calc(100% – var(–r)) calc(50% + var(–r) / 2), #0000 98%, #000) var(–r) calc(-1 * var(–r)) no-repeat,
radial-gradient(var(–r) at var(–r) calc(50% – var(–r) / 2), #000 98%, #0000),
radial-gradient(var(–r) at calc(50% + var(–r) / 2) calc(100% – var(–r)), #000 98%, #0000);
We eliminated the primary (high) gradient and adjusted the values of the second gradient in order that it covers the house left behind. You received’t discover a giant distinction within the code in the event you examine the 2 examples. It needs to be famous that we will discover completely different background configurations to create the identical form. For those who begin enjoying with gradients you’ll for positive give you one thing completely different than what I did. You might even write one thing that’s extra concise — in that case, share it within the feedback!
Along with creating the shapes, additionally, you will discover that I’m rising the width and/or the peak of the weather like under:
peak: calc(100% + var(–r));
width: calc(100% + var(–r));
The items of the puzzle must overflow their grid cell to attach.
Remaining demo
Right here is the total demo once more. For those who examine it with the primary model you will note the identical code construction to create the grid and the drag-and-drop function, plus the code to create the shapes.
Attainable enhancements
The article ends right here however we may hold enhancing our puzzle with much more options! How a couple of a timer? Or perhaps some form of congratulations when the participant finishes the puzzle?
I could contemplate all these options in a future model, so control my GitHub repo.
Wrapping up
And CSS ism’t a programming language, they are saying. Ha!
I’m not making an attempt to spark some #HotDrama by that. I say it as a result of we did some actually difficult logic stuff and coated a whole lot of CSS properties and strategies alongside the best way. We performed with CSS Grid, transitions, masking, gradients, selectors, and background properties. To not point out the few Sass methods we used to make our code simple to regulate.
The aim was to not construct the sport, however to discover CSS and uncover new properties and methods that you should use in different tasks. Creating a web-based recreation in CSS is a problem that pushes you to discover CSS options in nice element and discover ways to use them. Plus, it’s simply a whole lot of enjoyable that we get one thing to play with when all is claimed and carried out.
Whether or not CSS is a programming language or not, doesn’t change the truth that we at all times study by constructing and creating modern stuff.
How I Made a Pure CSS Puzzle Recreation initially printed on CSS-Methods, which is a part of the DigitalOcean household. It is best to get the e-newsletter.


Subscribe to MarketingSolution.
Receive web development discounts & web design tutorials.
Now! Lets GROW Together!