
The flexibility to establish customers is significant for sustaining the safety of any functions. Equally vital is the code that’s written to handle person identities, significantly with regards to avoiding loopholes for unauthorized entry to knowledge held by an utility. Writing authentication code with no framework or libraries accessible can take a ton of time to do proper — to not point out the continuing maintainance of that customized code.
That is the place Firebase involves the rescue. Its ready-to-use and intuitive strategies make organising efficient person identification administration on a web site occur very quickly. This tutorial will work us by way of on how to do this: implementing person registration, verification, and authentication.
Firebase v9 SDK introduces a brand new modular API floor, leading to a change to a number of of its companies, certainly one of which is Firebase Authentication. This tutorial is present to the modifications in v9.
To observe together with this tutorial, try to be acquainted with React, React hooks, and Firebase model 8. You must also have a Google account and Node put in in your machine.
Desk of Contents
Organising Firebase
Cloning and organising the starter repo
Integrating Firebase into our React app
Creating Person Registration performance
Managing Person State with React Context API
Ship a verification e mail to a registered person
Engaged on the person profile web page
Making a Non-public Route for the Profile part
Creating login performance
Conclusion
References
Organising Firebase
Earlier than we begin utilizing Firebase for our registration and authentication necessities, we’ve to first arrange our Firebase undertaking and likewise the authentication technique we’re utilizing.
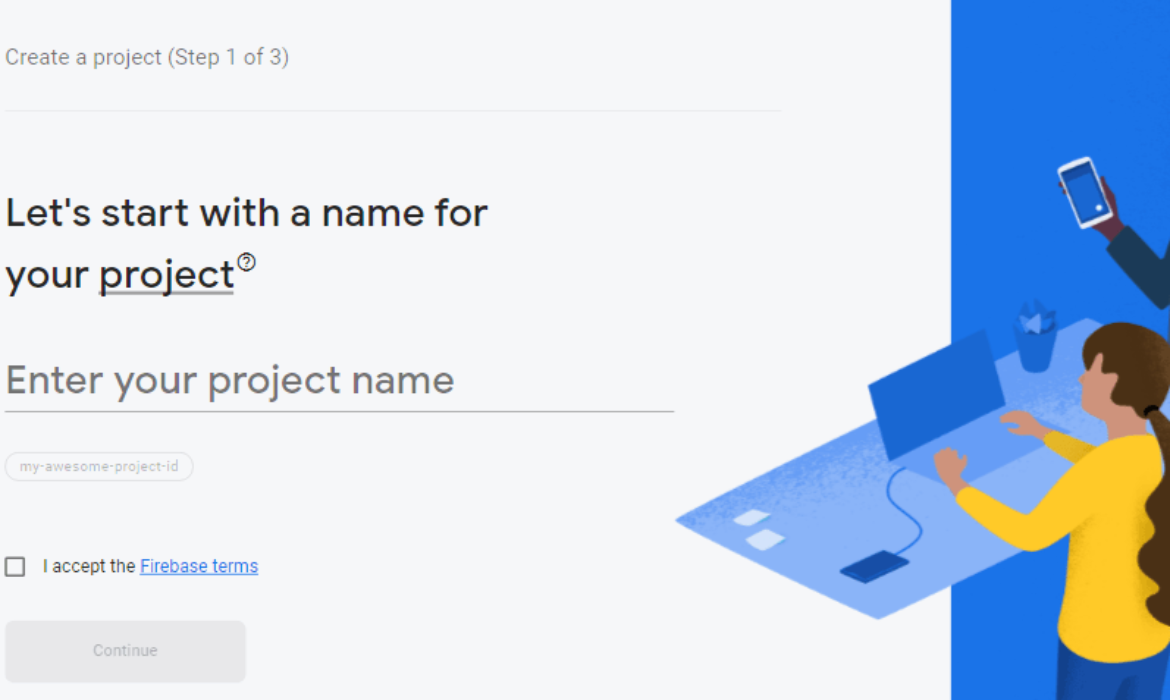
So as to add a undertaking, ensure you are logged into your Google account, then navigate to the Firebase console and click on on Add undertaking. From there, give the undertaking a reputation (I’m utilizing “Firebase-user-reg-auth”) and we must be all set to proceed.
Chances are you’ll be prompted to allow Google Analytics in some unspecified time in the future. There’s no want for it for this tutorial, so be at liberty to skip that step.
Firebase has numerous authentication strategies for each cell and internet, however earlier than we begin utilizing any of them, we’ve to first allow it on the Firebase Authentication web page. From the sidebar menu, click on on the Authentication icon, then, on the subsequent web page, click on on Get began.
We’re going to use E mail/Password authentication. Click on on it and we might be prompted with a display to allow it, which is strictly what we wish to do.
Cloning and organising the starter repo
I’ve already created a easy template we will use for this tutorial in order that we will focus particularly on studying methods to implement the functionalities. So what we have to do now could be clone the GitHub repo.
Hearth up your terminal. Right here’s what we will run from the command line:
git clone -b starter https://github.com/Tammibriggs/Firebase_user_auth.git
cd Firebase_user_auth
npm set up
I’ve additionally included Firebase model 9 within the dependency object of the bundle.json file. So, by operating the npm set up command, Firebase v9 — together with all different dependencies — might be put in.
With performed that, let’s begin the app with npm begin!
Integrating Firebase into our React app
To combine Firebase, we have to first get the net configuration object after which use it to initialize Firebase in our React app. Go over to the Firebase undertaking web page and we are going to see a set of choices as icons like this:
Click on on the internet (</>) icon to configure our Firebase undertaking for the net, and we are going to see a web page like this:
Enter firebase-user-auth because the identify of the net app. After that, click on on the Register app button, which takes us to the subsequent step the place our firebaseConfig object is offered.
Copy the config to the clipboard as we are going to want it afterward to initialize Firebase. Then click on on the Proceed to console button to finish the method.
Now, let’s initialize Firebase and Firebase Authentication in order that we will begin utilizing them in our app. Within the src listing of our React app, create a firebase.js file and add the next imports:
// src/firebase.js
import { initializeApp } from ‘firebase/app’
import {getAuth} from ‘firebase/auth’
Now, paste the config we copied earlier after the imports and add the next strains of code to initialize Firebase and Firebase Authentication.
// src/firebase.js
const app = initializeApp(firebaseConfig)
const auth = getAuth(app)
export {auth}
Our firebase.js file ought to now look one thing like this:
// src.firebase.js
import { initializeApp } from “firebase/app”
import { getAuth } from “firebase/auth”
const firebaseConfig = {
apiKey: “API_KEY”,
authDomain: “AUTH_DOMAIN”,
projectId: “PROJECT_ID”,
storageBucket: “STORAGE_BUCKET”,
messagingSenderId: “MESSAGING_SENDER_ID”,
appId: “APP_ID”
}
// Initialize Firebase and Firebase Authentication
const app = initializeApp(firebaseConfig)
const auth = getAuth(app)
export {auth}
Subsequent up, we’re going to cowl methods to use the ready-to-use capabilities offered by Firebase so as to add registration, e mail verification, and login performance to the template we cloned.
Creating Person Registration performance
In Firebase model 9, we will construct performance for person registration with the createUserWithEmailAndPassword operate. This operate takes three arguments:
auth occasion/serviceemailpassword
Providers are all the time handed as the primary arguments in model 9. In our case, it’s the auth service.
To create this performance, we might be working with the Register.js file within the src listing of our cloned template. What I did on this file is create three kind fields — e mail, password, and ensure password — and enter is managed by the state. Now, let’s get to enterprise.
Let’s begin by including a operate that validates the password and ensure password inputs, checking if they don’t seem to be empty and are the identical: Add the next strains of code after the states within the Register part:
// src/Register.js
// …
const validatePassword = () => {
let isValid = true
if (password !== ” && confirmPassword !== ”){
if (password !== confirmPassword) {
isValid = false
setError(‘Passwords doesn’t match’)
}
}
return isValid
}
// …
Within the above operate, we return an isValid variable which may return both true or false primarily based on the validity of the passwords. In a while, we are going to use the worth of this variable to create a situation the place the Firebase operate liable for registering customers will solely be invoked if isValid is true.
To create the registration performance, let’s begin by making the mandatory imports to the Register.js file:
// src/Register.js
import {auth} from ‘./firebase’
import {createUserWithEmailAndPassword} from ‘firebase/auth’
Now, add the next strains of code after the validatePassword password operate:
// src/Register.js
// …
const register = e => {
e.preventDefault()
setError(”)
if(validatePassword()) {
// Create a brand new person with e mail and password utilizing firebase
createUserWithEmailAndPassword(auth, e mail, password)
.then((res) => {
console.log(res.person)
})
.catch(err => setError(err.message))
}
setEmail(”)
setPassword(”)
setConfirmPassword(”)
}
// …
Within the above operate, we set a situation to name the createUserWithEmailAndPassword operate solely when the worth getting back from validatePassword is true.
For this to begin working, let’s name the register operate when the shape is submitted. We are able to do that by including an onSubmit occasion to the shape. Modify the opening tag of the registration_form to appear to be this:
// src/Register.js
<kind onSubmit={register} identify=’registration_form’>
With this, we will now register a brand new person on our web site. To check this by going over to http://localhost:3000/register within the browser, filling within the kind, then clicking on the Register button.
After clicking the Register button, if we open the browser’s console we are going to see particulars of the newly registered person.
Managing Person State with React Context API
Context API is a technique to share knowledge with elements at any stage of the React part tree with out having to cross it down as props. Since a person may be required by a unique part within the tree, utilizing the Context API is nice for managing the person state.
Earlier than we begin utilizing the Context API, there are some things we have to arrange:
Create a context object utilizing the createContext() methodPass the elements we wish to share the person state with as youngsters of Context.SupplierCross the worth we wish the kids/consuming part to entry as props to Context.Supplier
Let’s get to it. Within the src listing, create an AuthContext.js file and add the next strains of code to it:
// src/AuthContext.js
import React, {useContext} from ‘react’
const AuthContext = React.createContext()
export operate AuthProvider({youngsters, worth}) {
return (
<AuthContext.Supplier worth={worth}>
{youngsters}
</AuthContext.Supplier>
)
}
export operate useAuthValue(){
return useContext(AuthContext)
}
Within the above code, we created a context known as AuthContext together with that we additionally created two different capabilities that may permit us to simply use the Context API which is AuthProvider and useAuthValue.
The AuthProvider operate permits us to share the worth of the person’s state to all the kids of AuthContext.Supplier whereas useAuthValue permits us to simply entry the worth handed to AuthContext.Supplier.
Now, to offer the kids and worth props to AuthProvider, modify the App.js file to look one thing like this:
// src/App.js
// …
import {useState} from ‘react’
import {AuthProvider} from ‘./AuthContext’
operate App() {
const [currentUser, setCurrentUser] = useState(null)
return (
<Router>
<AuthProvider worth={{currentUser}}>
<Change>
…
</Change>
</AuthProvider>
</Router>
);
}
export default App;
Right here, we’re wrapping AuthProvider across the elements rendered by App. This manner, the currentUser worth provided to AuthProvider might be accessible to be used by all of the elements in our app besides the App part.
That’s it so far as organising the Context API! To make use of it, we’ve to import the useAuthValue operate and invoke it in any of the kid elements of AuthProvider, like Login. The code appears one thing like this:
import { useAuthValue } from “./AuthContext”
operate childOfAuthProvider(){
const {currentUser} = useAuthValue()
console.log(currentUser)
return …
}
Proper now, currentUser will all the time be null as a result of we’re not setting its worth to something. To set its worth, we have to first get the present person from Firebase which could be performed both by utilizing the auth occasion that was initialized in our firebase.js file (auth.currentUser), or the onAuthStateChanged operate, which truly occurs to be the advisable technique to get the present person. That manner, we make sure that the Auth object isn’t in an intermediate state — corresponding to initialization — once we get the present person.
Within the App.js file, add a useEffect import together with useState and likewise add the next imports:
// src/App.js
import {useState, useEffect} from ‘react’
import {auth} from ‘./firebase’
import {onAuthStateChanged} from ‘firebase/auth’
Now add the next line of code after the currentUser state within the App part:
// src/App.js
// …
useEffect(() => {
onAuthStateChanged(auth, (person) => {
setCurrentUser(person)
})
}, [])
// …
Within the above code, we’re getting the present person and setting it within the state when the part renders. Now once we register a person the currentUser state might be set with an object containing the person’s information.
Ship a verification e mail to a registered person
As soon as a person is registered, we wish them to confirm their e mail handle earlier than having the ability to entry the homepage of our web site. We are able to use the sendEmailVerification operate for this. It takes just one argument which is the item of the presently registered person. When invoked, Firebase sends an e mail to the registered person’s e mail handle with a hyperlink the place the person can confirm their e mail.
Let’s head over to the Register.js file and modify the Hyperlink and createUserWithEmailAndPassword import to appear to be this:
// src/Register.js
import {useHistory, Hyperlink} from ‘react-router-dom’
import {createUserWithEmailAndPassword, sendEmailVerification} from ‘firebase/auth’
Within the above code, we’ve additionally imported the useHistory hook. This may assist us entry and manipulate the browser’s historical past which, in brief, means we will use it to change between pages in our app. However earlier than we will use it we have to name it, so let’s add the next line of code after the error state:
// src/Register.js
// …
const historical past = useHistory()
// …
Now, modify the .then technique of the createUserWithEmailAndPassword operate to appear to be this:
// src/Register.js
// …
.then(() => {
sendEmailVerification(auth.currentUser)
.then(() => {
historical past.push(‘/verify-email’)
}).catch((err) => alert(err.message))
})
// …
What’s taking place right here is that when a person registers a legitimate e mail handle, they are going to be despatched a verification e mail, then taken to the verify-email web page.
There are a number of issues we have to do on this web page:
Show the person’s e mail after the half that claims “A verification e mail has been despatched to:”Make the Resend E mail button workCreate performance for disabling the Resend E mail button for 60 seconds after it’s clickedTake the person to their profile web page as soon as the e-mail has been verified
We’ll begin by displaying the registered person’s e mail. This requires using the AuthContext we created earlier. Within the VerifyEmail.js file, add the next import:
// src/VerifyEmail.js
import {useAuthValue} from ‘./AuthContext’
Then, add the next code earlier than the return assertion within the VerifyEmail part:
// src/VerifyEmail.js
const {currentUser} = useAuthValue()
Now, to show the e-mail, add the next code after the <br/> tag within the return assertion.
// src/VerifyEmail.js
// …
<span>{currentUser?.e mail}</span>
// …
Within the above code, we’re utilizing non-obligatory chaining to get the person’s e mail in order that when the e-mail is null our code will throw no errors.
Now, once we refresh the verify-email web page, we should always see the e-mail of the registered person.
Let’s transfer to the subsequent factor which is making the Resend E mail button work. First, let’s make the mandatory imports. Add the next imports to the VerifyEmail.js file:
// src/VerifyEmail.js
import {useState} from ‘react’
import {auth} from ‘./firebase’
import {sendEmailVerification} from ‘firebase/auth’
Now, let’s add a state that might be liable for disabling and enabling the Resend E mail button primarily based on whether or not or not the verification e mail has been despatched. This code goes after currentUser within the VerifyEmail part:
// src/VerifyEmail.js
const [buttonDisabled, setButtonDisabled] = useState(false)
For the operate that handles resending the verification e mail and disabling/enabling the button, we’d like this after the buttonDisabled state:
// src/VerifyEmail.js
// …
const resendEmailVerification = () => {
setButtonDisabled(true)
sendEmailVerification(auth.currentUser)
.then(() => {
setButtonDisabled(false)
}).catch((err) => {
alert(err.message)
setButtonDisabled(false)
})
}
// …
Subsequent, within the return assertion, modify the Resend E mail button like this:
// …
<button
onClick={resendEmailVerification}
disabled={buttonDisabled}
>Resend E mail</button>
// …
Now, if we go over to the verify-email web page and click on the button, one other e mail might be despatched to us. However there’s a drawback with how we created this performance as a result of if we attempt to click on the button once more in lower than a minute, we get an error from Firebase saying we despatched too many requests. It is because Firebase has a one minute interval earlier than having the ability to ship one other e mail to the identical handle. That’s the online factor we have to handle.
What we have to do is make the button keep disabled for 60 seconds (or extra) after a verification e mail is distributed. We are able to improve the person expertise a bit by displaying a countdown timer in Resend E mail button to let the person know the button is simply briefly disabled.
Within the VerifyEmail.js file, add a useEffect import:
import {useState, useEffect} from ‘react’
Subsequent, add the next after the buttonDisabled state:
// src/VerifyEmail.js
const [time, setTime] = useState(60)
const [timeActive, setTimeActive] = useState(false)
Within the above code, we’ve created a time state which might be used for the 60-second countdown and likewise a timeActive state which might be used to manage when the rely down will begin.
Add the next strains of code after the states we simply created:
// src/VerifyEmail.js
// …
useEffect(() => {
let interval = null
if(timeActive && time !== 0 ){
interval = setInterval(() => {
setTime((time) => time – 1)
}, 1000)
}else if(time === 0){
setTimeActive(false)
setTime(60)
clearInterval(interval)
}
return () => clearInterval(interval);
}, [timeActive, time])
// …
Within the above code, we created a useEffect hook that solely runs when the timeActive or time state modifications. On this hook, we’re reducing the earlier worth of the time state by one each second utilizing the setInterval technique, then we’re stopping the decrementing of the time state when its worth equals zero.
Because the useEffect hook depends on the timeActive and time state, certainly one of these states has to vary earlier than the time rely down can begin. Altering the time state is just not an possibility as a result of the countdown has to begin solely when a verification e mail has been despatched. So, as an alternative, we have to change the timeActive state.
Within the resendEmailVerification operate, modify the .then technique of sendEmailVerification to appear to be this:
// src/VerifyEmail.js
// …
.then(() => {
setButtonDisabled(false)
setTimeActive(true)
})
// …
Now, when an e mail is distributed, the timeActive state will change to true and the rely down will begin. Within the code above we have to change how we’re disabling the button as a result of, when the rely down is lively, we wish the disabled button.
We’ll do this shortly, however proper now, let’s make the countdown timer seen to the person. Modify the Resend E mail button to appear to be this:
// src/VerifyEmail.js
<button
onClick={resendEmailVerification}
disabled={buttonDisabled}
>Resend E mail {timeActive && time}</button>
To maintain the button in a disabled state whereas the countdown is lively, let’s modify the disabled attribute of the button to appear to be this:
disabled={timeActive}
With this, the button might be disabled for a minute when a verification e mail is distributed. Now we will go forward and take away the buttonDisabled state from our code.
Though this performance works, there’s nonetheless one drawback with how we applied it: when a person registers and is taken to the verify-email web page once they haven’t obtained an e mail but, they might attempt to click on the Resend E mail button, and in the event that they do this in lower than a minute, Firebase will error out once more as a result of we’ve made too many requests.
To repair this, we have to make the Resend E mail button disabled for 60 seconds after an e mail is distributed to the newly registered person. This implies we’d like a technique to change the timeActive state throughout the Register part. We are able to additionally use the Context API for this. It’ll permit us to globally manipulate and entry the timeActive state.
Let’s make just a few modifications to our code to make issues work correctly. Within the VerifyEmail part, minimize the timeActive state and paste it into the App part after the currentUser state.
// src/App.js
operate App() {
// …
const [timeActive, setTimeActive] = useState(false)
// …
Subsequent, put timeActive and setTimeActive inside the item of AuthProvider worth prop. It ought to appear to be this:
// src/App.js
// …
<AuthProvider worth={{currentUser, timeActive, setTimeActive}}>
// …
Now we will entry timeActive and setTimeActive throughout the youngsters of AuthProvider. To repair the error in our code, go to the VerifyEmail.js file and de-structure each timeActive and setTimeActive from useAuthProvider:
// src/VerifyEmail.js
const {timeActive, setTimeActive} = useAuthValue()
Now, to vary the timeActive state after a verification e mail has been despatched to the registered person, add the next import within the Register.js file:
// src/Register.js
import {useAuthValue} from ‘./AuthContext’
Subsequent, de-structure setTimeActive from useAuthValue with this snippet among the many different states within the Register part:
// src/Register.js
const {setTimeActive} = useAuthValue()
Lastly, within the register operate, set the timeActive state with the .then the tactic of sendEmailVerification:
// src/Register.js
// …
.then(() => {
setTimeActive(true)
historical past.push(‘/verify-email’)
})
// …
With this, a person will have the ability to ship a verification e mail with out getting any errors from Firebase.
The very last thing to repair regarding person verification is to take the person to their profile web page after they’ve verified their e mail. To do that, we are going to use a reload operate within the currentUser object. It permits us to reload the person object coming from Firebase, that manner we are going to know when one thing has modified.
First, let’s make the wanted imports. Within the VerifyEmail.js file, let’s add this:
// src/VerifyEmail.js
import {useHistory} from ‘react-router-dom’
We’re importing useHistory in order that we will use to navigate the person to the profile web page. Subsequent, add the next line of code after the states:
// src/VerifyEmail.js
const historical past = useHistory()
And, lastly, add the next strains of code after the historical past variable:
// src/VerifyEmail.js
// …
useEffect(() => {
const interval = setInterval(() => {
currentUser?.reload()
.then(() => {
if(currentUser?.emailVerified){
clearInterval(interval)
historical past.push(‘/’)
}
})
.catch((err) => {
alert(err.message)
})
}, 1000)
}, [history, currentUser])
// …
Within the above code, we’re operating the reload operate each one second till the person’s e mail has been verified, and, if it has, we’re navigating the person to their profile web page.
To check this, let’s confirm our e mail by following the directions within the e mail despatched from Firebase. If all is nice, we might be routinely taken to our profile web page.
Proper now the profile web page is exhibiting no person knowledge and he Signal Out hyperlink doesn’t work. That’s ur subsequent job.
Engaged on the person profile web page
Let’s begin by displaying the E mail and E mail verified values. For this, we are going to make use of the currentUser state in AuthContext. What we have to do is import useAuthValue, de-structure currentUser from it, after which show the E mail and E mail verified worth from the person object.
Here’s what the Profile.js file ought to appear to be:
// src/Profile.js
import ‘./profile.css’
import {useAuthValue} from ‘./AuthContext’
operate Profile() {
const {currentUser} = useAuthValue()
return (
<div className=’middle’>
<div className=’profile’>
<h1>Profile</h1>
<p><sturdy>E mail: </sturdy>{currentUser?.e mail}</p>
<p>
<sturdy>E mail verified: </sturdy>
{`${currentUser?.emailVerified}`}
</p>
<span>Signal Out</span>
</div>
</div>
)
}
export default Profile
With this, the E mail and E mail verified worth ought to now be displayed on our profile web page.
To get the signal out performance working, we are going to use the signOut operate. It takes just one argument, which is the auth occasion. So, in Profile.js. let’s add these imports.
// src/Profile.js
import { signOut } from ‘firebase/auth’
import { auth } from ‘./firebase’
Now, within the return assertion, modify the <span> that comprises “Signal Out” so that’s calls the signOut operate when clicked:
// src/Profile.js
// …
<span onClick={() => signOut(auth)}>Signal Out</span>
// …
Making a Non-public Route for the Profile part
Proper now, even with an unverified e mail handle, a person can entry the profile web page. We don’t need that. Unverified customers must be redirected to the login web page once they attempt to entry the profile. That is the place personal routes are available in.
Within the src listing, let’s create a brand new PrivateRoute.js file and add the next code to it:
// src/PrivateRoute.js
import {Route, Redirect} from ‘react-router-dom’
import {useAuthValue} from ‘./AuthContext’
export default operate PrivateRoute({part:Part, …relaxation}) {
const {currentUser} = useAuthValue()
return (
<Route
{…relaxation}
render={props => {
return currentUser?.emailVerified ? <Part {…props} /> : <Redirect to=’/login’ />
}}>
</Route>
)
}
This PrivateRoute is sort of just like utilizing the Route. The distinction is that we’re utilizing a render prop to redirect the person to the profile web page if their e mail is unverified.
We would like the profile web page to be personal, so effectively import PrivateRoute:
// src/App.js
import PrivateRoute from ‘./PrivateRoute’
Then we will exchange Route with PrivateRoute within the Profile part. The Profile route ought to now appear to be this:
// src/App.js
<PrivateRoute precise path=”/” part={Profile} />
Good! We have now made the profile web page accessible solely to customers with verified emails.
Creating login performance
Since solely customers with verified emails can entry their profile web page when logged in with the signInWithEmailAndPassword operate, we additionally have to verify if their e mail has been verified and, whether it is unverified, the person must be redirected to the verify-email web page the place the sixty-second countdown must also begin.
These are the imports we have to add to the Login.js file:
import {signInWithEmailAndPassword, sendEmailVerification} from ‘firebase/auth’
import {auth} from ‘./firebase’
import {useHistory} from ‘react-router-dom’
import {useAuthValue} from ‘./AuthContext’
Subsequent, add the next line of code among the many states within the Login part.
// src/Login.js
const {setTimeActive} = useAuthValue()
const historical past = useHistory()
Then add the next operate after the historical past variable:
// src/Login.js
// …
const login = e => {
e.preventDefault()
signInWithEmailAndPassword(auth, e mail, password)
.then(() => {
if(!auth.currentUser.emailVerified) {
sendEmailVerification(auth.currentUser)
.then(() => {
setTimeActive(true)
historical past.push(‘/verify-email’)
})
.catch(err => alert(err.message))
}else{
historical past.push(‘/’)
}
})
.catch(err => setError(err.message))
}
// …
This logs in a person after which verify if whether or not they’re verified or not. If they’re verified, we navigate them to their profile web page. But when they’re unverified, we ship a verification e mail, then redirect them to the verify-email web page.
All we have to do to make this work is name the login operate when the shape is submitted. So, let’s modify the opening tag of the login_form to this:
// src/Login.js
<kind onSubmit={login} identify=’login_form’>
And, hey, we’re performed!
Conclusion
On this tutorial, we’ve realized methods to use model 9 of the Firebase Authentication to construct a totally functioning person registration and authentication service in React. Is it tremendous simple? No, there are just a few factor we have to juggle. However is it a heck of lots simpler than constructing our personal service from scratch? You wager it’s! And that’s what I hope you bought from studying this.
References
Get Began with Firebase Authentication on Web sites (Firebase documentation)Handle Customers in Firebase (Firebase documentation)
Person Registration and Auth Utilizing Firebase and React initially revealed on CSS-Tips. It’s best to get the e-newsletter and develop into a supporter.


Subscribe to MarketingSolution.
Receive web development discounts & web design tutorials.
Now! Lets GROW Together!