
Transferring your WordPress website to a different location generally is a hectic and fiddly expertise, not helped by the very fact you possibly can’t simply merely transfer your information and database. No, that’s simply not how WordPress works.
Thankfully, WordPress has a useful “Import” and “Export” software inbuilt. However sadly, it’ll solely go well with some primary necessities and you’ll want to improvise somewhat to attain different results.
On this article, I’ll present you step-by-step the right way to migrate your WordPress set up’s content material to a brand new place.
Let’s get cracking!
Earlier than We Begin: Again Up Your Web site
Some WordPress installations or server setups might current you with distinctive challenges on migrating content material. Though this text will take care of an extra distinctive eventuality (particularly that you just solely need to switch a half of your WordPress set up’s content material), there’s no assure that the steps detailed right here will unfailingly work for each setup.
It goes with out saying that you just’re solely answerable for your website, even when following this information to the letter; there’s some database work concerned relying on what you need to do, and for those who unintentionally delete an enormous chunk of your website, that’s all the way down to you. Principally, watch out with this!
For the needs of this put up, I’ve created two separate localhost installations of WordPress to offer you photos of every step. You would possibly wish to strive transferring your content material to a check website to test it really works.
To that finish, I’d suggest making a backup of your complete website at this level. In fact, you try this commonly, don’t you? (If not, you undoubtedly ought to be. Get to it.)
If you wish to do that manually, keep in mind to incorporate each your database and website information (primarily as a result of this contains your web site’s Uploads folder).
Backing Up Information
You’ll be able to create and obtain a ZIP of your website information through FTP. How to do that varies per FTP consumer however is mostly pretty apparent. Be sure you obtain and securely retailer your backup compressed file – simply as with every backup.
Backing Up Your Database
Login to your phpMyAdmin account and choose the database during which WordPress is put in.
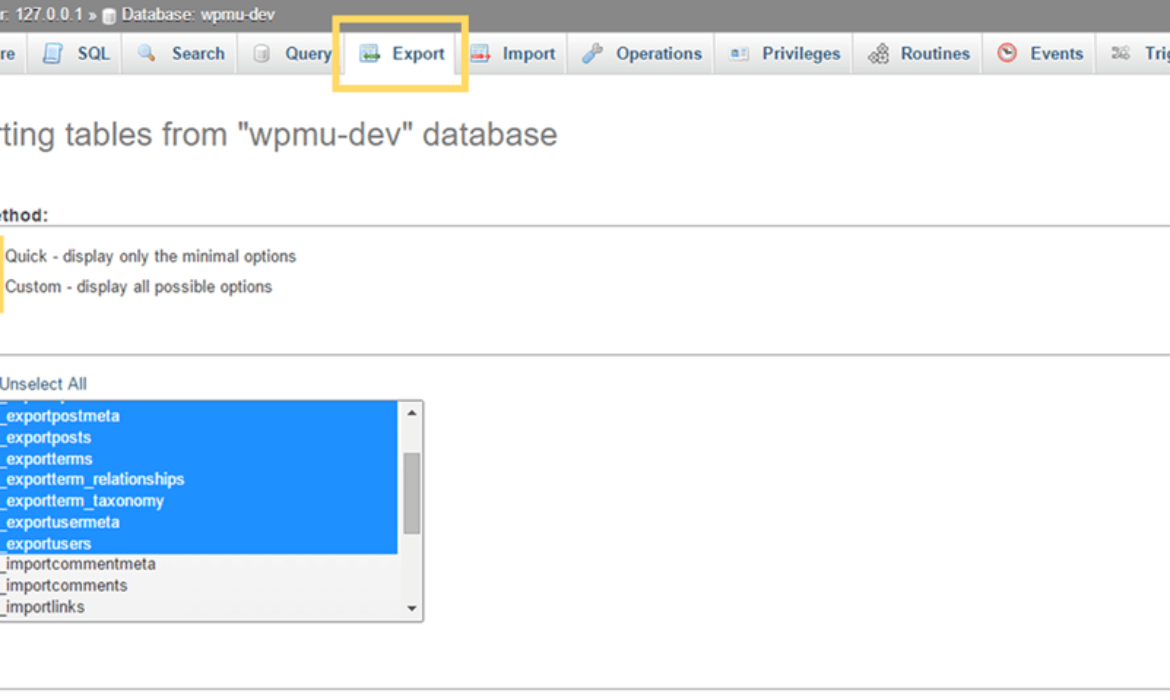
Choose Export from the highest menu. For most individuals, “Fast” choices will likely be enough. Nonetheless, if in case you have tables aside from the WordPress set up you need to again up in the identical database, click on Customized to pick out the tables you need to again up; all different choices ought to stay untouched. Lastly, click on Go to obtain your database backup file (.sql format).
Your WordPress tables are prefixed “wp_” by default – since I’ve two installations in the identical database, mine are literally prefixed wpmudev_export and wpmudev_import. Right here, I’m backing up the wpmudev_export information.
Hopefully, these backups received’t be wanted, but it surely’s all the time advisable earlier than embarking upon such work. If the positioning to which you’re migrating content material already has content material, be sure you again up that one too.
With precautions out of the way in which, let’s get to work!
Altering Your WordPress Set up’s URL? Transferring a Complete Website
Should you’re simply seeking to change your web site to a brand new URL or in any other case need to switch completely every little thing from one set up to a different, the excellent news is that you just’ve picked the straightforward possibility. WordPress’s personal import and export instruments will work completely for you so no have to do something too sophisticated underneath the hood.
Right here’s the right way to switch all your WordPress content material – pages, photographs and information, posts and every little thing else – to a brand new set up.
By the way, it’s most likely best to create a brand new set up in your new server (and even the brand new location inside a server) and import/export than to vary your information’ configurations. Nonetheless, for those who’d reasonably do it that approach, the WordPress Codex can advise. Your set up ought to be up-to-date with the most recent WordPress model so it received’t be an issue, but when it’s not, improve your outdated set up first. Should you actually can’t replace for some purpose – resembling holding a plugin that doesn’t work with new variations – your new set up might be an outdated model. That is removed from beneficial as a result of many aged variations of WordPress have important safety flaws.
The right way to Transfer Content material From One WordPress Website to One other
Export From Your Outdated Set up
Set up the Importer
Add Your Content material
Assign the Content material
1. Export From Your Outdated Set up
WordPress’s personal Export Device.
Go to your WordPress dashboard and choose the Export merchandise from the Instruments part.
Since you’re exporting every little thing, it’s simple: hold the All content material possibility chosen and hit Obtain Export File.
An XML file will likely be created. Preserve it in a protected place and go throughout to the set up to which you’re migrating.
2. Set up the Importer
The WordPress importers display.
On the brand new WordPress set up, go as soon as once more to Instruments, however this time choose Import.
You’ll be proven a listing of importers, from which it is best to choose the WordPress possibility.
Click on Set up Now and look ahead to the importer plugin to obtain and set up.
If all of it works, you possibly can click on Activate Plugin & Run Importer on the subsequent display.
At this level, you’re all able to import and the XML file you generated earlier comes into play.
3. Add Your Content material
Add the WordPress eXtended RSS (WXR) XML file you created earlier.
Click on Select File on the display that follows and choose the XML file you created on the outdated website.
Subsequent, click on Add file and import.
4. Assign the Content material
You’ll be able to import or add new creator accounts, or attribute content material to current authors. Make sure you import and obtain attachments.
You’ll be given an choice to assign content material to current customers on the brand new website (if in case you have an account on each, you possibly can assign your outdated posts to your new account), or create new customers both with their outdated usernames or with a brand new one you choose. This ensures all of the content material is attributed to an creator account that exists on the brand new website.
If in case you have any photographs or information to maneuver to the brand new website, make completely certain that you just tick Obtain and import file attachments – it’s not chosen by default.
Hit the Submit button and also you’re achieved! The web page might take somewhat longer than standard to load as a result of it’s creating all the brand new rows on the database, but it surely will get by it. Simply wait patiently for it to be processed and your whole content material ought to be imported onto the brand new website prepared for its life there.
Partial Content material Motion
In order that’s the straightforward bit out of the way in which. Nonetheless, for those who’re seeking to export solely some of your content material, I’m afraid to say that WordPress’s instruments most likely received’t cater on your wants on their very own.
Choosing All content material is the one approach to export your attachments (information that seem underneath the Media part). Subsequently, if you wish to switch particular elements of the content material and your photographs, you’ll both want to maneuver every little thing throughout then delete it (time consuming for bigger websites) or poke round in your information and database – which I shall present you the right way to do now.
The exporting and altering SQL that I’m about to indicate you’ll be demonstrated for transferring attachments, however you can even use the same methodology to switch the entire database throughout. That is helpful if you wish to switch every little thing however your XML file is just too giant to add by the importer.
1. Choose the Content material You Need to Export
Enterprise as soon as extra to the Instruments > Export display to start with.
Right here I’ve chosen to export solely posts after mid-2010 from a sure creator. You can even select to export by standing (eg. Printed, Pending, Draft) or their Class. Different content material varieties like pages (or Suggestions, Portfolio, and so on. if enabled) might be chosen.
When you’ve chosen which content material you’d wish to export, click on Obtain Export File as earlier than. If there are a number of alternatives you’d wish to make (eg. two authors’ posts in a date vary, or somebody’s posts and all pages), it’s solely attainable to return and create a number of export information for every choice.
2. Import as Earlier than
After you’ve gotten all of the WXR XML information you need, go to the brand new website and set up the WordPress Importer as beforehand proven. You’ll be able to add your information (one after the other) as earlier than they usually’ll set up the particular posts/pages/different content material onto the positioning.
Nonetheless, this isn’t the tip, since you’ll discover that you just nonetheless don’t have any attachments (eg. uploaded photographs) in your set up fairly but.
3. Duplicate Media Information
Go to your outdated set up’s FTP consumer and discover the /wp-content/uploads/ folder. I’m utilizing Home windows 10’s File Explorer as my FTP consumer, however most ought to be capable to compress information and obtain them.
Relying in your FTP consumer, compressing all folders inside your uploads listing right into a .zip file will likely be achieved by totally different strategies.
Obtain the .ZIP file you generate and add it to your new website’s FTP (or minimize and paste it for those who can entry each websites by your FTP consumer).
I’m reducing and pasting my compressed uploads throughout, however you possibly can obtain and add if you’ll want to change between FTP shoppers.
You’ll be able to then extract all of the information from the compressed folder into the Uploads listing.
Sadly, that’s not the tip of it; whereas your information are in the appropriate place, your WordPress set up received’t find out about them as a result of the attachment particulars haven’t but been copied throughout from the database.
Your new WordPress database doesn’t know concerning the information you’ve uploaded to the brand new server but.
4. Export Attachment Posts
Head over to your outdated website’s phpMyAdmin database and discover the wp_posts desk (exchange wp_ together with your prefix as obligatory).
Once more, I used wpmudev_exportposts, however exchange the desk title with the appropriate prefix as relevant to your database.
At this level, you’ll want to discover the attachment posts (these are the media posts) so paste within the following SQL (altering the desk title to have the appropriate prefix if obligatory) and hit Go.
SELECT
*
FROM
`wp_posts`
WHERE
`post_type` = “attachment”
The SQL question will return solely attachment posts.
Scroll to the underside of the question outcomes and test Present all so all attachment posts are displaying. As soon as all rows are displayed, select Examine All then click on Export.
At this level, issues get a bit extra sophisticated, however stick with me and comply with the steps rigorously and you ought to be effective.
For the needs of the image, the choices you’ll want to vary have been moved up the web page. Chances are you’ll have to scroll down to search out them.
Select Customized to indicate all attainable settings.
Scroll all the way down to the Format-specific Choices part.
Select information.
Go away every little thing else as it’s and click on Go.
5. Edit Your SQL
This step is important in case your new set up has a distinct database prefix to the one from which you’ve simply downloaded your SQL export file.
Edit the .sql file utilizing a textual content editor resembling Notepad++, discovering and changing the outdated prefix with the brand new prefix.
In my case, my unique database was prefixed wpmudev_export and the one to which I will likely be transferring the attachments is prefixed wpmudev_import!
In case your prefixes are the identical (eg. each tables are wp_posts), that’s effective and you may ignore this step.
6. Import Attachment Posts
As ever, discover the desk with the appropriate prefix as relevant!
Go to your new database and discover wp_posts (or equal); click on Import.
Click on Select File – be sure you click on, don’t drag it in, as this implies it received’t be uploaded in the appropriate place – and choose the exported SQL file.
Go away all different choices as they’re and execute the question by hitting Go. You’ll see a hit message as soon as it’s completed and all of your attachments will now be seen underneath Media – though there’s an extra step earlier than your photographs will begin displaying up correctly.
As you possibly can see, not one of the photographs really present as photographs…but!
7. Export Submit Meta
Once more, the choices you’ll want to change are on this image. Chances are you’ll have to scroll to search out them.
Much like the earlier database work, this time discover your outdated set up’s wp_postmeta desk and choose the Export tab.
Choose Customized settings once more and select information reasonably than construction and information, simply as earlier than.
This time, additionally find the Knowledge Creation Choices heading and choose REPLACE because the operate to make use of when dumping information.
As soon as once more, click on Go to create and obtain your SQL file.
8. Edit Your SQL
Once more, you’ll want to change the prefixes in your SQL file if the brand new database prefix will likely be totally different. You must also discover all references to your outdated URL and exchange them with the brand new one.
9. Import Submit Meta
Go to your new wp_postmeta (or different relevant prefix) desk and, precisely as earlier than, import your edited SQL file into the brand new set up.
Your media library is now full as soon as extra, prepared to suit again into your transferred content material (lastly).
Lastly, all of your photographs present up and might be proven inside content material!
Ending Up
Should you’ve bought by all that, nicely achieved – it’s a little bit of a roundabout methodology simply to switch some photographs throughout with particular posts.
In fact, there are nonetheless catches with this: for those who solely need to migrate a number of the photographs, you’ll want to undergo and select the folders (hopefully you need them by date or it could take ceaselessly) extra rigorously when importing. You possibly can additionally run into hassle with duplicate major keys transferring wp_posts for those who already had posts on the brand new set up.
Clearly, to make the Import/Export course of extra intuitive – reasonably than requiring such inventive considering with the databases behind the CMS – some work will have to be accomplished for a future WordPress launch. Whereas we wait, nonetheless, for those who do want to maneuver a few of your content material, this could give you the results you want – it’s nicely well worth the time!
Should you’ve bought any extra concepts and strategies for transferring throughout elements of a WordPress set up with all of the content material in tow, we’d love you to share it with us within the feedback. Likewise, tell us for those who’re having any points with these strategies and we are able to attempt to offer you a hand.


Subscribe to MarketingSolution.
Receive web development discounts & web design tutorials.
Now! Lets GROW Together!