
I like shapes, particularly colourful ones! Shapes on web sites are in the identical class of helpfulness as background colours, photos, banners, part separators, art work, and lots of extra: they might help us perceive context and inform our actions by way of affordances.
A couple of months again, I constructed an software to have interaction my 7-year previous daughter with arithmetic. Other than primary addition and subtraction, my goal was to current questions utilizing shapes. That’s once I received aware of the CSS clip-path property, a dependable strategy to make shapes on the internet. Then, I ended up constructing one other app known as, TryShape utilizing the facility of clip-path.
I’ll stroll you thru the story behind TryShape and the way it helps create, handle, share, and export shapes. We’ll cowl so much about CSS clip-path alongside the way in which and the way it helped me shortly construct the app.
Listed below are just a few vital hyperlinks:
TryShape web siteGitHub repoVideo demonpm bundle to wrap clip-path for React
First, the CSS clip-path property and shapes
Think about you could have a plain piece of paper and a pencil to attract a form (say, a sq.) on it. How will you proceed? Almost definitely, you’ll begin from a point, then draw a line to succeed in one other level, then repeat it precise three extra occasions to return again to the preliminary level. You additionally need to ensure you have reverse traces parallel and of the identical size.
So, the important components for a form are factors, traces, instructions, curves, angles, and lengths, amongst many others. The CSS clip-path helps specify many of those properties to clip a area of an HTML factor to indicate a particular area. The half that’s contained in the clipped area is proven, and the remaining is hidden. It offers an ocean of alternatives to builders to create numerous shapes utilizing clip-path property.
Be taught extra about clipping and the way it’s totally different from masking.
The clip-path values for form creation
The clip-path property accepts the next values for creating shapes:
circle()ellipse()inset()polygon()A clip supply utilizing url() functionpath()
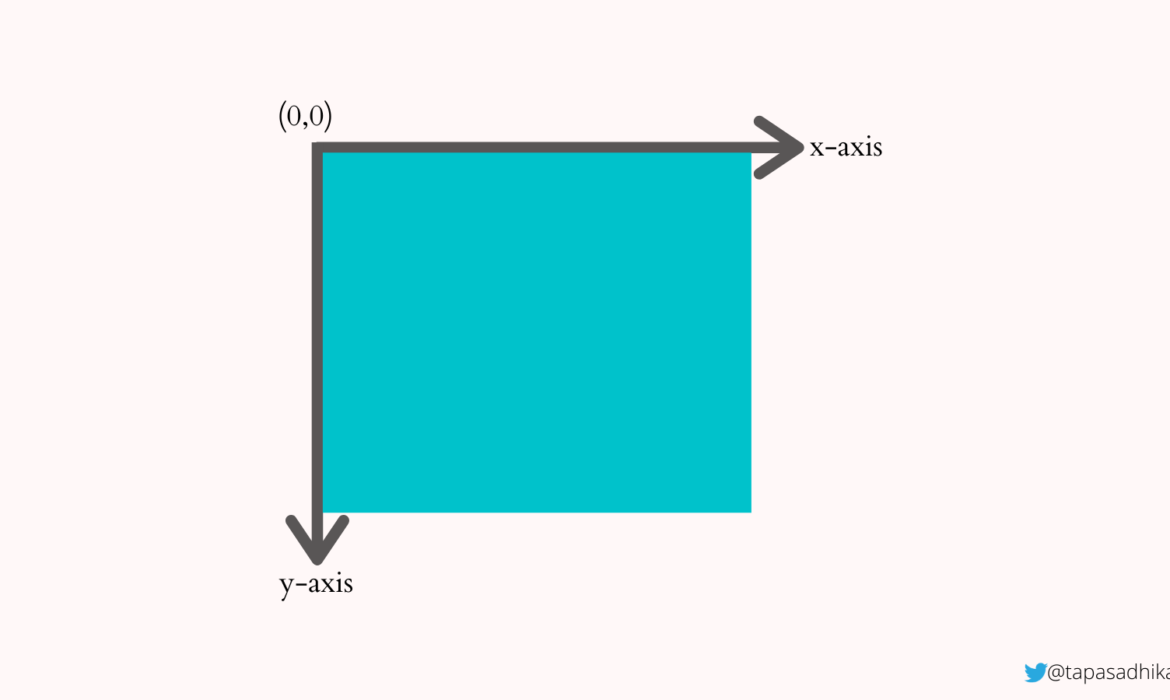
We have to perceive the fundamental coordinate system a bit to make use of these values. When making use of the clip-path property on a component to create shapes, we should think about the x-axis, y-axis, and the preliminary coordinates (0,0) on the factor’s top-left nook.
Here’s a div factor with its x-axis, y-axis, and preliminary coordinates (0,0).
Preliminary coordinates(0,0) with x-axis and y-axis
Now let’s use the circle() worth to create a round form. We are able to specify the place and radius of the circle utilizing this worth. For instance, to clip a round form on the coordinate place (70, 70) with a radius of 70px, we are able to specify the clip-path property worth as:
clip-path: circle(70px at 70px 70px)
So, the middle of the circle is positioned on the coordinate (70, 70) with a 70px radius. Now, solely this round area is clipped and proven on the factor. The remainder of the portion of the factor is hidden to create the impression of a circle form.
The middle of the circle is positioned at (70, 70) coordinates with a 70px x 70px space clipped. Therefore the complete circle is proven.
Subsequent, what if we wish to specify the place at (0,0)? On this case, the circle’s heart is positioned on the (0,0) place with a radius of 70px. That makes solely a portion of the circle seen contained in the factor.
The middle of the circle is positioned at (0, 0) coordinates with a 70px x 70px space clipping the bottom-left area of the circle.
Let’s transfer on to make use of the opposite two important values, inset() and polygon(). We use an inset to outline an oblong form. We are able to specify the hole that every of the 4 edges could need to clip a area from a component. For instance:
clip-path: inset(30px)
The above clip-path worth clips a area by leaving out the 30px values from factor’s edges. We are able to see that within the picture under. We are able to additionally specify a special inset worth for every of the perimeters.
The inset() perform permits us to clip and space from the skin fringe of a form.
Subsequent is the polygon() worth. We are able to create a polygonal form utilizing a set of vertices. Take this instance:
clip-path: polygon(10% 10%, 90% 10%, 90% 90%, 10% 80%)
Right here we’re specifying a set of vertices to create a area for clipping. The picture under reveals the place of every vertex to create a polygonal form. We are able to specify as many vertices as we wish.
The polygon() perform permits us to create polygonal shapes utilizing the set of vertices handed to it.
Subsequent, let’s check out the ellipse() and the url() values. The ellipse() worth helps create shapes by specifying two radii values and a place. Within the picture under, we see an ellipse on the place the place the radii is at (50%,50%) and the form is 70px broad and 100px tall.
We have to specify two radii values and a place to create an ellipse.
url() is a CSS perform to specify the clip-path factor’s ID worth to render an SVG form. Please check out the picture under. Now we have outlined a SVG form utilizing clipPath and path components. You should utilize the ID worth of the clipPath factor as an argument to the url() perform to render this form.
Right here, we’re making a coronary heart form utilizing the url() perform
Moreover, we are able to use the trail values immediately within the path() perform to attract the form.
Right here we’re making a curvy form utilizing the trail() perform.
Alright. I hope you’ve got an understanding of various clip-path property values. With this understanding, let’s take a loot at some implementations and mess around with them. Here’s a Pen for you. Please use it to attempt including, modifying values to create a brand new form.
Let’s discuss TryShape
It’s time to speak about TryShape and its background story. TryShape is an open-source software that helps create, export, share, and use any shapes of your alternative. You’ll be able to create banners, circles, arts, polygons and export them as SVG, PNG, and JPEG information. You too can create a CSS code snippet to repeat and use in your software.
TryShape is constructed utilizing the next framework and libraries (and clip-path, in fact):
CSS clip-path: We’ve already mentioned the facility of this superior CSS property.Subsequent.js: The good React-based framework round. It helped me create pages, parts, interactions, and APIs to hook up with the back-end database.HarperDB: A versatile database to retailer knowledge and question them utilizing each SQL and No-SQL interactions. TryShape has its schema and tables created within the HarperDB cloud. The Subsequent.js APIs work together with the schema and tables to carry out required CRUD operations from the consumer interface.Firebase: Authentication providers from Google. TryShape makes use of it to get the social login working utilizing Google, GitHub, Twitter, and different accounts.react-icons: One store for all of the icons for a React-based softwaredate-fns: The fashionable, light-weight library for date formattingaxios: Making the API calls straightforward from the React partsstyled-components: A structured strategy to create CSS guidelines from react partsreact-clip-path: A homegrown module to deal with clip-path property in a React appreact-draggable: Make an HTML factor draggable in a React app. TryShape makes use of it to regulate the place of form vertices.downloadjs: Set off a obtain from JavaScripthtml-to-image: Converts an HTML factor to picture (together with SVG, JPEG, and PNG)Vercel: Greatest for internet hosting a Subsequent.js app
Creating shapes in TryShape utilizing CSS clip-path
Let me spotlight the supply code that helps create a form utilizing the CSS clip-path property. The code snippet under defines the consumer interface construction for a container factor (Field) that’s 300px sq.. The Field factor has two little one components, Shadow and Part.
<Field
top=”300px”
width=”300px”
onClick={(e) => props.handleChange(e)}>
{
props.shapeInformation.showShadow &&
<Shadow
backgroundColor={props.shapeInformation.backgroundColor}
id=”shapeShadow” />
}
<Part
method={props.shapeInformation.method}
backgroundColor={props.shapeInformation.backgroundColor}
id=”clippedShape” />
</Field>
The Shadow element defines the realm that’s hidden by the clip-path clipping. We create it to indicate a lightweight colour background to make this space partially seen to the top consumer. The Part is to assign the clip-path worth to indicate the clipped space.
See the styled-component definitions of Field, Shadow, and Part under:
// The styled-components code to create the UI parts utilizing CSS properties
// The container div
const Field = styled.div`
width: $ ‘100px’;
top: $;
margin: 0 auto;
place: relative;
`;
// Shadow defines the realm that’s hidden by the `clip-path` clipping
// We present a lightweight colour background to make this space partially seen.
const Shadow = styled.div`
background-color: $;
opacity: 0.25;
place: absolute;
prime: 10px;
left: 10px;
proper: 10px;
backside: 10px;
`;
// The precise element that takes the `clip-path` worth (method) and set
// to the `clip-path` property.
const Part = styled.div`
clip-path: ${props => props.method}; // the method is the clip-path worth
background-color: $;
place: absolute;
prime: 10px;
left: 10px;
proper: 10px;
backside: 10px;
`;
The parts to indicate a form(each seen and hidden areas) after the clipping.
Please be at liberty to look into all the codebase within the GitHub repo.
The longer term scope of TryShape
TryShape works effectively with the creation and administration of primary shapes utilizing CSS clip-path within the background. It’s useful to export the shapes and the CSS code snippets to make use of in your internet purposes. It has the potential to develop with many extra useful options. The first one would be the skill to create shapes with curvy edges.
To help the curvy shapes, we’d like the help of the next values in TryShape:
a clip supply utilizing url() andpath().
With the assistance of those values, we are able to create shapes utilizing SVG after which use one of many above values. Right here is an instance of the url() CSS perform to create a form utilizing the SVG help.
<div class=”coronary heart”>Coronary heart</div>
<svg>
<clipPath id=”heart-path” clipPathUnits=”objectBoundingBox”>
<path d=”M0.5,1
C 0.5,1,0,0.7,0,0.3
A 0.25,0.25,1,1,1,0.5,0.3
A 0.25,0.25,1,1,1,1,0.3
C 1,0.7,0.5,1,0.5,1 Z” />
</clipPath>
</svg>
Then, the CSS::
.coronary heart {
clip-path: url(#heart-path);
}
Now, let’s create a form utilizing the trail() worth. The HTML ought to have a component like a div:
<div class=”curve”>Curve</div>
In CSS:
.curve {
clip-path: path(“M 10 80 C 40 10, 65 10, 95 80 S 150 150, 180 80”);
}
Earlier than we finish…
I hope you loved assembly my TryShape app and studying about the concept that results in it, the methods I thought of, the know-how below the hood, and its future potential. Please think about making an attempt it and searching by way of the supply code. And, in fact, be at liberty to contribute to it with points, characteristic requests, and code.
Earlier than we finish, I wish to go away you with this brief video ready for the Hashnode hackathon the place TryShape was an entry and eventually within the checklist of winners. I hope you get pleasure from it.
Let’s join. You’ll be able to @ me on Twitter (@tapasadhikary) with feedback, or be at liberty to comply with.
The submit The Story Behind TryShape, a Showcase for the CSS clip-path property appeared first on CSS-Tips. You’ll be able to help CSS-Tips by being an MVP Supporter.


Subscribe to MarketingSolution.
Receive web development discounts & web design tutorials.
Now! Lets GROW Together!