
The WordPress login web page isn’t very welcoming, is it? It’s extra like a boring door in an alley than spectacular pearly gates. However the way you provoke customers into the key a part of your website issues, particularly if in case you have one thing particular in there.
The portal by means of which individuals enter your world helps construct anticipation and primes their peepers for what’s inside. Branding your WordPress sign-in web page can assist you elevate your protected content material and WordPress admin dashboard, telling your customer, that is no atypical WordPress website.
On this publish, I’m going to point out you what goes into constructing a customized WordPress login web page. I’ll then present you how one can make the modifications utilizing the suitable CSS and/or PHP code, for these of you who need full management or solely need to change one little factor.
Then, we’ll cowl how one can make modifications with Branda, (previously the Final Branding plugin), which can help you fully customise the look of your login type, rapidly and with out touching any code. We even have a fast video that reveals you precisely how one can arrange Branda, so keep tuned for that or skip forward.
Content material
The way to customise the totally different login web page components with CSS and PHP:
The way to Add Customized CSS to Your Login Web page
WordPress Login Parts CSS Selectors
A Crash Course in CSS
The way to Change Your Admin Login Web page with PHP
The way to customise the totally different login web page components utilizing Branda:
Emblem on the Login Display
Login Web page Background
Login Type
Bear in mind Me Checkbox
Error Message
Hyperlinks Under the WordPress Login Type
Login Redirect
WordPress Login Web page Customise
The WordPress login web page is rather like another web page in your WordPress website:
You’ll be able to change the styling and colours by modifying the factor with CSS
You’ll be able to change the performance or add, subtract, and transfer components by altering the format utilizing hooks and filters in PHP.
The way to Add Customized CSS to Your WordPress Login Web page
Your WordPress sign-in web page doesn’t use the stylesheet that’s included along with your theme. Which means that should you attempt to add CSS to customise the login web page to your types.css file in your theme folder, the modifications won’t seem. You’ll want so as to add your customized CSS types to the top of your login web page with PHP.
You probably have just some traces of CSS, you possibly can create a customized operate, and use the login_enqueue_scripts hook to insert CSS into the top of the login web page.
Within the instance above, I need to take away the Again to hyperlink below the login type. I’m solely altering one factor, however you possibly can customise a number of components in between the <model> tags.
To get this practice CSS to load, I added my customized operate with all my customized CSS to the login web page utilizing login_enqueue_scripts. You’ll add all of the code above to your capabilities.php file, simply exclude the opening <?php.
This can be a easy manner so as to add a few types. If you wish to make loads of modifications, then I counsel you create an extra stylesheet in your theme information so it’ll be simpler to handle.
So as to add a customized stylesheet to the top of your login web page, as an alternative of utilizing <model> tags in your operate, you’ll use wp_enqueue_style as an alternative to load the stylesheet.
Within the instance above, the customized CSS file in my theme the place I’ll be including the customizations for my login web page is known as style-login.css. I’ll add my CSS to style-login.css and add the code above to my capabilities file to load it.
WordPress Login Web page Parts
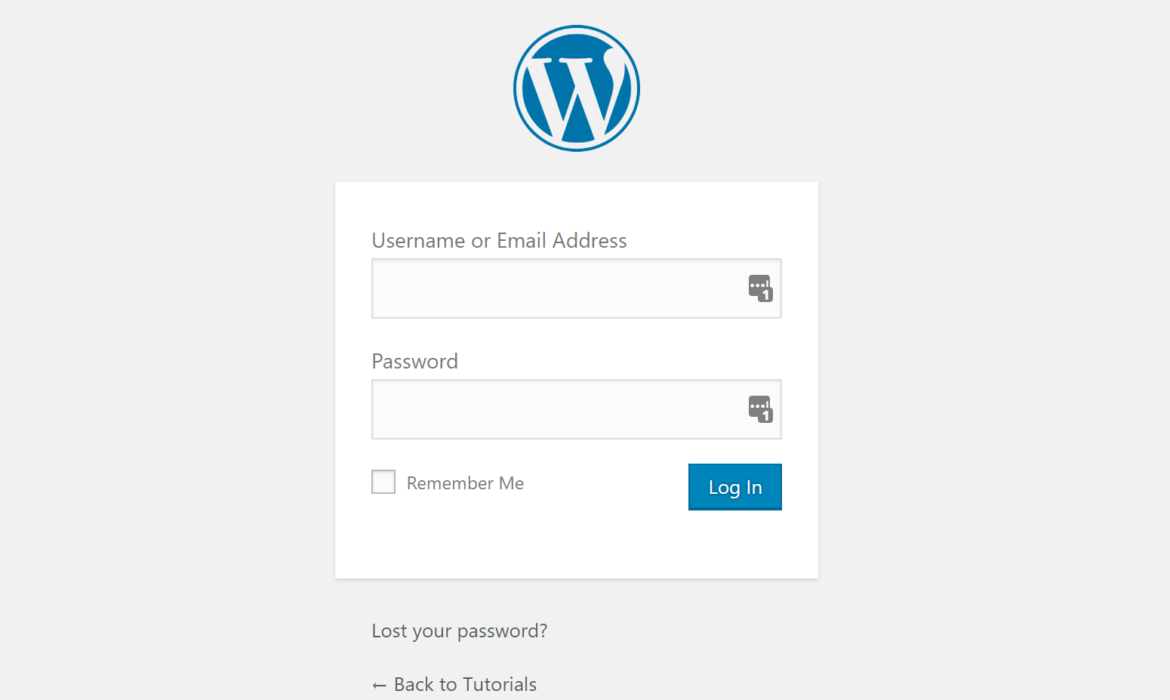
So here’s what the default WordPress login web page seems to be like for reference:
No frills, no thrills
To customise every factor with CSS, you’ll want to have the ability to goal it through the use of its selector. In different phrases, it’s essential to know its title.
Listed below are some particular selectors for the login web page and what they management:
Selector
Modifies
physique.login
The web page background
physique.login div#login h1 a
The WordPress brand
physique.login div#login type#loginform
The white field that accommodates the shape
physique.login div#login type#loginform p label
The username and password discipline labels
physique.login div#login type#loginform enter
Each enter fields (username and password)
physique.login div#login type#loginform enter#user_login
Simply the username enter discipline
physique.login div#login type#loginform enter#user_pass
Simply the password enter discipline
physique.login div#login type#loginform p.forgetmenot
The Bear in mind Me discipline
physique.login div#login type#loginform p.submit enter#wp-submit
The Submit button
physique.login div#login p#nav a
The Misplaced Your Password hyperlink
physique.login div#login p#backtoblog a
The Again to hyperlink
A Crash Course in CSS
Okay, have you ever discovered the factor you need to goal? Good. When you’re acquainted with CSS, you realize the place to go from right here, so you possibly can jump over this part. Everybody else, comply with me. Right here’s how one can customise the weather with CSS. When you get caught, depart us a remark. When you get annoyed and wish a simple answer, give Branda a strive.
The way to Take away an Component
To cover a component, such because the Again to hyperlink as we did earlier, you should use show:none;
Right here’s how one can disguise the misplaced password hyperlink, for instance.
The way to Change the Background
To alter the background shade of a component, such because the web page background or button background, you’ll use background-color:#222222; and substitute #222222 along with your shade of alternative. Within the instance under, I used #17a8e3 which is a lighter blue.
I additionally use !vital as a way to override the default shade. When you’re utilizing a really particular selector, you received’t have to make use of !vital. However in some circumstances, in case your customized CSS isn’t working, you’ll have so as to add it.
If you wish to add a background picture, you’ll use background-image: url(‘login-logo.png’); and exchange login-logo.pnp along with your picture file URL. Ensure you add the background file to the identical listing as your stylesheet. When you use the media library uploader, it received’t work.
Within the instance under, you’ll see that I modified the smooth gray background of the login web page to a picture home-bg.jpg
To alter the WordPress login brand, you’ll use the next:
The way to Add Area Round an Component
When including house to a component, it’s essential to specify if you’d like the house to be on the within (padding) or outdoors (margin) of the factor.
Consider the submit button. If you wish to create more room contained in the button, so the textual content inside has room to breathe and isn’t so near the perimeters, you’ll want to extend the padding padding:10px 10px 10px 10px;. If you wish to create room outdoors the button so different components aren’t so shut, you’ll enhance the margin margin:10px 10px 10px 10px;
Padding and margin have 4 values. One for the highest, one for the precise, one for the underside and one for the left aspect, in that order.
For instance, for a component with padding: 10px 20px 30px 40px:
The highest padding might be 10px.
The best aspect could have a padding of 20px.
The underside could have a padding of 30px.
And the left aspect could have a padding of 40px.
Margin works the identical manner.
The way to Change the Font Measurement and Coloration
Change the font measurement of your paragraph textual content, hyperlinks or type fields with font-size: 16px;. Simply exchange 16px with the scale you need. You’ll be able to change the textual content shade with shade:#222222;, simply exchange the #222222.
Additionally, observe that you would be able to add a number of types to at least one factor.
The way to Change the Border
Border is a three-part model border: 2px strong #222222;. You’ll specify the width of the border first, then the model (strong, dashed, and so on.) and end up by specifying the colour
Right here’s an instance with a number of types.
The way to Change Your Admin Login Web page with PHP
To alter the performance of your WordPress login web page, you’re going to have to make use of PHP. You’ll add these capabilities to your capabilities.php file.
Change the Login Error Message
In addition to branding your error message, modifying the error message can assist enhance the security of your website. When you enter an incorrect password or username, WordPress will return a really particular error message to let you realize what you probably did improper. This helps customers, however it additionally helps hackers.
You should use this operate to override the default error message:
You’ll be able to customise the message by altering the ‘Incorrect login particulars’ message that’s in quotes. Go away the quotes although.
Change the Redirect URL
When your consumer logins in, you possibly can direct them again to the frontend as an alternative of the dashboard, which is what occurs by default.
To redirect the consumer to the house web page, add the next to your capabilities.php file:
Set Bear in mind Me To Checked
The Bear in mind Me checkbox is unchecked by default, however if in case you have forgetful customers who don’t verify it, you possibly can allow it routinely.
To depart this field at all times checked, add this snippet to capabilities.php:
As you possibly can see, in the case of supplying you with final management over the model of your web page, CSS is the place it’s at. However, if you wish to modify the format or rename objects, it turns into rather more tough as a result of you need to use PHP. That is the place Branda can assist you tremendously. Let’s go over how one can change your login web page utilizing Branda.
The way to Use Branda to Customise the WordPress Web site Login Web page
Branda can assist you do greater than easy customizations. Try this video on how one can use Branda to fully overhaul the WordPress login web page. You’ll see Micah undergo every step so that you’ll get a superb overview and know precisely what to do. Then I’ll present you all of the totally different choices intimately under.
First, you’ll have to set up the Branda plugin in your website. Then, it’s essential to activate the Customise Login Display module from the Branda dashboard.
Click on the pencil icon to activate the Customise Login Web page module
The Customise Login Display module is split into 6 sections
Template – means that you can change the format of the login web page
Content material – that is the place you possibly can present/disguise components or change the wording or add customized photographs
Design – change the margins, borders, opacity, mainly the styling of various components
Colours – change the colour of any factor right here
Redirection – set the place you need the customer to be directed to after they log in or out
Customized CSS – add your individual code or modify the code Branda generates as you construct your customized login type. Why not use the CSS you simply realized?
Let me train you how one can make some frequent customizations utilizing Branda. Right here’s how one can customise the next:
WordPress Change Emblem
Login Web page Background
Login Type
Bear in mind Me Checkbox
Error Message
Hyperlinks Under the WordPress Login Type
Login Redirect
Change the WordPress Login Emblem
In Branda, to alter the WordPress login brand and insert your individual, go to the Content material part and open the Emblem and Background dropdown. From there you possibly can add a picture or enter a URL in case your picture is hosted elsewhere. It’s also possible to take away the emblem altogether should you’re going for a minimal look.
Your brand ought to have a width of 320px. You probably have a bigger brand, see the part under.
When you’d like to essentially push your brand right into a extra distinctive form, go to the Design part in Branda and open the Emblem dropdown. From there you possibly can modify to the width of the emblem container to accommodate a wider brand. It’s also possible to change the place, opacity, nook radius, and the margins of the emblem.
Have a brand that’s larger or smaller than 320px? No downside, simply modify the container
Customizing the WordPress Web site Login Web page Background
In Branda, you possibly can change the smooth gray background to a shade of your alternative. To alter the colour, go to the Colours part and open the Background dropdown.
Gray no extra
To make use of a picture, you’ll go to the Content material part, then open Emblem and Background. From there you possibly can add a brand new picture. Branda additionally provides you the choice to add a number of photographs and create a slideshow or present a random picture every time. To make use of a number of photographs, scroll all the way down to Design, and open Background to configure.
Make a big effect with a customized background picture
Customizing the WordPress Login Type
Wish to know how one can create a consumer login in WordPress? Rename your discipline labels! In Branda, go to Content material > Type to rename the enter fields for username and password in your customized login type. You should use consumer ID, member quantity, or superhero title, no matter!
Model your type fields
You’ll be able to customise the look of the shape utilizing Branda. Go to Design > Type to edit the margin, padding, border, nook radius, and the shadow. It’s also possible to modify the button in the identical place. Alter the button border radius or modify the button shadows.
Change the looks of the shape itself
To edit the colours of your type, corresponding to textual content colours, border colours, and so on., you’ll go to Colours > Kinds
Be aware the tabs to change the colours of Lively, Focus, and Hover states.
Modifying the Bear in mind Me Checkbox on the WordPress Login Display
Branda makes it simple to routinely verify or disguise the Bear in mind Me checkbox within the login type. Go to the Content material part and open the Type part. There, you’ll be capable to present or disguise the Bear in mind Me field. When you select to point out it, then you possibly can routinely mark the checkbox as properly.
Till you’re in my arms once more, Bear in mind me
Customise WordPress Web site Login Web page Error Message
Ah, there’s nothing like an error message to make you’re feeling such as you don’t know what you’re doing.
Fortunately Branda can assist you soften your error messages up or make them extra useful. In Branda, go to Content material > Error Message to change. You should use HTML throughout the message for added readability or emphasis.
Professional tip, should you change the shape fields names, change your error message to match
To alter the styling of your message, you possibly can modify the opacity of the container by going to Design > Error Message. To alter the colours of your error messages, go to Colours > Error Message.
Be aware the tabs to change the colours of Lively, Focus, and Hover states.
Customizing the Hyperlinks Under the WordPress Login Type
In Branda, you possibly can select to cover the hyperlinks under your customized login type by going to Content material > Hyperlinks Under Type. You’ll be able to disguise the Register/Misplaced Password hyperlink, the Privateness Coverage Hyperlink or the Again to Hyperlink.
You’ll be able to’t disguise from me
You’ll be able to modify the colour of the hyperlinks under the login type with Branda by going to Colours > Hyperlinks Under Type
Coloration me hyperlink
Customizing the WordPress Login Redirect
In Branda, you possibly can change the place the login type will redirect the consumer to within the Redirect part.
Modify the place the customer will go to after logging in or logging out
That’s All
As you possibly can see, there’s a couple of option to pores and skin a login web page. Customizing your website login is a simple option to delight your customers and make an announcement. If you wish to change a few issues and are snug with PHP and CSS, then you possibly can edit your information immediately. However should you actually need to go all out, Branda can assist you’re taking your login web page to the subsequent stage.
However why cease there, WPMU DEV provides you what it’s essential to white label all of the issues! It’s an particularly good contact for bespoke websites.
When you’d like to offer Branda a attempt to see what we’ve added since we overhauled Final Branding, you possibly can obtain the plugin at no cost. You’re gonna love her. She’s gonna be your new greatest pal.


Subscribe to MarketingSolution.
Receive web development discounts & web design tutorials.
Now! Lets GROW Together!