
We lately coated creating fancy borders with CSS masks properties, and now we’re going to minimize the corners with CSS masks and clip-path! Loads of strategies exist to chop completely different shapes from the corners of any component. On this article, we’ll think about fashionable strategies to create distinctive nook shapes whereas attempting to work from reusable code that enables us to supply completely different outcomes by adjusting variables.
Verify this on-line instrument to get an thought of what we’re constructing. It’s a CSS generator the place you choose the form, the corners, and the dimensions you then get the code very quickly!
We primarily have two sorts of cuts: a round one and an angled one. For every, we are able to get the complete form or the border-only form, to not point out that we are able to choose the corners we need to minimize. Loads of mixtures!
Like within the earlier article, we’ll make a lot of use of the CSS masks property. So, if you’re not accustomed to it, I like to recommend studying the short primer I wrote earlier than persevering with.
Round cut-out
For a round or rounded minimize, we’ll use radial-gradient(). To chop 4 corners, the logical answer is to create 4 gradients, one for every nook:
Every gradient is taking 1 / 4 of the component’s dimensions. The syntax of the gradient is self-explanatory:
radial-gradient(circle 30px at prime left, #0000 98%, purple) prime left;
Translated, this renders a circle on the top-left nook with a 30px radius. The principle colour is clear (#0000) and the remaining is purple. The entire gradient can be positioned in order that it begins on the component’s top-left nook. Similar logic for the three different gradients. The key phrase circle could be omitted since we explicitly specified one worth for the radius.
Like I did within the earlier article, I might be utilizing barely greater or smaller values this time round with the intention to keep away from unhealthy visible end result. Right here, I’m utilizing 98% as an alternative of 100% to keep away from jagged edges and 51% as an alternative of fifty% to create an overlap between gradients and keep away from white areas. This logic will observe all through this text. The truth is, you will discover that including or eradicating 1% or 1deg sometimes ends in a pleasant visible.
We apply this to the CSS masks property and we’re achieved!
We are able to truly optimize that code slightly:
–g: #0000 98%,#000;
–r: 30px;
masks:
radial-gradient(var(–r) at 0 0 ,var(–g)) 0 0,
radial-gradient(var(–r) at 100% 0 ,var(–g)) 100% 0,
radial-gradient(var(–r) at 0 100%,var(–g)) 0 100%,
radial-gradient(var(–r) at 100% 100%,var(–g)) 100% 100%;
mask-size: 51% 51%;
mask-repeat: no-repeat;
This manner, we use customized properties for the redundant values and, as a private desire, I’m utilizing numeric values for the positions as an alternative of key phrases.
Within the generator, I’ll use the next syntax:
–g: #0000 98%,#000;
–r: 30px;
masks:
radial-gradient(var(–r) at 0 0 ,var(–g)) 0 0 /51% 51% no-repeat,
radial-gradient(var(–r) at 100% 0 ,var(–g)) 100% 0 /51% 51% no-repeat,
radial-gradient(var(–r) at 0 100%,var(–g)) 0 100%/51% 51% no-repeat,
radial-gradient(var(–r) at 100% 100%,var(–g)) 100% 100%/51% 51% no-repeat;
The shorthand syntax is simpler to generate plus the entire worth can be utilized as one customized property.
Can we use fewer gradients if we wish?
Certain! One gradient can do the job. Hover the beneath to see the trick:
Right here, we outline one radial-gradient() with no measurement (by default it’s 100% top and 100% width). This provides us a gap within the heart. We translate/transfer the gradient by half the width and top of the picture to maneuver the outlet to at least one nook. Since, by default, the CSS masks repeats, we get the identical on every nook. We’ve 4 minimize corners with just one gradient!
The one downside of this methodology is that we have to know the width and top of the component upfront.
Can’t we use -50% as an alternative of half the width and top?
Sadly, we’re unable to try this right here as a result of percentages doesn’t behave the identical as pixel values when used with the CSS mask-position property. They’re tough.
I’ve an in depth Stack Overflow reply that explains the distinction. It offers with background-position however the identical logic applies to the CSS mask-position property.
Nevertheless, we are able to use some tips to make it work with share values and with out the necessity to know the width or the peak. When a gradient (or a background layer) has a width and top equal to the component, we can not transfer it utilizing share values. So we have to change its measurement!
I’ll outline a measurement equal to 99.5% 99.5%. I’m lowering 0.5% from the width and the peak to have a price completely different from 100% and on the similar time hold the identical visible end result since we received’t discover an enormous distinction between 100% and 99.5%. Now that our gradient has a measurement completely different from 100% we are able to transfer it utilizing share values.
I cannot element all the mathematics, however to maneuver it by half the width and the peak we have to use this equation:
100% * (50/(100 – 99.5)) = 100% * 100 = 10000%
It’s an odd worth but it surely does the job:
As you may see, the trick works simply high-quality. Regardless of the measurement of the component is, we are able to minimize 4 corners utilizing just one gradient. Nevertheless, this methodology has a small downside when the width or the peak of the component is a decimal worth. Right here is an instance with a picture having a width equal to 150.5px:
The usage of 99.5% mixed with 150.5px will create rounding points that may break the calculation, ensuing within the masks being misaligned. So, use this methodology with warning.
To beat the rounding challenge, we are able to mix the final trick with a pseudo-element. Here’s a step-by-step illustration to grasp the thought:
Right here’s what happening in there:
We outline a pseudo-element that behaves as our background layer. Logically, we must always use inset:0 to make it cowl the whole space, however we’ll create a small overflow through the use of inset: -10% which means that the pseudo component will overflow both sides by 10%.We set our CSS masks to the pseudo-element. The masks measurement must match the dimensions of the principle component, not the pseudo-element. In different phrases, it is going to be smaller than the dimensions of the pseudo-element and that is what we wish to have the ability to transfer utilizing share values. After we do the mathematics, the dimensions must be 100%/1.2. Discover within the demo above that the CSS masks is inside the inexperienced border in order that it matches the dimensions of the container.Now, we have to transfer it in a approach that simulates chopping the nook of the principle component. The middle of the outlet must be within the nook of the principle component, as illustrated within the demo. To do that, we use mask-position: 300% 300% ( 300% = 50%/(1 – 1/1.2) ).We take away no-repeat to activate the repetition and get the identical impact for each nook.We clip the overflow and we get our remaining end result!
I do know it’s a bit overkill, but it surely does work and it requires just one gradient as an alternative of 4.
Let’s rapidly recap the three strategies we simply coated:
The primary methodology makes use of 4 gradients and has no drawbacks so far as utilization. Certain, it’s verbose but it surely works with any type of component and measurement. I like to recommend utilizing this one.The second methodology makes use of one gradient and works with any component, however it may well break in some specific instances. It’s appropriate with fixed-size parts. It’s okay to make use of, however perhaps much less ceaselessly.The third methodology makes use of one gradient and requires a pseudo-element. It received’t work with <img> and different parts that unable to assist a pseudo-element.
The generator solely helps the primary and third strategies.
Now that we noticed the case with all of the corners, let’s disable a few of them. Utilizing the primary methodology, any nook we need to hold uncut we merely take away its gradient and alter the dimensions of what stays.
To disable the top-right nook:
We take away the top-right gradient (the blue one).We’ve an empty nook, so we enhance the dimensions of the purple gradient (or the purple one) to cowl that leftover house.
Executed!
You most likely see simply what number of prospects and mixtures we are able to do right here. If we need to minimize N corners (the place N ranges from 1 to 4), we use N gradients. All we’d like is to accurately set the dimensions of every one to depart no house.
What concerning the different strategies the place there’s just one gradient? We’ll want one other gradient! These two strategies use just one radial-gradient() to chop the corners, so we’ll depend on one other gradient to “cover” the minimize. We are able to use a conic-gradient() with 4 sections for this activity:
conic-gradient(purple 25%, blue 0 50%, inexperienced 0 75%, purple 0)
We add it on the highest of the radial gradient to get the next:
The conic-gradient() covers the radial-gradient() and no nook is minimize. Let’s change one colour within the conic-gradient() to clear. The one on the top-right, for instance:
Did you see that? We revealed one nook of the radial-gradient() and we finish with one minimize nook!
Now let’s do the identical factor, however for the bottom-left nook.
I feel you most likely get the trick by now. By altering the colours of the conic-gradient() from opaque to clear, we reveal the corners we need to minimize and achieve every kind of attainable mixtures. The identical could be achieved with the third methodology.
Round border-only cut-out
Let’s make the border-only model of the earlier form. In different phrases, we obtain the identical form however knock out the fill so all we’re left with is a border of the form.
This can be a bit tough as a result of we’ve got completely different instances with completely different code. Honest warning, I might be utilizing lots of gradients right here whereas discovering alternatives to trim the variety of them.
It ought to be famous that we’ll think about a pseudo-element on this case. Displaying solely the border means we have to cover the inside “fill” of the form. Making use of this to the principle component may even cover the content material — that’s why it is a good use case for a pseudo-element.
One minimize nook
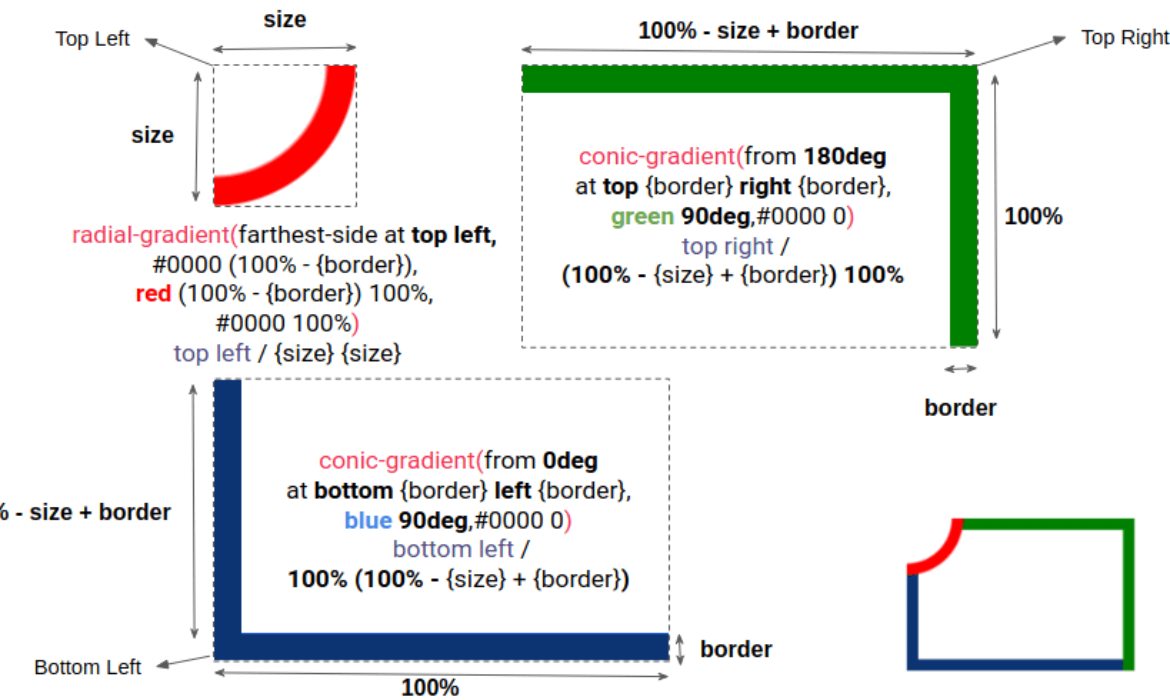
This one wants one radial gradient and two conic gradients:
The primary instance illustrates the radial gradient (in purple) and each conic gradients (in blue and inexperienced). Within the second instance, we apply all of them contained in the CSS masks property to create the border-only form with one minimize nook.
Right here’s a diagram of the sport plan.
Because the diagram exhibits, the radial-gradient() creates the quarter of a circle and every conic-gradient() creates two perpendicular segments to cowl two sides. It ought to be famous that overlapping gradients shouldn’t be a difficulty since we aren’t going to alter the CSS mask-composite property worth.
Utilizing the identical code an adjusting a couple of variables, we are able to get the form for the opposite corners.
Two minimize corners
For the two-corner configuration we’ve got two conditions happening.
Within the first scenario, there are two reverse corners the place we’d like two radial gradients and two conic gradients.
The configuration is sort of the identical as chopping just one nook: we add an additional gradient and replace a couple of variables.
Within the second scenario, there are two adjoining corners and, on this case, we’d like two radial gradients, one conic gradient, and one linear gradient.
“Wait!” you would possibly exclaim. “How come the conic gradient covers three sides?” If you happen to verify the code, discover the repeat-y. In the entire examples, we at all times used no-repeat for the gradients, however for this we are able to repeat considered one of them to cowl extra sides and scale back the variety of gradients we use.
Right here is an instance with solely the conic-gradient() to grasp the repetition. The trick is to have a top equal to 100% minus the border measurement in order that the gradient fills that house when repeating, which covers the third aspect within the course of.
Three minimize corners
For this configuration, we’d like three radial gradients, one conic gradient, and two linear gradients.
4 corners minimize
It takes 4 radial gradients and two linear gradients to chop all 4 corners.
I can hear you screaming, “How on earth am I alleged to memorize all these instances?!” You don’t must memorize something since you may simply generate the code for every case utilizing the web generator. All you want is to grasp the general trick quite than every particular person case. That’s why I’ve solely gone into high-quality element on the primary configurations — the remainder are merely iterations that tweak the preliminary basis of the trick.
Discover there’s a common sample we’ve been following all through the examples:
We add a radial-gradient() on the corners we need to minimize.We fill the perimeters utilizing both a conic-gradient() or a linear-gradient() to create the ultimate form.
It ought to be famous that we are able to discover other ways to create the identical form. What I’m exhibiting on this put up are the strategies I discovered to be greatest after attempting a lot of different concepts. You will have a distinct method you think about to be higher! In that case, positively share it within the feedback!
Angled cut-out
Let’s deal with one other sort of minimize form: the angled minimize.
We’ve two parameters: the measurement and angle of the minimize. To get the form, we’d like a conic-gradient() for every nook. This configuration is similar to the instance that kicked off this text.
Right here is an illustration of 1 nook to grasp the trick:
The distinction between every nook is an additional offset of 90deg in from and the at place. The complete code is like beneath:
–size: 30px;
–angle: 130deg;
–g: #0000 var(–angle), #000 0;
masks:
conic-gradient(from calc(var(–angle)/-2 – 45deg)
at prime var(–size) left var(–size),var(–g)) prime left,
conic-gradient(from calc(var(–angle)/-2 + 45deg)
at prime var(–size) proper var(–size),var(–g)) prime proper,
conic-gradient(from calc(var(–angle)/-2 – 135deg)
at backside var(–size) left var(–size),var(–g)) backside left,
conic-gradient(from calc(var(–angle)/-2 + 135deg)
at backside var(–size) proper var(–size),var(–g)) backside proper;
mask-size: 51% 51%;
mask-repeat: no-repeat;
If we need to disable one nook, we take away the conic-gradient() for that nook and replace the dimensions of one other one to fill the remaining house precisely like we did with the round minimize. Right here’s how that appears for one nook:
We are able to do the very same factor for all the opposite corners to get the identical impact.
Along with CSS masks, we are able to additionally use the CSS clip-path property to chop the corners. Every nook could be outlined with three factors.
The form consists of two factors at every finish of the minimize, and one between them to kind the angle.
The opposite corners may have the identical worth with an offset of 100%. This provides us the ultimate code with a complete of 12 factors — three per nook.
/* I’ll outline T = [1-tan((angle-90)/2)]*measurement */
clip-path: polygon(
/* Prime-left nook */
0 T, measurement measurement,0 T, /* OR 0 0 */
/* Prime-right nook */
calc(100% – T) 0,calc(100% – measurement) measurement,100% T, /* OR 100% 0 */
/* Backside-right nook*/
100% calc(100% – T),calc(100% – measurement) calc(100% – measurement), calc(100% – T) 100%, /* OR 100% 100% */
/* Backside-left nook */
T 100%, measurement calc(100% – measurement),0 calc(100% – T) /* OR 0 100% */
)
Discover the OR feedback in that code. It defines the code we’ve got to contemplate if we need to disable a selected nook. To chop a nook, we use three factors. To uncut a nook, we use one level — which is nothing however the coordinate of that nook.
Border-only angled minimize
Oof, we’ve got reached the final and trickiest form eventually! This one could be achieved with both gradients or clip-path, however let’s go together with the clip-path method.
Issues would get complicated and verbose if we go together with the gradient method. Right here’s a demo that illustrates that time:
There are 9 gradients complete, and I’m nonetheless not achieved with the calculation. As you may inform, the thickness of the border is inaccurate, plus the ultimate result’s unsatisfying as a result of nature of gradients and their anti-aliasing points. This method is likely to be a very good train to push the restrict of gradients, however I don’t advocate it in a manufacturing setting.
So, again to the clip-path methodology. We’ll nonetheless wind up with verbose code, however much less of an enormous deal for the reason that generator can do the job for us with a cleaner finish end result.
Right here is an outline of the trail. I’m including a small hole to higher see the completely different factors however we must always have an overlap of factors as an alternative.
We’ve 13 outer factors (those in black) and 13 inside factors (those in blue).
The best way we calculate the outer factors is identical as how we did it for the common angled minimize. For the inside factors, nonetheless, we’d like extra math. Don’t fear, I’ll spare you some “boring” geometry clarification for this one. I do know most of you don’t need it, however in case it’s good to dig into this, you may verify the JavaScript file of the generator to seek out the code and the mathematics I’m utilizing to generate the form.
The 180deg particular case
Earlier than we finish, there’s a particular case for the angle minimize I need to name out. It’s the place we use an angle equal to 180deg. Right here’s what that produces:
We’ve a straight line on the nook so we are able to optimize the clip-path code. For the complete form, we are able to use eight factors (two factors per nook) as an alternative of 12. And for the border-only model, we are able to use 18 factors (9 inside factors and outer factors) as an alternative of 26. In different phrases, we are able to take away the center level.
The border-only form can be made utilizing gradients. However quite than utilizing 9 gradients like we did earlier than, we are able to get away with solely 4 linear gradients and a clear end result.
Conclusion
We simply mixed CSS masks with gradients to create some fancy shapes with out resorting to hacks and lots of code! We additionally skilled simply how a lot it takes to strike the correct steadiness of code to get the correct outcomes. We even realized a couple of tips alongside the best way, like altering values by one and even half a unit. CSS is tremendous highly effective!
However, as we mentioned, the web generator I made is a good place to get the code you want quite than writing it out by hand. I imply, I went by all of the work of determining how all of this works and I’d probably nonetheless must reference this very article to recollect the way it’s all put collectively. If you happen to can memorize all of this, kudos! But it surely’s good to have a generator to fall again on.
Methods to Reduce Corners Utilizing CSS Masks and Clip-Path Properties initially printed on CSS-Methods. You must get the e-newsletter.


Subscribe to MarketingSolution.
Receive web development discounts & web design tutorials.
Now! Lets GROW Together!