
Migrating a stay web site from one server to a different is like performing a coronary heart transplant…you don’t wish to miss a beat! Find out how our assisted web site migration can transplant your stay web site to our blazing quick internet hosting servers with surgical precision and minimal downtime!
Worry of downtime, lack of enterprise, and having your web site’s rankings negatively impacted are all legitimate causes for pondering twice about switching your web site over to a brand new host.
On this publish, we present you the right way to transfer your web site over from a third-party internet hosting service to WPMU DEV’s managed WordPress internet hosting shortly and simply.
Maintain studying, or use the hyperlinks under to leap forward:
Migrating Your Web site to WPMU DEV Internet hosting – Your Choices
Assisted Web site Migration (Handbook Migration Possibility) Tutorial
Choose Migration Vacation spot Web site
Choose Supply Migration Web site
Choose Migration Technique
Create Non permanent URL
Choose Internet hosting Location
Routinely Create Your Non permanent URL
Enter (S)FTP Credentials
Migrate Web site
Observe our ‘Go Stay’ Guidelines
How To Decrease Web site Migration Downtime
Troubleshooting Net Internet hosting Migration Points
Pre-Migration Guidelines
Put up-Migration Guidelines
Migrating Your Web site to WPMU DEV Internet hosting – Your Choices
In case you are migrating your WordPress web site(s) from a third-party internet hosting service to WPMU DEV internet hosting, you’ve three choices:
Migrate your web site utilizing our (S)FTP Migration instrument
Use our Assisted Migration service (handbook migration choice)
Use our Shipper Professional WordPress web site migration plugin
Notice: This text assumes that you’ve got already arrange your internet hosting on WPMU DEV (you’ll be able to buy internet hosting individually or get it as a part of a value-packed membership) and are able to migrate an current web site from one other internet hosting supplier to its new residence.
(S)FTP Migration Software
We advocate utilizing WPMU DEV’s migration instrument to manually migrate websites your self in order for you a sturdy migration course of, as a substitute of a PHP-driven (i.e., plugin) migration, which we additionally provide (see our Shipper plugin choice additional under).
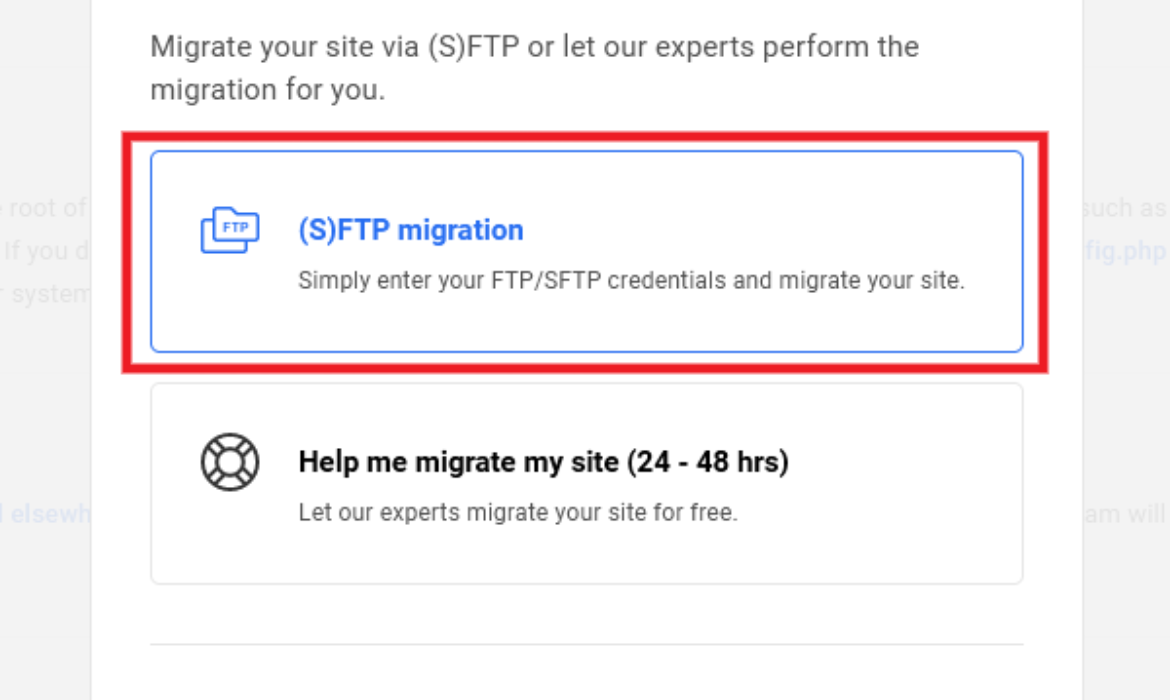
Choose the (S)FTP migration instrument to carry out handbook web site migrations.
The (S)FTP migration instrument supplies a server-to-server by way of FTP course of that simplifies and accelerates all file transfers and mechanically resolves points that may intervene with a clean migration.
It’s also far much less vulnerable to timeout points than PHP and can redefine URLs in a single clean course of with out requiring further applications or utilities.
Merely enter your FTP/SFTP credentials to start migrating your web site.
For a whole step-by-step tutorial on utilizing this selection, see our (S)FTP migration instrument documentation.
Additionally, when you expertise any errors migrating your web site utilizing the (S)FTP handbook instrument, then take a look at our migration troubleshooting information. It accommodates plenty of workarounds for the most typical errors that may happen in the course of the web site migration course of.
Assisted Web site Migration (Handbook Migration Possibility)
The third choice is to let our knowledgeable group deal with your migration.
Choose this selection to have our knowledgeable group migrate your web site.
We offer an assisted web site migration service, the place we carry out the handbook migration for you…without cost!
One of many important advantages of letting our group migrate your web site is that we will determine and troubleshoot any points within the course of (see ‘Troubleshooting Net Internet hosting Migration Points’ part additional under), so if you’re not feeling assured about performing your individual handbook web site migration or would merely choose us to do it for you, then observe the tutorial under to create an assisted web site migration ticket.
Shipper Professional WordPress Web site Migration Plugin
Select this selection if you need emigrate websites utilizing a plugin.
Migrate WordPress websites simply out of your dashboard with our Shipper Professional migration plugin.
Shipper Professional strikes WordPress web sites with one-click, from host to host, native to manufacturing, and growth to stay with out utilizing FTP or SFTP.
For extra particulars, take a look at our step-by-step tutorial on utilizing the Shipper Professional WordPress web site migration plugin.
Assisted Web site Migration (Handbook Migration Possibility) Tutorial
No matter whether or not you select emigrate your web site your self or allow us to deal with the migration for you, it’s necessary to know the handbook web site migration course of, as you’ll need to make selections and enter details about your web site in a number of the steps.
Consult with the chart under as we undergo this tutorial. It’s going to aid you perceive the method.
WPMU DEV handbook web site migration course of.
1. Choose Migration Vacation spot Web site
Step one of the migration course of is to pick out the vacation spot web site (i.e. the place your web site will likely be migrated to).
When you haven’t created a vacation spot web site but, then go to The Hub and click on the (+) button so as to add a web site and create a brand new migration web site (when you need assistance with this step, see our documentation part on creating a brand new web site).
Create a web site in The Hub.
When you’ve got already created this web site in your internet hosting account, then you’ll be able to both go to The Hub > Internet hosting > Instruments > Migrate Current Web site, click on on Start Migration and choose your current web site from the drop-down menu…
If you have already got a vacation spot web site, then use the Migrate Current Web site instrument within the Internet hosting > Instruments part.
Or go to The Hub, click on the (+) button so as to add a web site, and choose the Migrate choice from the Add web site display screen.
Choose Migrate web site.
2. Choose Migration Supply Web site
The subsequent step is to pick out the location you might be migrating (from a Third-party host) from the drop-down menu.
Choose the web site emigrate.
Notice: Make sure that the supply web site is linked to The Hub otherwise you gained’t see it within the drop-down menu.
When you need assistance with this step, take a look at our documentation for a full step-by-step tutorial on the right way to join your web site to The Hub.
3. Choose Migration Technique
Right here, you’ve two selections:
(S)FTP Migration – We touched on this selection within the earlier part. Use our handbook migration instrument emigrate websites your self.
Assisted Handbook Migration – Choose this selection to let our consultants migrate your web site without cost. Notice: We solely migrate websites. Please consult with our documentation or contact assist for help with transferring over emails.
For this instance, we’ll select the assisted migration choice.
4. Create Non permanent URL
In case you are migrating a stay web site, your web site ought to nonetheless be residing in your Third-party host at this level and your area DNS data are probably nonetheless pointing to that server.
So, we have to create a short lived web site URL the place we’ll copy and transfer all your web site’s information to. This may will let you entry and examine your web site in your WPMU DEV internet hosting (don’t fear, it will likely be hidden from engines like google and you’ll password-protect it).
Tip: Maintain your momentary URL easy and memorable through the use of your area title because the prefix (e.g. mydomain.tempurl.host)
After altering your DNS data, the momentary URL will likely be changed along with your area.
Select a short lived URL to your migrated web site.
5. Choose Internet hosting Location
We provide a world alternative of information facilities, so we advocate selecting the server location closest to the place most of your guests are located (tip: the closest your knowledge middle is to your guests, the sooner your web site will load for them).
Choosing a server location closest to the place most of your guests are discovered can cut back latency points and enhance web site pace efficiency.
6. Routinely Create Your Non permanent URL
When you click on the Subsequent button, this step is mechanically achieved for you in minutes.
Now could be the proper time to go take just a little break and have just a little stretch…
Again already? Nice! Then let’s make some migration magic occur…
7. Enter (S)FTP Credentials
Whether or not you select emigrate your web site(s) your self or have us do it for you utilizing the handbook migration choice, right here is the place you enter your FTP credentials.
In case you are letting us deal with the migration course of for you, we’ll ask you for extra particulars, so we will log into your web site and server to verify every thing runs easily.
This step is essential to the success of your migration, so just remember to enter all the proper particulars.
See our “Pre-Migration Guidelines” part additional under for every thing it is best to have already got at hand earlier than you start and see our documentation on getting FTP credentials out of your host when you need assistance with this step.
Make sure that the entire particulars you present listed below are right to keep away from any migration points or delays.
8. Migrate Web site
When you’ve got chosen the (S)FTP migration instrument DIY choice, then click on the button to begin the migration course of.
In case you are utilizing our assisted handbook migration service, clicking the button will create a assist ticket and our consultants will then deal with this stage of the migration course of for you.
A internet hosting handbook migration ticket will likely be mechanically created and despatched to our assist group.
You will note a affirmation discover on The Hub letting you understand {that a} assist ticket has been created.
The Hub will show a handbook migration request affirmation discover, so that you’ll know we now have obtained your request.
The assist group will get in contact with you as soon as they obtain your ticket and your web site will likely be expertly migrated 24-48 hours after you’ve submitted your request.
9. Observe our ‘Go Stay’ Guidelines
At this level, your entire web site ought to have been transferred over to our internet hosting and is residing on a short lived area (i.e. siteid.tempurl.host).
Whether or not you select emigrate your web site(s) your self or allow us to carry out a full migration of your web site utilizing our assisted migration service, there are nonetheless a number of issues left to do earlier than going stay.
After verifying that the migration course of has been accomplished efficiently and confirming that every thing is okay, you could:
Add your customized area title
Replace the DNS (NS or A/CNAME)
Verify DNS propagation
Set up SSL
Make your customized area main
Use our Go Stay Guidelines for detailed directions when you need assistance finishing the above steps.
How To Decrease Web site Migration Downtime
No migration course of can assure you “0” downtime.
When altering DNS data, for instance, there is likely to be some intermittent downtime whereas pointing your DNS to your new servers. This will occur even in case you have area registrar/DNS supervisor.
DNS propagation can typically occur immediately, however it might additionally take anyplace from a number of minutes to some hours, and even as much as a day or so. It’s commonplace for outages to happen in the course of the propagation course of, and this may end up in some customers seeing the outdated web site, whereas others will see the location that’s been migrated to the brand new server.
How We Decrease Web site Migration Downtime
Our automated and handbook migration processes goal to remove any delays apart from these brought on by DNS propagation when transferring websites to our servers by ensuring that every one information and databases have been totally transferred with out issues after which making the location prepared on our internet hosting for the DNS change.
The way to Guarantee A Clean and Fast Web site Migration
You’ll be able to assist to attenuate web site migration downtime and keep away from issues by making certain the next:
Ensure that the credentials you provide (FTP, Server/cPanel login, web site admin login particulars, and many others.) are right.
In case your supply host has a firewall or some type of IP-based safety, be certain to whitelist WPMU DEV’s internet hosting server IP tackle.
Don’t cancel your current internet hosting plan till the location migration is full (together with DNS document adjustments). Planning forward might help to keep away from downtime and issues like dropping essential information and knowledge. Some internet hosting firms will cancel their service instantly and provides a prorated refund of charges for the stability of the month, so ensure that your outdated internet hosting firm gained’t take your web site down as quickly as you notify them of your intention to cancel your service.
Make a full backup of your web site in your outdated host earlier than migration. Internet hosting purposes like cPanel have their very own backup methods. In case you are uncertain of the know-how or utility getting used, ask your host to carry out a full backup of your web site.
Verify your databases. It is a good time to investigate, restore, optimize, and create a backup of your database. Additionally, ensure that your web site’s database shouldn’t be password-protected or constrained by any particular permission settings.
Enter the proper nameserver particulars when making DNS adjustments. Utilizing incorrect particulars will end result within the DNS not propagating to the brand new area. Because of this, we advocate utilizing our nameserver particulars copy operate. Merely copy and paste it into the change nameserver fields and you need to be good to go.
Copy and paste your nameserver particulars to keep away from errors.
Troubleshooting Net Internet hosting Migration Points
Understanding the right way to troubleshoot or take care of migration points is essential, particularly when you plan to maneuver a big or actively used web site to a different server.
A number of the extra frequent points that may occur throughout web site migration embrace:
Lack of essential information or knowledge
phpMyAdmin timeout
500 Inside Server error/Permission errors
Because of this, we advocate utilizing our assisted migration service when you lack data or expertise migrating websites. Our knowledgeable group is aware of what can go incorrect in the course of the web site migration course of and, extra importantly, the right way to tackle and resolve all points shortly.
When you plan emigrate your web site manually by yourself, it’s necessary to arrange your self in case there are errors or issues. Maintain our web site migration troubleshooting information helpful if you could consult with it, or contact our assist group when you need assistance checking out any migration points.
Pre-Migration Guidelines
As talked about, making certain that your migration proceeds easily requires planning and preparation.
Along with the guidelines supplied above on the right way to reduce downtime throughout migration, be certain to finish the next:
1. Credentials
Be sure to have obtained the next particulars and credentials, as you’ll need to enter these while you begin the migration course of:
SFTP/FTP (safe file/file switch protocol) particulars, e.g.: hostname, username, password, port, WordPress set up path.
Internet hosting/Server/cPanel login and password.
WordPress admin login particulars
2. Consumer/Buyer Information, Transaction Historical past, Passwords
In case you are migrating an eCommerce, membership, listing itemizing web site, and many others. it’s necessary that every one admins, customers, clients, members, and advertisers can log into their accounts with no issues after the location has been transferred, so just remember to have entry to all consumer/buyer knowledge, transaction historical past, passwords, and many others. accessible as export/import information.
Many good eCommerce, membership, or listing itemizing plugins will let you export/import, so test their documentation or contact the builders when you need assistance.
Tip: In case you are migrating an eCommerce retailer or a web site that data transactions (e.g. boards/chats/shops with stay customers logging in and including knowledge), we advocate placing your supply web site in upkeep mode.
The rationale for that is that since DNS propagation can take as much as 48 hours in some instances, you don’t need guests being offered with and making transactions on the location in your outdated server, as this knowledge won’t exist on the newly created web site. It will also be complicated when this occurs, as it’s possible you’ll obtain emails for orders positioned on the outdated server that won’t seem in your admin space while you log into the brand new web site.
Placing your outdated web site below upkeep will stop this from occurring and make sure that orders and transactions will solely happen on the location on the brand new server.
3. Extra Credentials and Information
Be sure to have helpful entry to some other login particulars you’ll need to entry providers in your web site throughout or after migration, corresponding to area title/area registrar particulars, social media administration instruments, Google providers, and many others.
It’s a good suggestion to backup and/or export knowledge from instruments like Google Analytics, web site monitoring providers, your outdated server’s logs, and any providers associated to your outdated server’s IP tackle, simply in case any historic knowledge is misplaced after altering servers.
Additionally, we advocate taking a screenshot of your dashboard menu, “at a look” panel, exporting your web site’s URLs, and exporting your web site configuration particulars from the Web site Well being Information part.
Your Web site Well being Information part helps you to export each element concerning the configuration of your WordPress web site.
Put up-Migration Guidelines
After your web site has been totally migrated, we advocate checking the next areas:
1. search engine optimization
Migrating websites to and from totally different servers can have an effect on your search engine rankings. WPMU DEV internet hosting is finely-tuned and optimized for pace and delivering fast-loading pages shortly, so that you shouldn’t count on any issues transferring out of your outdated host to our servers.
One of many areas that may impression your web site’s efficiency and search rankings, nevertheless, is proximity to customers. Therefore, we advocate selecting the server location closest to nearly all of your guests when establishing your vacation spot web site.
Additionally, as any downtime throughout migration can have an effect on your rankings, we advocate leaving your outdated web site alone till the DNS has been totally propagated (permit 72 hours for this course of) and you’ve got verified that search engine bots are crawling the location in your new server.
When you’ve got a Google Search Console account arrange to your area (and it is best to), you’ll be able to monitor your account for any indexing points and examine studies like index rely, crawl errors, and search queries to verify the bots can crawl your pages appropriately.
2. Web site Settings
Log into your dashboard and carry out a common scan of your important settings. When you’ve got taken screenshots of your dashboard menu and “at a look” panel, for instance, you’ll be able to shortly examine and see if every thing appears to be like okay with out going into element.
3. Information
Click on by way of to numerous pages in your web site from navigation menus, content material hyperlinks, obtain hyperlinks, and many others. to ensure that every thing is working appropriately.
In some instances, it’s possible you’ll have to resave your permalinks or rename your .htaccess file and reload your web site to get hyperlinks or pages to work appropriately.
Tip: as advisable earlier, be sure to have an entire backup of all of your web site’s information and knowledge.
4. Content material
Verify numerous pages and posts in your web site for damaged hyperlinks, damaged redirects and 404 errors, or any lacking/incomplete content material.
5. Consumer/Buyer Information, Transaction Historical past, Passwords, and many others.
As talked about earlier, ensure that all customers, clients, members, and advertisers can log into their accounts with no issues.
In some instances, this will likely require importing information into the brand new web site. For instance, if you’re migrating an eCommerce web site, it’s possible you’ll have to import any transaction knowledge which will have taken place on the outdated web site whereas the location was being migrated to the brand new server.
Say Goodbye to Your Outdated Host and Hi there to Your New Internet hosting
After finishing all of the above steps, ensuring that you’ve got backups of every thing, DNS data have totally propagated, and your web site has transitioned seamlessly to it’s new residence, it’s time to close down the web site in your outdated host.
This will contain deleting your outdated web site out of your server (e.g. on a shared server with WHM), or canceling your outdated internet hosting plan altogether.
Congratulations…your web site is now totally migrated!
When you haven’t skilled the advantages of internet hosting with WPMU DEV but, together with our assisted migration service and knowledgeable 24/7 assist group, take a look at our subsequent era managed WordPress internet hosting plans or join a 7-day free membership trial with internet hosting included.


Subscribe to MarketingSolution.
Receive web development discounts & web design tutorials.
Now! Lets GROW Together!