
(It is a sponsored submit.)
We’ve gotten a superb overview of how npm works and the best way to use it to put in packages and run instructions at this level. Now let’s go somewhat additional and see what it appears prefer to obtain and set up an present npm challenge, quite than beginning one from scratch. Extra probably than not, that’s in all probability what you’ll be doing more often than not. It’s a lot, a lot simpler than putting in and configuring all the person items one after the other.
That’s what we’re protecting on this ultimate chapter of the information to npm, and I’ll be drawing from private expertise on a real-life challenge of mine.
Information chapters
Who the Heck is This Information For?What the Heck Does “npm” Imply?What the Heck is the Command Line?What the Heck is Node?What the Heck is a Bundle Supervisor?How the Heck Do You Set up npm?How the Heck Do You Set up npm Packages?What the Heck Are npm Instructions?How the Heck Do You Set up an Present npm Mission? (You might be right here!)
Right here’s a real-life npm challenge
The challenge I’ve chosen for that is my very own SvelteKit static weblog starter. I believe it’s a pleasant instance as a result of it comes with numerous pre-installed packages which can be nice for demonstration functions.
It is a actual challenge of mine that’s designed to offer you—as you may need guessed by the identify—a head-start for constructing a statically-generated weblog website. (“Statically generated” implies that our code can be compiled right down to .html information, able to deploy wherever on the net. That is one of some approaches encompassed within the “Jamstack” approach of constructing websites.)
And no worries in case you don’t know something about SvelteKit—that is simply to exhibit, and we gained’t write something you don’t already know. That stated, it’s value noting that SvelteKit makes use of Vite underneath the hood, which is definitely a npm bundle that offers us entry to trendy construct instruments and an excellent speedy growth server.
Cloning the challenge
First, we have to “clone” the challenge, which is a flowery phrase for copying the challenge to our system so we are able to work on it domestically. There are two methods to clone an present challenge.
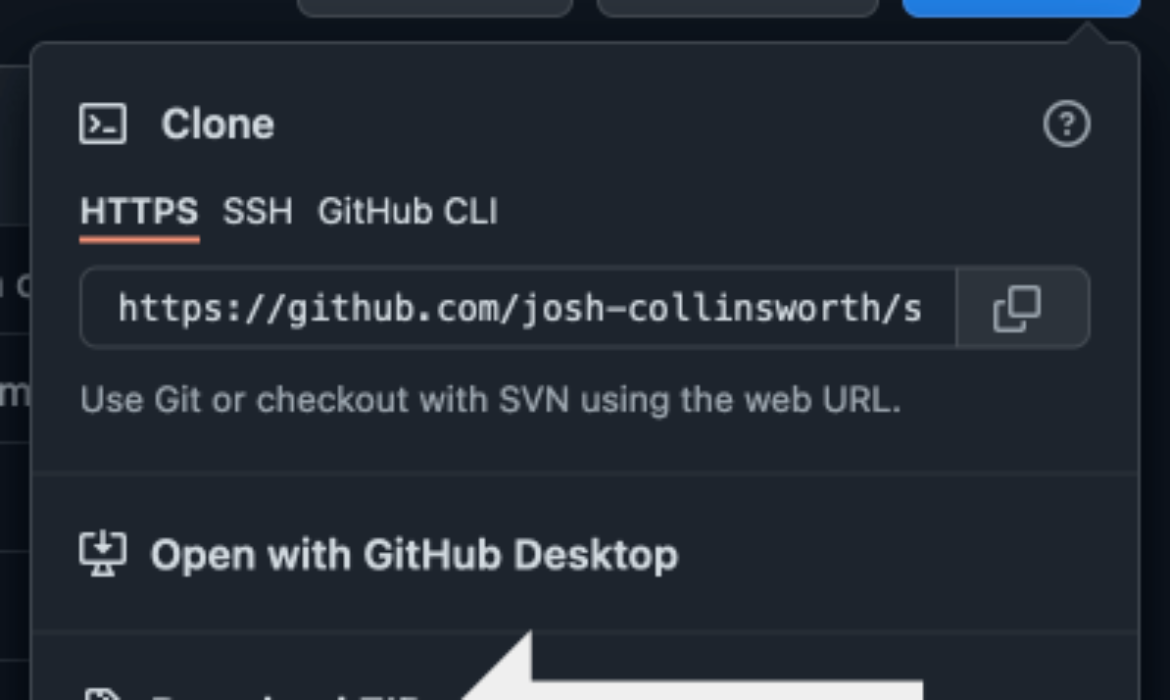
In the event you choose the in-browser, visible approach, head to the starter repo over at GitHub, and click on the “Code” dropdown that’s positioned straight in GitHub’s UI, and choose the “Obtain ZIP” possibility.
Alternatively, in case you choose utilizing the command line as a substitute, run this command (simply be sure you’re in a spot the place you don’t thoughts a brand new challenge folder added to your pc, e.g. cd /path/to/folder):
npx degit https://github.com/josh-collinsworth/sveltekit-blog-starter.git sveltekit-blog-starter
You could keep in mind that npx permits us to run npm packages with out completely putting in them. degit clones the challenge identical to git clone would, however with out its Git historical past (actually, “de-git”).
Whichever technique you employ, you get a recent new sveltekit-blog-starter folder. Let’s open it in a code editor, pop open the terminal, and run the npm set up (or npm i) command.
npm robotically runs an audit when putting in packages.
At this level, you’ll see a notice about vulnerabilities, like we lined within the final part of this information. It might say one thing like “discovered 0 vulnerabilities” (because it does in screenshot above), however it’s fairly attainable that quantity can be higher than zero. In the event you do see vulnerabilities, don’t fear. You’re free to disregard it for now since this isn’t a challenge we intend to launch in manufacturing for others to see or use. (See the part on npm audit in a earlier chapter for more information.)
Beginning the server and making adjustments
In the event you had been to peek within the bundle.json file within the cloned challenge, you’d see the command to begin the dev server:
npm run dev
Run that command within the terminal and it’s best to see one thing like the next virtually instantly:
In VS Code, you possibly can press CMD whereas clicking the http://localhost:3000 URL, or you possibly can manually enter it in your browser. Both approach, the location must be displayed within the browser!
Let’s take only a second right here to understand how comparatively quick and easy that was! Sure, we’d have needed to set up a bunch of scaffolding first, however that’s an up-front, one-time price. We now have a complete challenge working on our machine with simply a few instructions—and we are able to do that identical factor any time we wish to set up one other present challenge!
I gained’t go deep into the small print of this explicit challenge as a result of it’s unimportant to studying npm, however it’s a pleasant instance as a result of it has numerous cool issues pre-configured, and we are able to simply make adjustments and see them replace straight away within the browser. Let’s take a look at a number of of these instructions subsequent.
SvelteKit requires Node 14 or larger. In the event you put in npm as a part of this information, that gained’t be an issue for you. However in case you already had it put in earlier than we began, and in case you run into errors making an attempt to get this challenge working, it’s value a fast node -v to make certain. nvm is your buddy if that you must improve.
Robotically compile Sass on save
You could find the challenge’s Sass information within the src/lib/belongings/scss/ folder. Strive opening the worldwide.scss file straight. Make a change, reserve it, and it’s best to see the replace robotically (and virtually immediately) in your browser.
Making content material adjustments
The starter website truly makes use of the repo’s README.md file as its homepage. In the event you open README.md and start making adjustments (it’s OK in case you don’t know Markdown, any edit will do), you must also see these adjustments present up as quickly as you save identical to Sass did within the final step:
If you’d like, you possibly can open one other web page, say the src/routes/contact.svelte file, and replace the HTML to see it reside refresh in your browser in addition to quickly because it saves.
You possibly can even duplicate one of many Markdown information within src/routes/weblog/_posts/ and make edits to see that it robotically seem within the checklist of posts on the /weblog web page, if you wish to go that far. (Simply remember to give it a novel title.)
Understanding imports
There’s one vital factor about npm tasks that we talked about briefly within the fourth chapter, however haven’t lined but: imports. This information wouldn’t actually be full if we didn’t contact on that. The essential thought is that we are able to—true to the identify—import a bundle, solely achieve this with out ever putting in it both in a challenge folder or your system. As a substitute, it’s used on the spot.
How so? Open up the svelte.config.js folder within the challenge root, and also you’ll see a block of import traces on the prime, one thing like this:
import adapter from ‘@sveltejs/adapter-static’
import { mdsvex } from ‘mdsvex’
import preprocess from ‘svelte-preprocess’
import rehypeAutolinkHeadings from ‘rehype-autolink-headings’
import rehypeSlug from ‘rehype-slug’
Each a kind of imports is an put in bundle used on this file. What every bundle truly does isn’t vital proper now; I simply wish to name consideration to the import syntax. That is how we use packages in our precise code information; we inform JavaScript what to import and from the place. Then we are able to name it in our code.
This syntax is known as “ES6 imports,” which is barely important (get it?!) to know as a result of it’s the usual that each browser-based JavaScript and Node JavaScript have agreed on utilizing going ahead.
Beforehand, Node JavaScript used (and infrequently nonetheless makes use of) a barely completely different syntax known as CommonJS. In the event you see an import that appears like this, that’s the outdated CommonJS model:
const myPackage = require(‘package-name’)
The opposite essential factor to know in regards to the ES6 model of import is: the syntax is npm-specific, not a language commonplace.
To be clear: you can use import in regular JavaScript. It’s a really extraordinary function of the language. However that you must present a relative path, or (in additional trendy browsers) a URL to no matter you’re importing. Simply utilizing a string with a bundle’s slug, like we see right here, although, isn’t legitimate.
So why is it used if it’s not technically legitimate code? As a result of dealing with this model of import is among the good issues npm does for us. After we inform npm to import somePackage from ‘identify’ as a string, npm robotically is aware of to go search by the put in packages on the challenge to search out the import what we requested for. This protects us from each typing tedious relative paths, and from truly needing to know the place our packages reside deep within the labyrinth of node_modules.
This will go with out saying, however: for the reason that syntax isn’t legitimate, you gained’t be capable to use it efficiently until your npm challenge features a bundler or compiler of some variety, to course of the imports and modules into legitimate browser code.
Constructing the ultimate website
Most npm tasks like this have two major functions:
Allow you to develop your website or appBuild a finalized, manufacturing model
SvelteKit is not any exception. After we’re completed with our (superior) growth server setup and proud of our adjustments, we are able to run this command:
npm run construct
In case your dev server continues to be working, you possibly can both cease it with Ctrl+C, or open up a brand new terminal tab. You gained’t be capable to kind any instructions in the identical terminal window the place the dev course of is working because it’s an lively, steady job.
After we run the construct command, SvelteKit chews by all of the information within the challenge and spits out a completely bundled, ready-to-deploy assortment of static HTML, CSS and JavaScript information, and does so quite rapidly. You may add this assortment of information wherever you possibly can host an internet site. Trendy tooling; good old school output.
When the construct command finishes, it’s best to see a brand new construct folder within the root (i.e. prime stage) of your challenge folder. In the event you look by it, you’ll discover there are now not .md, .svelte, or some other information that may’t be learn by a browser. Every thing has been compiled into pure HTML, CSS and JavaScript, to not point out—as you’ll see in case you open a JavaScript or CSS file—they’re completely minified to be as small as attainable to load within the browser as quick as attainable.
If you’d like, you possibly can run npm run preview as soon as the construct is completed to see how the compiled website masses within the browser. The distinction right here is that the content material can be loaded from the ultimate construct folder, quite than constructed with pre-compiled information on the fly as it might when utilizing the dev command. You gained’t see any distinction until you open up the Community tab in DevTools (or attempt to replace one thing), however you’ll be wanting on the ultimate product.
That is an elective step, however I believe it’s fairly cool to get an thought of how few compiled information we truly find yourself with, contemplating all the assorted information we put into the challenge, and the way tiny the ultimate bundle truly is, because of the superb construct instruments constructed into this challenge. (For the document, it’s all SvelteKit and Vite.)
Trendy deployment practices
It is a matter for one more time, however trendy deployment usually doesn’t require you to run a construct command and add the information your self (although that’s nonetheless an possibility). As a substitute, a number (like Netlify or Vercel) connects on to the GitHub repo of your challenge and, everytime you push adjustments to the primary department of the repo, the host runs your construct command for you and deploys the compiled information robotically!
That’s one of many many extraordinarily good options of this new period of front-end growth. No messing with FTP or manually dragging information wherever; we’re assured that all the things is constructed and deployed robotically once we push our code, with out us needing to do something!
Wrapping up this npm information
In the event you’ve made it this far, congratulations! And thanks. Congratulations, as a result of this was an extended, lengthy learn. And thanks, as a result of… nicely, it was an extended, lengthy learn.
However you made it, and hopefully, you realized some vital issues as nicely. I discussed initially that my aim was not brevity, however effectiveness. Which means we lined a lot. We began with a temporary overview of npm and the place it matches within the trendy front-end growth panorama earlier than getting aware of the command line. From there, we broke down the phrases “Node” and “bundle supervisor” to get a exact understanding of what npm is and does. As soon as we acquired acquainted with the position that packages managers play in growth, we dove straight into npm, together with the best way to set up it, add packages to a challenge, arrange instructions, and at last, the best way to soar into an present challenge that makes use of npm.
My hope is that all the things we lined on this npm information at the least opens the door sufficient so that you can discover npm additional and stage up if you’re prepared. It usually takes me repeating one thing many occasions and making an attempt a number of approaches for one thing to actually sink in. So, in case you’re sitting there feeling virtually as confused as you had been earlier than, take some extra time on this. Replicate on what and what you’ve realized, and are available again—or strive a brand new method if you’re prepared!
Information chapters
Who the Heck is This Information For?What the Heck Does “npm” Imply?What the Heck is the Command Line?What the Heck is Node?What the Heck is a Bundle Supervisor?How the Heck Do You Set up npm?How the Heck Do You Set up npm Packages?What the Heck Are npm Instructions?How the Heck Do You Set up an Present npm Mission? (You might be right here!)
How the Heck Do You Set up an Present npm Mission? initially printed on CSS-Methods. You need to get the e-newsletter and develop into a supporter.


Subscribe to MarketingSolution.
Receive web development discounts & web design tutorials.
Now! Lets GROW Together!