
These days, creating advanced shapes is a simple process utilizing clip-path, however including a border to the shapes is at all times a ache. There isn’t any strong CSS answer and we at all times want to supply particular “hacky” code for every specific case. On this article, I’ll present you clear up this drawback utilizing the CSS Paint API.
Exploring the CSS Paint API sequence:
Half 1: Picture Fragmentation ImpactHalf 2: Blob AnimationHalf 3: Polygon Border (you’re right here!)
Earlier than we dig into this third experimentation, Here’s a small overview of what we’re constructing. And, please notice that every part we’re doing right here is simply supported in Chromium-based browsers so that you’ll wish to view the demos in Chrome, Edge, or Opera. See caniuse for the most recent help.
You’ll discover no advanced CSS code there however slightly a generic code the place we solely alter a number of variables to regulate the form.
The primary thought
With the intention to obtain the polygon border, I’m going to depend on a mix of the CSS clip-path property and a customized masks created with the Paint API.
We begin with a fundamental rectangular form.We apply clip-path to get our polygon form.We apply the customized masks to get our polygon border
The CSS setup
Right here’s the CSS for the clip-path step we’ll get to:
.field {
–path: 50% 0,100% 100%,0 100%;
width: 200px;
peak: 200px;
background: purple;
show: inline-block;
clip-path: polygon(var(–path));
}
Nothing advanced to date however notice using the CSS variable –path. The whole trick depends on that single variable. Since I will likely be utilizing a clip-path and a masks, each want to make use of the identical parameters, therefore the –path variable. And, sure, the Paint API will use that very same variable to create the customized masks.
The CSS code for the entire course of turns into:
.field {
–path: 50% 0,100% 100%,0 100%;
–border: 5px;
width: 200px;
peak: 200px;
background: purple;
show: inline-block;
clip-path: polygon(var(–path));
-webkit-mask: paint(polygon-border)
}
Along with the clip-path, we apply the customized masks, plus we add an additional variable, –border, to regulate the thickness of the border. As you possibly can see, every part remains to be fairly fundamental and generic CSS to date. In spite of everything, this is without doubt one of the issues that makes the CSS Paint API so nice to work with.
The JavaScript setup
I extremely advocate studying the primary a part of my earlier article to grasp the construction of the Paint API.
Now, let’s see what is occurring contained in the paint() perform as we leap into JavaScript:
const factors = properties.get(‘–path’).toString().break up(‘,’);
const b = parseFloat(properties.get(‘–border’).worth);
const w = dimension.width;
const h = dimension.peak;
const cc = perform(x,y) {
// …
}
var p = factors[0].trim().break up(” “);
p = cc(p[0],p[1]);
ctx.beginPath();
ctx.moveTo(p[0],p[1]);
for (var i = 1; i < factors.size; i++) {
p = factors[i].trim().break up(” “);
p = cc(p[0],p[1]);
ctx.lineTo(p[0],p[1]);
}
ctx.closePath();
ctx.lineWidth = 2*b;
ctx.strokeStyle = ‘#000’;
ctx.stroke();
The power to get and set CSS customized properties is without doubt one of the causes they’re so nice. We will attain for JavaScript to first learn the worth of the –path variable, then convert it into an array of factors (seen on the very first line above). So, meaning 50% 0,100% 100%,0 100% grow to be the factors for the masks, i.e. factors = [“50% 0″,”100% 100%”,”0 100%”].
Then we loop by the factors to attract a polygon utilizing moveTo and lineTo. This polygon is strictly the identical because the one drawn in CSS with the clip-path property.
Lastly, and after drawing the form, I add a stroke to it. I outline the thickness of the stroke utilizing lineWidth and I set a strong coloration utilizing strokeStyle. In different phrases, solely the stroke of the form is seen since I’m not filling the form with any coloration (i.e. it’s clear).
Now all now we have to do is to replace the trail and the thickness to create any polygon border. It’s price noting that we aren’t restricted to strong coloration right here since we’re utilizing the CSS background property. We will think about gradients or photos.
In case we have to add content material, now we have to think about a pseudo-element. In any other case, the content material will get clipped within the course of. It’s not extremely robust to help content material. We transfer the masks property to the pseudo-element. We will hold the clip-path declaration on the principle ingredient.
Questions to date?
I do know you in all probability have some burning questions you wish to ask after wanting over that final script. Enable me to preemptively reply a pair issues I guess you keep in mind.
What’s that cc() perform?
I’m utilizing that perform to transform the worth of every level into pixel values. For every level, I get each x and y coordinates — utilizing factors[i].trim().break up(” “) — after which I convert these coordinates to make them usable contained in the canvas ingredient that enables us to attract with these factors.
const cc = perform(x,y) {
var fx=0,fy=0;
if (x.indexOf(‘%’) > -1) {
fx = (parseFloat(x)/100)*w;
} else if(x.indexOf(‘px’) > -1) {
fx = parseFloat(x);
}
if (y.indexOf(‘%’) > -1) {
fy = (parseFloat(y)/100)*h;
} else if(y.indexOf(‘px’) > -1) {
fy = parseFloat(y);
}
return [fx,fy];
}
The logic is straightforward: if it’s a proportion worth, I take advantage of the width (or the peak) to search out the ultimate worth. If it’s a pixel worth, I merely get the worth with out the unit. If, for, instance now we have [50% 20%] the place the width is the same as 200px and the peak is the same as 100px, then we get [100 20]. If it’s [20px 50px], then we get [20 50]. And so forth.
Why are you utilizing CSS clip-path if the masks is already clipping the ingredient to the stroke of the form?
Utilizing solely the masks was the primary thought I had in thoughts, however I stumbled upon two main points with that strategy. The primary is said to how stroke() works. From MDN:
Strokes are aligned to the middle of a path; in different phrases, half of the stroke is drawn on the interior aspect, and half on the outer aspect.
That “half interior aspect, half outer aspect” gave me quite a lot of complications, and I at all times find yourself with an odd overflow when placing every part collectively. That’s the place CSS clip-path helps; it clips the outer half and solely retains the interior aspect — no extra overflow!
You’ll discover using ctx.lineWidth = 2*b. I’m including double the border thickness as a result of I’ll clip half of it to finish with the fitting thickness wanted across the total form.
The second concern is said to the form’s hover-able space. It’s recognized that masking doesn’t have an effect on that space and we will nonetheless hover/work together with the entire rectangle. Once more, reaching for clip-path fixes the problem, plus we restrict the interplay simply to the form itself.
The next demo illustrates these two points. The primary ingredient has each a masks and clip-path, whereas the second solely has the masks. We will clearly see the overflow concern. Attempt to hover the second to see that we will change the colour even when the cursor is outdoors the triangle.
Why are you utilizing @property with the border worth?
That is an fascinating — and fairly difficult — half. By default, customized properties (like –border) are thought-about a “CSSUnparsedValue” which suggests they’re handled as strings. From the CSS spec:
‘CSSUnparsedValue’ objects signify property values that reference customized properties. They’re comprised of a listing of string fragments and variable references.
With @property, we will register the customized property and provides it a sort in order that it may be acknowledged by the browser and dealt with as a sound sort as a substitute of a string. In our case, we’re registering the border as a <size> sort so later it turns into a CSSUnitValue. What this additionally does is permit us to make use of any size unit (px, em, ch,vh, and many others.) for the border worth.
This will sound a bit advanced however let me attempt to illustrate the distinction with a DevTools screenshot.
I’m utilizing console.log() on a variable the place I outlined 5em. The primary one is registered however the second is just not.
Within the first case, the browser acknowledges the kind and makes the conversion right into a pixel worth, which is beneficial since we solely want pixel values contained in the paint() perform. Within the second case, we get the variable as a string which isn’t very helpful since we can not convert em models into px models contained in the paint() perform.
Attempt all of the models. It would at all times outcomes with the computed pixel worth contained in the paint() perform.
What in regards to the –path variable?
I wished to make use of the identical strategy with the –path variable however, sadly, I believe I pushed CSS proper as much as the boundaries of what it might probably do right here. Utilizing @property, we will register advanced sorts, even multi-value variables. However that’s nonetheless not sufficient for the trail we want.
We will use the + and # symbols to outline a space-separated or comma-separated listing of values, however our path is a comma-separated listing of space-separated proportion (or size) values. I’d use one thing like [<length-percentage>+]#, however it doesn’t exist.
For the trail, I’m obliged to govern it as a string worth. That limits us simply to proportion and pixel values for now. Because of this, I outlined the cc() perform to transform the string values into pixel values.
We will learn within the CSS spec:
The interior grammar of the syntax strings is a subset of the CSS Worth Definition Syntax. Future ranges of the specification are anticipated to develop the complexity of the allowed grammar, permitting customized properties that extra carefully resemble the total breadth of what CSS properties permit.
Even when the grammar is lengthen to have the ability to register the trail, we’ll nonetheless face concern in case we have to embody calc() inside our path:
–path: 0 0,calc(100% – 40px) 0,100% 40px,100% 100%,0 100%;
Within the above, calc(100% – 40px) is a worth that the browser considers a <length-percentage>, however the browser can not compute that worth till it is aware of the reference for the share. In different phrases, we can not get the equal pixel worth contained in the paint() perform for the reason that reference can solely be recognized when the worth will get used inside var().
To beat this, we will can lengthen the cc() perform to do the conversion. We did the conversion of a proportion worth and a pixel worth, so let’s mix these into one conversion. We are going to think about 2 instances: calc(P% – Xpx) and calc(P% + Xpx). Our script turns into:
const cc = perform(x,y) {
var fx=0,fy=0;
if (x.indexOf(‘calc’) > -1) {
var tmp = x.substitute(‘calc(‘,”).substitute(‘)’,”);
if (tmp.indexOf(‘+’) > -1) {
tmp = tmp.break up(‘+’);
fx = (parseFloat(tmp[0])/100)*w + parseFloat(tmp[1]);
} else {
tmp = tmp.break up(‘-‘);
fx = (parseFloat(tmp[0])/100)*w – parseFloat(tmp[1]);
}
} else if (x.indexOf(‘%’) > -1) {
fx = (parseFloat(x)/100)*w;
} else if(x.indexOf(‘px’) > -1) {
fx = parseFloat(x);
}
if (y.indexOf(‘calc’) > -1) {
var tmp = y.substitute(‘calc(‘,”).substitute(‘)’,”);
if (tmp.indexOf(‘+’) > -1) {
tmp = tmp.break up(‘+’);
fy = (parseFloat(tmp[0])/100)*h + parseFloat(tmp[1]);
} else {
tmp = tmp.break up(‘-‘);
fy = (parseFloat(tmp[0])/100)*h – parseFloat(tmp[1]);
}
} else if (y.indexOf(‘%’) > -1) {
fy = (parseFloat(y)/100)*h;
} else if(y.indexOf(‘px’) > -1) {
fy = parseFloat(y);
}
return [fx,fy];
}
We’re utilizing indexOf() to check the existence of calc, then, with some string manipulation, we extract each values and discover the ultimate pixel worth.
And, in consequence, we additionally have to replace this line:
p = factors[i].trim().break up(” “);
…to:
p = factors[i].trim().break up(/(?!(.*)s(?![^(]*?))/g);
Since we have to think about calc(), utilizing the house character received’t work for splitting. That’s as a result of calc() additionally accommodates areas. So we want a regex. Don’t ask me about it — it’s the one which labored after making an attempt lots from Stack Overflow.
Right here is fundamental demo for instance the replace we did to date to help calc()
Discover that now we have saved the calc() expression inside the variable –v that we registered as a <length-percentage>. That is additionally part of the trick as a result of if we do that, the browser makes use of the proper format. Regardless of the complexity of the calc() expression, the browser at all times converts it to the format calc(P% +/- Xpx). Because of this, we solely need to cope with that format contained in the paint() perform.
Under totally different examples the place we’re utilizing a unique calc() expression for each:
In the event you examine the code of every field and see the computed worth of –v, you’ll at all times discover the identical format which is tremendous helpful as a result of we will have any sort of calculation we would like.
It ought to be famous that utilizing the variable –v is just not necessary. We will embody the calc() straight inside the trail. We merely want to verify we insert the proper format for the reason that browser is not going to deal with it for us (do not forget that we can not register the trail variable so it’s a string for the browser). This may be helpful when we have to have many calc() inside the trail and making a variable for each will make the code too prolonged. We are going to see a number of examples on the finish.
Can now we have dashed border?
We will! And it solely takes one instruction. The <canvas> ingredient already has a built-in perform to attract dashed stroke setLineDash():
The setLineDash() technique of the Canvas 2D API’s CanvasRenderingContext2D interface units the road sprint sample used when stroking strains. It makes use of an array of values that specify alternating lengths of strains and gaps which describe the sample.
All now we have to do is to introduce one other variable to outline our sprint sample.
Within the CSS, we merely added a CSS variable, –dash, and inside the masks is the next:
// …
const d = properties.get(‘–dash’).toString().break up(‘,’);
// …
ctx.setLineDash(d);
We will additionally management the offset utilizing lineDashOffset. We are going to see later how controlling the offset can assist us attain some cool animations.
Why not use @property as a substitute to register the sprint variable?
Technically, we will register the sprint variable as a <size># because it’s a comma-separated listing of size values. It does work, however I wasn’t in a position to retrieve the values contained in the paint() perform. I don’t know if it’s a bug, an absence of help, or I’m simply lacking a bit of the puzzle.
Here’s a demo for instance the problem:
I’m registering the –dash variable utilizing this:
@property –dash{
syntax: ‘<size>#’;
inherits: true;
initial-value: 0;
}
…and later declaring the variable as this:
–dash: 10em,3em;
If we examine the ingredient, we will see that the browser is dealing with the variable accurately for the reason that computed values are pixel ones
However we solely get the primary worth contained in the paint() perform
Till I discover the a repair for this, I’m caught utilizing the –dash variable as a string, just like the –path. Not a giant deal on this case as I don’t assume we’ll want greater than pixel values.
Use instances!
After exploring the behind the scene of this method, let’s now deal with the CSS half and take a look at a number of makes use of instances for our polygon border.
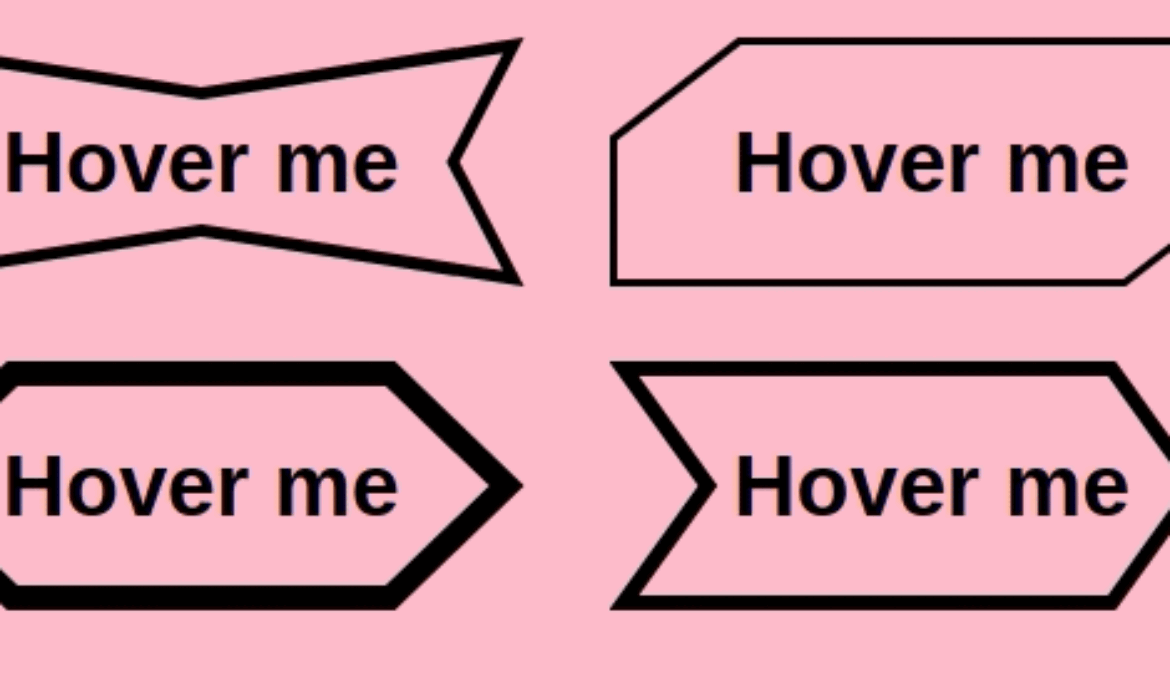
A group of buttons
We will simply generate customized form buttons having cool hover impact.
Discover how calc() is used inside the trail of the final button the best way we described it earlier. It really works high quality since I’m following the proper format.
Breadcrumbs
No extra complications when making a breadcrumb system! Under, you’ll find no “hacky” or advanced CSS code, however slightly one thing that’s fairly generic and simple to grasp the place all now we have to do is to regulate a number of variables.
Card reveal animation
If we apply some animation to the thickness, we will get some fancy hover impact
We will use that very same thought to create an animation that reveals the cardboard:
Callout & speech bubble
“How the hell we will add border to that small arrow???” I believe everybody has came upon this concern when coping with both a callout or speech bubble form of design. The Paint API makes this trivial.
In that demo, you’ll find a number of examples that you would be able to lengthen. You solely want to search out the trail to your speech bubble, then alter some variables to regulate the border thickness and the dimensions/place of the arrow.
Animating dashes
A final one earlier than we finish. This time we’ll deal with the dashed border to create extra animations. We already did one within the button assortment the place we rework a dashed border right into a strong one. Let’s sort out two others.
Hover the under and see the good impact we get:
Those that have labored with SVG for a while are seemingly aware of the type impact that we obtain by animating stroke-dasharray. Chris even tackled the idea some time again. Due to the Paint API, we will do that straight in CSS. The concept is sort of the identical one we use with SVG. We outline the sprint variable:
–dash: var(–a),1000;
The variable –a begins at 0, so our sample is a strong line (the place the size equals 0) with a spot (the place size 1000); therefore no border. We animate –a to a giant worth to attract our border.
We additionally talked about utilizing lineDashOffset, which we will use for an additional sort of animation. Hover the under and see the outcome:
Lastly, a CSS answer to animate the place of dashes that works with any sort of form!
What I did is fairly easy. I added an additional variable, –offset, to which I apply a transition from 0 to N. Then, contained in the paint() perform, I do the next:
const o = properties.get(‘–offset’);
ctx.lineDashOffset=o;
So simple as that! Let’s not neglect an infinite animation utilizing keyframes:
We will make the animation run repeatedly by offsetting 0 to N the place N is the sum of the values used within the sprint variable (which, in our case, is 10+15=25). We use a damaging worth to have the wrong way course.
I’ve in all probability missed quite a lot of use instances that I allow you to uncover!
Exploring the CSS Paint API sequence:
Half 1: Picture Fragmentation ImpactHalf 2: Blob AnimationHalf 3: Polygon Border (you’re right here!)
The publish Exploring the CSS Paint API: Polygon Border appeared first on CSS-Methods. You’ll be able to help CSS-Methods by being an MVP Supporter.


Subscribe to MarketingSolution.
Receive web development discounts & web design tutorials.
Now! Lets GROW Together!