
In my earlier article, I created a fragmentation impact utilizing CSS masks and customized properties. It was a neat impact but it surely has one downside: it makes use of loads of CSS code (generated utilizing Sass). This time I’m going to redo the identical impact however depend on the brand new Paint API. This drastically reduces the quantity of CSS and utterly removes the necessity for Sass.
Here’s what we’re making. Like within the earlier article, solely Chrome and Edge help this for now.
See that? Not more than 5 CSS declarations and but we get a fairly cool hover animation.
What’s the Paint API?
The Paint API is a part of the Houdini mission. Sure, “Houdini” the unusual time period that everybody is speaking about. A number of articles already cowl the theoretical facet of it, so I gained’t trouble you with extra. If I’ve to sum it up in a couple of phrases, I might merely say : it’s the way forward for CSS. The Paint API (and the opposite APIs that fall underneath the Houdini umbrella) permit us to increase CSS with our personal functionalities. We now not want to attend for the discharge of recent options as a result of we will do it ourselves!
From the specification:
An API for permitting net builders to outline a customized CSS <picture> with javascript [sic], which is able to reply to model and dimension modifications.
And from the explainer:
The CSS Paint API is being developed to enhance the extensibility of CSS. Particularly this permits builders to jot down a paint operate which permits us to attract immediately into an components [sic] background, border, or content material.
I believe the concept is fairly clear. We will draw what we wish. Let’s begin with a really primary demo of background coloration:
We add the paint worklet utilizing CSS.paintWorklet.addModule(‘your_js_file’).We register a brand new paint methodology known as draw.Inside that, we create a paint() operate the place we do all of the work. And guess what? Every part is like working with <canvas>. That ctx is the 2D context, and I merely used some well-known capabilities to attract a pink rectangle protecting the entire space.
This will look unintuitive at first look, however discover that the principle construction is all the time the identical: the three steps above are the “copy/paste” half that you simply repeat for every mission. The actual work is the code we write contained in the paint() operate.
Let’s add a variable:
As you’ll be able to see, the logic is fairly easy. We outline the getter inputProperties with our variables as an array. We add properties as a 3rd parameter to color() and later we get our variable utilizing properties.get().
That’s it! Now now we have all the pieces we have to construct our advanced fragmentation impact.
Constructing the masks
It’s possible you’ll marvel why the paint API to create a fragmentation impact. We stated it’s a device to attract photographs so the way it will permit us to fragment a picture?
Within the earlier article, I did the impact utilizing completely different masks layer the place each is a sq. outlined with a gradient (do not forget that a gradient is a picture) so we bought a form of matrix and the trick was to regulate the alpha channel of every one individually.
This time, as an alternative of utilizing many gradients we’ll outline just one customized picture for our masks and that customized picture will likely be dealt with by our paint API.
An instance please!
Within the above, I’ve created a picture having an opaque colour protecting the left half and a semi-transparent one protecting the correct half. Making use of this picture as a masks provides us the logical results of a half-transparent picture.
Now all we have to do is to separate our picture to extra components. Let’s outline two variables and replace our code:
The related a part of the code is the next:
const n = properties.get(‘–f-n’);
const m = properties.get(‘–f-m’);
const w = dimension.width/n;
const h = dimension.top/m;
for(var i=0;i<n;i++) {
for(var j=0;j<m;j++) {
ctx.fillStyle = ‘rgba(0,0,0,’+(Math.random())+’)’;
ctx.fillRect(i*w, j*h, w, h);
}
}
N and M outline the dimension of our matrix of rectangles. W and H are the scale of every rectangle. Then now we have a primary FOR loop to fill every rectangle with a random clear colour.
With a bit JavaScript, we get a customized masks that we will simply management by adjusting the CSS variables:
Now, we have to management the alpha channel with the intention to create the fading impact of every rectangle and construct the fragmentation impact.
Let’s introduce a 3rd variable that we use for the alpha channel that we additionally change on hover.
We outlined a CSS customized property as a <quantity> that we transition from 1 to 0, and that very same property is used to outline the alpha channel of our rectangles. Nothing fancy will occur on hover as a result of all of the rectangles will fade the identical method.
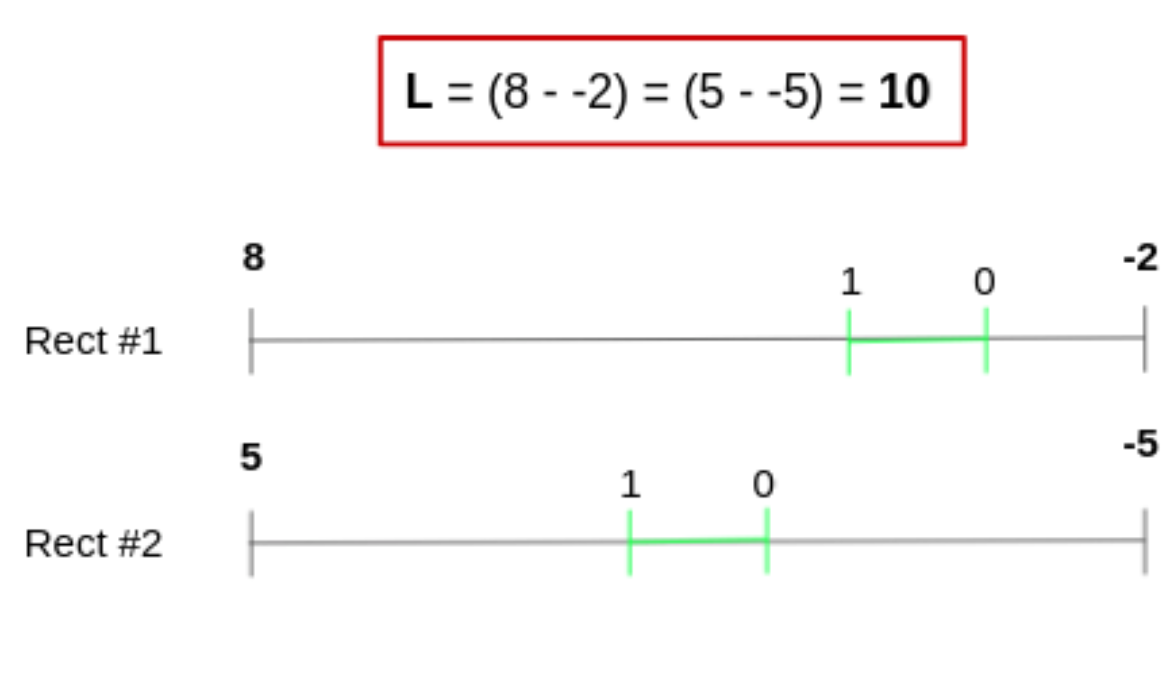
We’d like a trick to stop fading of all of the rectangles on the similar time, as an alternative making a delay between them. Right here is an illustration to clarify the concept I’m going to make use of:
The above is exhibiting the alpha animation for 2 rectangles. First we outline a variable L that must be greater or equal to 1 then for every rectangle of our matrix (i.e. for every alpha channel) we carry out a transition between X and Y the place X – Y = L so now we have the identical total period for all of the alpha channel. X must be greater or equal to 1 and Y smaller or equal to 0.
Wait, the alpha worth shouldn’t be within the vary [1 0], proper ?
Sure, it ought to! And all of the methods that we’re engaged on depend on that. Above, the alpha is animating from 8 to -2, which means now we have an opaque colour within the [8 1] vary, a clear one within the [0 -2] vary and an animation inside [1 0]. In different phrases, any worth greater than 1 could have the identical impact as 1, and any worth smaller than 0 could have the identical impact as 0.
Animation inside [1 0] is not going to occur on the similar time for each our rectangles. Rectangle 2 will attain [1 0] earlier than Rectangle 1 will. We apply this to all of the alpha channels to get our delayed animations.
In our code we’ll replace this:
rgba(0,0,0,’+(o)+’)
…to this:
rgba(0,0,0,’+((Math.random()*(l-1) + 1) – (1-o)*l)+’)
L is the variable illustrated beforehand, and O is the worth of our CSS variable that transitions from 1 to 0
When O=1, now we have (Math.random()*(l-1) + 1). Contemplating the truth that the random() operate provides us a price inside the [0 1] vary, the ultimate worth will likely be within the [L 1]vary.
When O=0, now we have (Math.random()*(l-1) + 1 – l) and a price with the [0 1-L] vary.
L is our variable to manage the delay.
Let’s see this in motion:
We’re getting nearer. We have now a cool fragmentation impact however not the one we noticed at first of the article. This one isn’t as clean.
The problem is said the random() operate. We stated that every alpha channel must animate between X and Y, so logically these worth want to stay the identical. However the paint() operate known as a bunch in the course of the transition, so every time, the random() operate give us completely different X and Y values for every alpha channel; therefore the “random” impact we’re getting.
To repair this we have to discover a solution to retailer the generated worth so they’re all the time the identical for every name of the paint() operate. Let’s take into account a pseudo-random operate, a operate that all the time generates the identical sequence of values. In different phrases, we need to management the seed.
Sadly, we can’t do that with the JavaScript’s built-in random() operate, so like all good developer, let’s decide one up from Stack Overflow:
const masks = 0xffffffff;
const seed = 30; /* replace this to vary the generated sequence */
let m_w = (123456789 + seed) & masks;
let m_z = (987654321 – seed) & masks;
let random = operate() {
m_z = (36969 * (m_z & 65535) + (m_z >>> 16)) & masks;
m_w = (18000 * (m_w & 65535) + (m_w >>> 16)) & masks;
var end result = ((m_z << 16) + (m_w & 65535)) >>> 0;
end result /= 4294967296;
return end result;
}
And the end result turns into:
We have now our fragmentation impact with out advanced code:
a primary nested loop to create NxM rectanglesa intelligent components for the channel alpha to create the transition delaya prepared random() operate taken from the Internet
That’s it! All it’s a must to do is to use the masks property to any component and modify the CSS variables.
Preventing the gaps!
In the event you play with the above demos you’ll discover, in some specific case, unusual gaps between the rectangles
To keep away from this, we will lengthen the world of every rectangle with a small offset.
We replace this:
ctx.fillRect(i*w, j*h, w, h);
…with this:
ctx.fillRect(i*w-.5, j*h-.5, w+.5, h+.5);
It creates a small overlap between the rectangles that compensates for the gaps between them. There isn’t any specific logic with the worth 0.5 I used. You’ll be able to go greater or smaller based mostly in your use case.
Need extra shapes?
Can the above be prolonged to think about greater than rectangular form? Positive it might probably! Let’s not overlook that we will use Canvas to attract any form of form — not like pure CSS shapes the place we typically want some hacky code. Let’s attempt to construct that triangular fragmentation impact.
After looking the net, I discovered one thing known as Delaunay triangulation. I gained’t go into the deep principle behind it, but it surely’s an algorithm for a set of factors to attract linked triangles with particular properties. There are many ready-to-use implementations of it, however we’ll go together with Delaunator as a result of it’s speculated to be the quickest of the bunch.
We first outline a set of factors (we’ll use random() right here) then run Delauntor to generate the triangles for us. On this case, we solely want one variable that defines the variety of factors.
const n = properties.get(‘–f-n’);
const o = properties.get(‘–f-o’);
const w = dimension.width;
const h = dimension.top;
const l = 7;
var dots = [[0,0],[0,w],[h,0],[w,h]]; /* we all the time embrace the corners */
/* we generate N random factors inside the space of the component */
for (var i = 0; i < n; i++) {
dots.push([random() * w, random() * h]);
}
/**/
/* We name Delaunator to generate the triangles*/
var delaunay = Delaunator.from(dots);
var triangles = delaunay.triangles;
/**/
for (var i = 0; i < triangles.size; i += 3) { /* we loop the triangles factors */
/* we draw the trail of the triangles */
ctx.beginPath();
ctx.moveTo(dots[triangles[i]][0] , dots[triangles[i]][1]);
ctx.lineTo(dots[triangles[i + 1]][0], dots[triangles[i + 1]][1]);
ctx.lineTo(dots[triangles[i + 2]][0], dots[triangles[i + 2]][1]);
ctx.closePath();
/**/
var alpha = (random()*(l-1) + 1) – (1-o)*l; /* the alpha worth */
/* we fill the world of triangle with the semi-transparent colour */
ctx.fillStyle = ‘rgba(0,0,0,’+alpha+’)’;
/* we take into account stroke to battle the gaps */
ctx.strokeStyle = ‘rgba(0,0,0,’+alpha+’)’;
ctx.stroke();
ctx.fill();
}
I’ve nothing extra so as to add to the feedback within the above code. I merely used some primary JavaScript and Canvas stuff and but now we have a fairly cool impact.
We will make much more shapes! All now we have to do is to search out an algorithm for it.
I can’t transfer on with out doing the hexagon one!
I took the code from this text written by Izan Pérez Cosano. Our variable is now R that can outline the dimension of 1 hexagon.
What’s subsequent?
Now that now we have constructed our fragmentation impact, let’s give attention to the CSS. Discover that the impact is so simple as altering the opacity worth (or the worth of whichever property you might be working with) of a component on it hover state.
Opacity animation
img {
opacity:1;
transition:opacity 1s;
}
img:hover {
opacity:0;
}
Fragmentation impact
img {
-webkit-mask: paint(fragmentation);
–f-o:1;
transition:–f-o 1s;
}
img:hover {
–f-o:0;
}
This implies we will simply combine this type of impact to create extra advanced animations. Listed here are a bunch of concepts!
Responsive picture slider
One other model of the identical slider:
Noise impact
Loading display screen
Card hover impact
That’s a wrap
And all of that is simply the tip of the iceberg of what could be achieved utilizing the Paint API. I’ll finish with two necessary factors:
The Paint API is 90% <canvas>, so the extra about <canvas>, the extra fancy issues you are able to do. Canvas is extensively used, which suggests there’s a bunch of documentation and writing about it to get you up to the mark. Hey, right here’s one proper right here on CSS-Tips!The Paint API removes all of the complexity from the CSS facet of issues. There’s no coping with advanced and hacky code to attract cool stuff. This makes CSS code a lot simpler to keep up, to not point out much less liable to error.
The publish Exploring the CSS Paint API: Picture Fragmentation Impact appeared first on CSS-Tips. You’ll be able to help CSS-Tips by being an MVP Supporter.


Subscribe to MarketingSolution.
Receive web development discounts & web design tutorials.
Now! Lets GROW Together!