
The CSS Paint API (a part of the magical Houdini household) opens the door to an thrilling new world of design in CSS. Utilizing the Paint API, we will create customized shapes, intricate patterns, and exquisite animations — all with a contact of randomness — in a approach that’s transportable, quick, and responsive.
We’re going to dip our toes into the effervescent cauldron of generative CSS magic by creating my favourite form, the blob. Random blobs are an amazing start line for anybody new to generative artwork/design, and we will probably be studying the CSS Paint API as we go, so this is a perfect start line for folk who’re new to this world. You’ll be a generative CSS magician very quickly!
Let’s hop on our broomsticks and conjure up some shapes.
Generative?
For some of us studying this, generative artwork could also be an unfamiliar matter. In case you are already comfy with generative artwork/design, be happy to hop all the way down to the following part. If not, right here’s just a little instance:
Think about, for a second, that you’re sitting at a desk. You’ve got three stamps, some cube, and a chunk of paper. Every of the stamps has a special form on it. There’s a sq., a line, and a circle. You roll the cube. If the cube land on one, you utilize the sq. stamp on the web page. If the cube lands on two, you utilize the line stamp. If it lands on three, you utilize the circle stamp. If the cube reads 4, 5, or six, you do nothing. You repeat the roll-and-stamp course of till the web page fills with shapes — that is generative artwork!
It might probably appear just a little scary at first, however actually, that’s all “generative” means — one thing created with a component of likelihood/unpredictability. We outline some guidelines and let a supply of randomness information us to an end result. Within the “analog” instance above, the randomness supply is a few cube. Once we are working within the browser, it could possibly be Math.random() or one other related perform.
To carry issues again to the land of ones and zeros for a second, that is what the above instance would seem like if written in code:
Fairly cool, eh? By defining some easy guidelines and actioning them at random, we now have created a novel sample. On this tutorial sequence, we are going to use generative strategies identical to this to create thrilling person interfaces.
What’s the CSS Paint API, and what’s a worklet?
The CSS Paint API permits us low-level entry to CSS itself(!) via an HTML5 <canvas>-like drawing API. We are able to harness this energy with one thing referred to as a worklet.
Worklets, briefly, are JavaScript courses. Every worklet class should have a paint() perform. A worklet’s paint() perform can programmatically create a picture for any CSS property that expects one.
For instance:
.my-element {
background-image: paint(texture);
}
Right here, we now have a fictional texture worklet that generates a gorgeous (I’ll go away this as much as your creativeness), programmatic texture. The place we’d normally assign a url(…) worth to the background-image property, we as a substitute name paint(worklet_name) — this runs the worklet’s paint() perform and renders the output to the goal component.
We will probably be stepping into find out how to write worklets intimately shortly, however I needed to provide you a fast primer on what they’re earlier than I begin speaking about them.
What we’re constructing
So, on this tutorial, we will probably be constructing a generative blob worklet. Our worklet will take a number of enter parameters (as CSS Customized Properties, extra on this just a little later) and return a gorgeous, random blob form.
Let’s get began by trying out some examples of the completed worklet in motion — if an image paints a thousand phrases, a CodePen should paint one million, proper?
The blob worklet, as a background picture
First, right here’s a demo of the blob worklet simply hanging out by itself, producing a worth for the background-image property of a component:
I encourage you to have a look at the CSS for the above CodePen, change the customized properties, resize the component, and see what occurs. See how the form resizes fluidly and updates when the customized properties change? Don’t fear about understanding how this works proper now. At this stage, we’re solely involved with what we’re constructing.
Generative picture masks, a sensible use case
Superior, now that we now have seen the “standalone” worklet, let’s take a look at how we will use it. On this instance, the worklet features as a generative picture masks:
The outcome (I believe) is somewhat placing. The worklet provides a pure, eye-catching curve to the design. As well as, the masks form is completely different every time the web page masses, which is a unbelievable strategy to hold the UI contemporary and thrilling — click on “rerun” on the CodePen above to see this impact in motion. This ever-changing conduct is refined, for certain, however I hope it is going to carry of us who discover it a little little bit of pleasure. The net will be fairly a chilly, sterile place, and generative touches like this could make it really feel much more natural!
Be aware: I’m actually not suggesting all of us begin making our complete interfaces change at random. That might be horrible for usability! This sort of conduct works finest when utilized sparingly and solely to presentational parts of your web site or app. Assume weblog submit headers, hero photos, refined background patterns, and so forth.
Now, this is only one instance (and easy one, at that), however I hope it provides you some concepts on how you possibly can use the blob worklet in your personal design and growth. For anybody on the lookout for some additional inspiration, a fast Dribbble search for “blobs” ought to provide you with a complete heap of concepts!
Wait, do I want the CSS Paint API to make blobs?
In brief, no!
There are, the truth is, a plethora of how to make blobs to make use of in your UI design. You can attain for a software like Blobmaker, do some magic with border-radius, use an everyday <canvas> component, no matter! There are tons of roads resulting in blob metropolis.
None of those, nevertheless, are fairly the identical as utilizing the CSS Paint API. Why?
Effectively, to call a number of causes…
It permits us to be expressive in our CSS
As an alternative of dragging round sliders, tweaking radii, or endlessly clicking “regenerate” within the hope that an ideal blob comes our approach, we will use only a few human-readable values to get what we want.
For instance, the blob worklet we will probably be constructing on this tutorial takes the next enter properties:
.worklet-target {
–blob-seed: 123456;
–blob-num-points: 8;
–blob-variance: 0.375;
–blob-smoothness: 1;
–blob-fill: #000;
}
Want your blobs to be tremendous refined and minimal? Scale back the –blob-variance customized property. Want them to be detailed and overstated? Deliver it up!
Fancy redesigning your website in a extra brutalist course? No drawback! As an alternative of re-exporting tons of of property or customized coding a bunch of border-radius properties, merely cut back the –blob-smoothness customized property to zero:
Useful, eh? The CSS Paint API, via worklets, permits us to create ever-unique UI parts that match proper in with a design system.
Be aware: I’m utilizing GSAP within the examples above to animate the enter properties of the paint worklet we’re constructing on this tutorial.
It’s tremendous performant
It simply so occurs that generative work can get a little heavy, computation-wise. We frequently discover ourselves looping via numerous parts, performing calculations, and different enjoyable stuff. Once we think about that we might must create a number of programmatic, generative visuals on a web page, efficiency points might develop into a threat.
Fortunately for us, CSS Paint API worklets do all their magic exterior of the principle browser thread. The primary browser thread is the place all the JavaScript we normally write exists and executes. Writing code this manner is completely OK (and customarily preferable), **however it could actually have limitations. Once we try to do an excessive amount of on the principle browser thread, the can UI develop into sluggish and even blocked.
As worklets run on a special thread to the principle web site or app, they won’t “block” or decelerate the interface. Moreover, which means the browser can spin up numerous separate worklet situations that it could actually name on when wanted — that is just like containerization and ends in blazing quick efficiency!
It gained’t muddle the DOM
As a result of the CSS Paint API basically provides a picture to a CSS property, it doesn’t add any additional parts to the DOM. To me, this appears like a brilliant clear method to creating generative visible parts. Your HTML construction stays clear, semantic, and unpolluted, whereas your CSS handles how issues look.
Browser help
It’s value noting that the CSS Paint API is a comparatively new know-how, and though help is rising, it’s nonetheless unavailable in some main browsers. Here’s a browser help desk:
This browser help knowledge is from Caniuse, which has extra element. A quantity signifies that browser helps the function at that model and up.
Desktop
ChromeFirefoxIEEdgeSafari65NoNo79No
Cell / Pill
Android ChromeAndroid FirefoxAndroidiOS Safari92No92No
Though browser help continues to be just a little skinny on the bottom — on this tutorial, we will probably be taking a look at find out how to use the css-paint-polyfill maintained by GoogleChromeLabs to verify customers in all browsers can get pleasure from our creations.
We are going to, moreover, be taking a look at find out how to “fail gracefully” when the CSS Paint API is unsupported. A polyfill means additional JavaScript weight, so for some of us, it’s not a viable resolution. If that is you, don’t fear. We will probably be exploring browser help choices for everybody.
Let’s code!
OK, OK! We all know what we’re constructing and why the CSS Paint API rocks — now let’s get coding! First issues first, let’s get a growth surroundings spun up.
Be aware: in the event you get just a little misplaced at any level throughout on this tutorial, you possibly can view a completed model of the worklet.
A easy growth surroundings
To get us began, I’ve created a worklet-starter-kit repository. As a primary step, pop on over to GitHub and clone it. After you have cloned and navigated contained in the repo, run:
npm set up
Adopted by:
npm run begin
After you have run the above instructions, a easy growth server fires up within the present listing, and your default browser opens. As worklets have to be loaded both over HTTPS or from localhost — this setup ensures that we will use our worklet with none CORS points. The starter package additionally handles mechanically refreshing the browser after we make any modifications.
In addition to serving our content material and offering a fundamental dwell reload, this repository incorporates a easy construct step. Powered by esbuild, this course of bundles up any JavaScript imports inside our worklet and outputs the outcome to a worklet.bundle.js file. Any modifications made in worklet.js are mechanically mirrored in worklet.bundle.js.
You probably have a poke across the repository, you may discover that there’s already some HTML and CSS kicking round. We now have a easy index.html file with a single worklet-canvas div, alongside some CSS to middle it on the web page and scale it to the viewport. Consider this as a clean canvas for all your worklet experimentation!
Initializing our worklet
OK, now that we now have our growth surroundings up and operating, it’s time to create our worklet. Let’s begin by navigating to the worklet.js file.
Be aware: Bear in mind, worklet.bundle.js is mechanically generated by our construct step. We don’t ever wish to edit this file immediately.
In our worklet.js file, we will outline our Blob class and register it with the registerPaint perform. We cross two values to registerPaint — the identify we wish our worklet to have (in our case, blob) and the category that defines it:
class Blob {}
registerPaint(“blob”, Blob);
Wonderful! We simply took step one in direction of creating our blobs!
Including a paint() perform
Now, not a lot is occurring but, so let’s add a easy paint() perform to our Blob class to examine issues are working OK:
paint(ctx, geometry, properties) {
console.log(`Factor dimension is ${geometry.width}x${geometry.peak}`);
ctx.fillStyle = “tomato”;
ctx.fillRect(0, 0, geometry.width, geometry.peak);
}
We are able to consider this paint() perform like a callback. It runs, initially, when the worklet’s goal component first renders. After this, any time the component’s dimensions change or the worklet’s enter properties replace, it runs once more.
When the paint() perform is known as, it mechanically has a number of values handed via it. On this tutorial, we’re making use of the primary three:
context — a 2D drawing context just like that of a <canvas> component, we use this to attract issues.geometry — an object containing the width and peak of the goal elementproperties — an array of customized properties
Now that we now have a easy paint() perform outlined, let’s pop over to the index.html file and cargo our worklet. To take action, we’re going to add a brand new <script> simply earlier than our closing </physique> tag:
<script>
if (CSS[“paintWorklet”] !== undefined) {
CSS.paintWorklet.addModule(“./worklet.bundle.js”);
}
</script>
Be aware: we’re registering the bundled model of our worklet!
Wonderful. Our blob worklet is now loaded and prepared to be used in our CSS. Let’s use it to generate a background-image for our worklet-canvas class:
.worklet-canvas {
background-image: paint(blob);
}
After you have added the above snippet, you must see a purple sq.. Our worklet is alive! Good work. For those who resize the browser window, you must see the worklet-canvas component’s dimensions printed within the browser console. Bear in mind, the paint() perform runs each time the worklet goal’s dimensions change.
Defining the worklet’s enter properties
To permit our worklet to generate stunning blobs, we have to assist it out and cross it some properties. The properties we want are:
–blob-seed — a “seed” worth for a pseudorandom quantity generator; extra on this in a moment–blob-num-points — how detailed the blob relies on the variety of factors used alongside the shape–blob-variance — how assorted the blob’s management factors are–blob-smoothness — the smoothness/sharpness of the blob’s edges–blob-fill — the blob’s fill colour
Let’s inform our worklet that it’s going to obtain these properties and that it wants to look at them for modifications. To take action, we will head again over to our Blob class and add an inputProperties getter:
static get inputProperties() {
return [
“–blob-seed”,
“–blob-num-points”,
“–blob-variance”,
“–blob-smoothness”,
“–blob-fill”,
];
}
Cool. Now that our worklet is aware of what enter properties to count on, we should always add them to our CSS:
.worklet-canvas {
–blob-seed: 123456;
–blob-num-points: 8;
–blob-variance: 0.375;
–blob-smoothness: 1;
–blob-fill: #000;
}
Now, at this level, we might use the CSS Properties and Values API (one other member of the Houdini household) **to assign some defaults and make these customized properties just a little simpler to parse in our worklet. Sadly, nevertheless, at this second, the Properties and Values API doesn’t have the most effective browser help.
For now, to maintain issues easy, we’re going to go away our customized properties as they’re — counting on some fundamental parsing features in our worklet as a substitute.
Heading again to our worklet class for a second, let’s add these utility features:
propToString(prop) {
return prop.toString().trim();
}
propToNumber(prop) {
return parseFloat(prop);
}
Within the absence of the Properties and Values API, these easy utility features will assist us convert the properties handed to color() to usable values.
Utilizing our new helper features, we will parse properties and outline some variables to make use of in our paint() perform. Let’s take away the previous “debug” code, too:
paint(ctx, geometry, properties) {
const seed = this.propToNumber(properties.get(“–blob-seed”));
const numPoints = this.propToNumber(properties.get(“–blob-num-points”));
const variance = this.propToNumber(properties.get(“–blob-variance”));
const smoothness = this.propToNumber(properties.get(“–blob-smoothness”));
const fill = this.propToString(properties.get(“–blob-fill”));
}
For those who log any of those variables, you must see that the properties made out there by the paint() perform map precisely to the Customized Properties we outlined in our CSS a second in the past.
For those who open up dev-tools, examine the worklet-canvas component, and alter any of those customized properties — you must see that the logs re-run and mirror the up to date worth. Why? Our worklet reacts to any modifications to its enter properties and re-runs its paint() perform when it detects them.
OK, of us, it’s time to begin forming our blob form. To do that, we want a approach of producing random numbers. In spite of everything, that is what is going to make our blobs generative!
Now, chances are you’ll be considering, “Hey, we will use Math.random() for this!” and in some ways, you’d be proper on. There’s, nevertheless, an issue with utilizing a “common” random quantity generator in CSS Paint API worklets. Let’s test it out.
The issue with Math.random()
We seen earlier how a worklet’s paint() perform runs somewhat typically. If we use a way comparable to Math.random() to generate random values inside paint() — they are going to be completely different every time the perform executes. Completely different random numbers imply a special visible outcome each time the worklet re-renders. We don’t need this in any respect. Positive, we would like our blobs to be random, however solely on the level of conception. They shouldn’t change as soon as they exist on the web page until we explicitly inform them to take action.
I discovered this idea just a little tough to get my head round at first, so I’ve made a few CodePens (finest seen in a browser that natively helps the CSS Paint API) to assist reveal. Within the first instance, we now have a worklet that units a random background colour, utilizing Math.random():
Warning: resizing the component under will end in a flash of colour.
Strive resizing the component above and spot how the background colour modifications because it updates. For some area of interest functions and enjoyable demos, this may be what you need. In most sensible use-cases, although, it isn’t. Apart from being visually jarring, conduct like this could possibly be an accessibility subject for customers who’re delicate to movement. Think about that your worklet contained tons of of dots that every one began flying round and flashing each time one thing on the web page modified dimension!
Fortunately for us, this subject is sort of easy to repair. The answer? A pseudorandom quantity generator! Pseudorandom quantity mills (or PRNGs) generate random numbers based mostly on a seed. Given the identical seed worth, a PRNG at all times returns the identical sequence of random numbers — that is good for us, as we will re-initialize the PRNG each time the paint() perform runs, guaranteeing the identical sequence of random values!
Right here’s a CodePen demonstrating how a PRNG works:
Click on “generate” to decide on some random numbers — then, click on “generate” a number of extra instances. Discover how the sequence of numbers is identical every time you click on? Now, strive altering the seed worth, and repeat this course of. The numbers will probably be completely different from the earlier seed worth, however constant throughout generations. That is the fantastic thing about a PRNG. Predictable randomness!
Right here’s the random-background-color CodePen once more, utilizing a PRNG somewhat than Math.random():
Ah! Significantly better! The component has a random colour set when the web page masses, however the background colour doesn’t change when it resizes. Good! You possibly can take a look at this out by clicking “Rerun” on the CodePen above, and resizing the component.
Including pseudorandom numbers to our worklet
Let’s go forward and add a PRNG perform above our Blob class definition:
// supply: https://github.com/bryc/code/blob/grasp/jshash/PRNGs.md
perform mulberry32(a) {
return perform () t)) ^ t;
return ((t ^ (t >>> 14)) >>> 0) / 4294967296;
;
}
Now, I’d be mendacity if I stated I perceive fairly actually something this perform is doing. I found this stunning little snippet of code via Jake Archibald’s glorious article on being predictably random with the CSS Paint API, and have used it in a ton of labor since. You possibly can discover the unique repository for this perform over at GitHub — it features a complete heap of fantastic PRNGs and is actually value a glance.
Be aware: whereas I don’t absolutely perceive how this perform works, I understand how to make use of it. Typically, when working within the generative world (in case you are something like me, anyway!), one can find your self on this scenario. While you do, don’t fear! It’s completely OK to make use of a snippet of code to create some artwork/design with out understanding precisely the way it works. We are able to study by doing, and that’s superior.
OK, nice, we now have a PRNG perform. Let’s add it to color():
const random = mulberry32(seed);
On this snippet, we name mulberry32() with our –blob-seed customized property as its seed worth, and it returns a model new perform. This new perform — random — returns a random quantity between zero and one.
Pretty, let’s put our shiny new PRNG to make use of.
A fast apart: Drawing with the CSS Paint API
When working with CSS Paint API worklets, identical to HTML <canvas>, we draw every part inside a 2D context. This context has a width and a peak. For worklets, the width and peak of this context at all times matches that of the component the worklet is portray to.
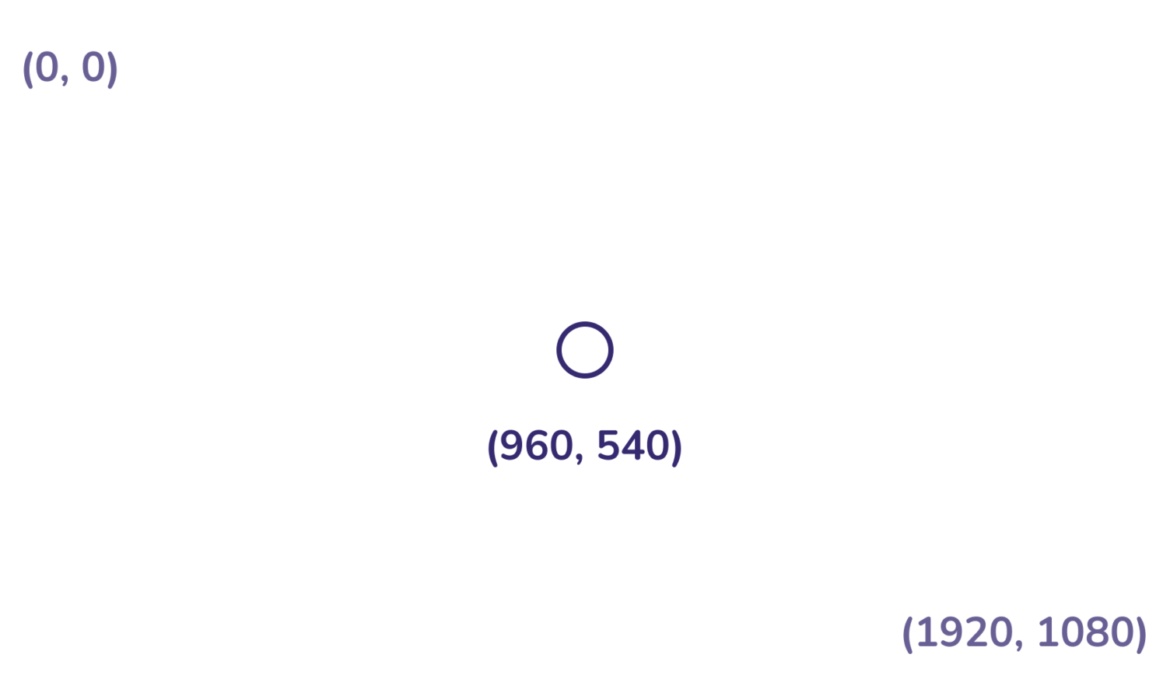
Say, for instance, we needed so as to add some extent to the middle of a 1920x1080px context, we might visualize it like so:
As we start to put in writing our “render” code, that is good to bear in mind.
How our blob is fashioned, an summary
Earlier than we write any code, I’d like to indicate you just a little SVG animation of how we are going to create our blob form. In case you are a visible learner like me, chances are you’ll discover an animated reference useful for understanding this sort of factor:
To interrupt this course of down into three steps:
Plot a number of equally spaced factors across the radius of a circle.Pull every level a random quantity in direction of the middle of the circle.Draw a clean curve via every of the factors.
Now, issues are about to get a tiny bit maths-y however don’t fear. We’ve acquired this!
Defining the blob’s management factors
To begin, let’s outline the radius of our blob. The blob’s radius determines how massive or small it’s.
We would like our blob form to at all times “match” contained in the component it’s painted on. To make sure that is the case, we examine the width and peak of the worklet’s goal component and set the blob’s radius accordingly. Our blob is basically a bizarre circle, and a circle’s complete width/peak will at all times be equal to its radius multiplied by two, so we divide this worth to match. Let’s add some code to attain this in our paint() perform:
const radius = Math.min(geometry.width, geometry.peak) / 2;
Right here’s a picture to assist clarify what is occurring right here:
Cool! Now that we all know what the radius of our blob must be, we will initialize its factors:
const factors = [];
const middle = {
x: geometry.width / 2,
y: geometry.peak / 2,
};
const angleStep = (Math.PI * 2) / numPoints;
for (let i = 1; i <= numPoints; i++) {
const angle = i * angleStep;
const level = {
x: middle.x + Math.cos(angle) * radius,
y: middle.y + Math.sin(angle) * radius,
};
}
Phew! On this snippet, we “stroll” across the circumference of a circle, plopping down some equally spaced factors as we go. How does this work?
To begin, we outline an angleStep variable. The utmost angle between two factors on the circumference of a circle is Pi × 2. By dividing Pi × 2 by the variety of “factors” we wish to create, we now have the specified (equally spaced) angle between every level.
Subsequent, we loop over every level. For every of those factors, we outline an angle variable. This variable is our angleStep multiplied by the purpose’s index. Given a radius, an angle, and a middle level for a circle, we will use Math.cos() and Math.sin() to plot every level.
Be aware: If you want to study just a little extra about trigonometric features, I wholeheartedly advocate Michelle Barker’s glorious sequence!
Now that we now have some good, stunning, equally spaced factors positioned across the circumference of a circle — we should always mess them up. To take action, we will “pull” every one, a random quantity, in direction of the circle’s middle.
How can we do that?
First, let’s add a brand new lerp perform (quick for linear interpolation) slightly below the place we outlined mulberry32:
perform lerp(place, goal, amt) {
return {
x: (place.x += (goal.x – place.x) * amt),
y: (place.y += (goal.y – place.y) * amt),
};
}
This perform takes a start-point, an end-point, and an “quantity” worth between zero and one. The return worth of this perform is a brand new level, positioned someplace between the beginning and finish factors.
In our worklet, slightly below the place we outline the purpose variable in our for-loop, we will use this lerp perform to “pull” the purpose in direction of the middle place. We retailer the modified level in our factors array:
factors.push(lerp(level, middle, variance * random()));
For the linear interpolation quantity, we use our –blob-variance property multiplied by a random quantity generated by random() — as random() at all times returns a worth between zero and one, this quantity will at all times be someplace between zero, and our –blob-variance quantity.
Be aware: The next –blob-variance will end in crazier blobs, as every level can find yourself nearer to the middle.
Drawing the curve
So, we now have our blob’s factors saved in an array. Proper now, although, they aren’t used for something! For the ultimate step in our blob creation course of, we are going to draw a clean curve via every of them.
To attract this curve, we’re going to use one thing referred to as a Catmull-Rom spline. A Catmull-Rom spline is, briefly, an effective way of drawing a clean Bézier curve via any variety of { x, y } factors. With a spline, we don’t have to fret about any tough management level calculation. We cross in an array of factors, and get a gorgeous, natural curve again. No sweat.
Let’s head over to the beginning of our worklet.js file and add the next import:
import { spline } from “@georgedoescode/generative-utils”;
Then set up the bundle like so:
npm i @georgedoescode/generative-utils
This spline perform is sort of sizeable and a little advanced. For that reason, I’ve packaged it up and added it to my generative-utils repository, a small assortment of helpful generative artwork utilities.
As soon as we now have imported spline — we will use it in our worklet’s paint() perform like this:
ctx.fillStyle = fill;
ctx.beginPath();
spline(factors, smoothness, true, (CMD, knowledge) => {
if (CMD === “MOVE”) {
ctx.moveTo(…knowledge);
} else {
ctx.bezierCurveTo(…knowledge);
}
});
ctx.fill();
Be aware: Place this snippet simply after your for-loop!
We cross in our factors, –blob-smoothness property, and a flag to let spline understand it ought to return a closed form. As well as, we use our –blob-fill customized property to set the fill colour of the blob. Now, if we check out our browser window, we should always see one thing like this!
Hooray! We did it! The spline perform has efficiently drawn a clean curve via every of our factors, thus making a stunning (and random) blob form. If you want your blob to be rather less rounded, strive decreasing the –blob-smoothness property.
Now, all we have to do is add a contact extra randomness.
A random, random seed worth
Proper now, our blob’s PRNG seed is a hard and fast worth. We outlined this –blob-seed customized property in our CSS earlier, with a worth of 123456 — that is nice, nevertheless it implies that the random numbers generated by random() and, subsequently, the blob’s core form, is at all times the identical.
For some situations, that is best. You might not need your blobs to be random! You might wish to select some good seed values and use them throughout your website as a part of a semi-generative design system. For different instances, although, it’s your decision your blobs to be random — identical to the picture masks instance I confirmed you earlier.
How can we do that? Randomize the seed!
Now, this isn’t fairly so simple as it may appear. Initially, after I was engaged on this tutorial, I believed, “Hey, I can initialize the seed worth within the Blob class’s constructor!” Sadly, although, I used to be flawed.
Because the browser might spin up a number of situations of a worklet to deal with calls to color() — certainly one of a number of Blob courses might find yourself rendering the blob! If we initialize our seed worth inside the worklet class, this worth will probably be completely different throughout situations, and will result in the visible “glitching” we mentioned earlier.
To check this out, add a constructor perform to your Blob class with the next code inside:
constructor() {
console.log(`My seed worth is ${Math.random()}`);
}
Now, take a look at your browser console, and resize the window. In most instances, you get a number of logs with completely different random values. This conduct is not any good for us; we want our seed worth to be fixed.
To resolve this subject, let’s add just a little JavaScript on the principle thread. I’m popping this within the <script> tag we created earlier:
doc
.querySelector(“.worklet-canvas”)
.type.setProperty(“–blob-seed”, Math.random() * 10000);
Wonderful! Now when refreshing the browser window, we should always see a brand new blob form every time.
For our easy demo, that is good. In a “actual” utility, chances are you’ll wish to create a .blob class, goal all situations of it on load, and replace the seed worth of every component. You can additionally experiment with setting the blob’s variance, variety of factors, and roundness properties to random values.
For this tutorial, although, that’s it! All we now have left to do is ensure our code works OK for customers in all browsers, or present an appropriate fallback for when it doesn’t.
Loading a polyfill
By including a polyfill, our CSS Paint API code will work in all main browsers, with the price of additional JavaScript weight. Right here’s how we will replace our CSS.paintWorklet.addModule code so as to add one to our instance:
(async perform () {
if (CSS[“paintWorklet”] === undefined) {
await import(“https://unpkg.com/css-paint-polyfill”);
}
CSS.paintWorklet.addModule(“./worklet.bundle.js”);
})();
Utilizing this snippet, we solely load the polyfill if the present browser doesn’t help the CSS Paint API. Good!
A CSS-based fallback
If additional JavaScript weight isn’t your vibe, that’s cool. I completely get it. Fortunately, utilizing @helps, we will outline a light-weight, CSS-only fallback for browsers that don’t help the CSS Paint API. Right here’s how:
.worklet-canvas {
background-color: var(–blob-fill);
border-radius: 49% 51% 70% 30% / 30% 30% 70% 70%;
}
@helps (background: paint(blob)) {
.worklet-canvas {
background-color: clear;
border-radius: 0;
background-image: paint(blob);
}
}
On this snippet, we apply a background-color and a blob-like border-radius (generated by fancy border radius) to the goal component. If the CSS Paint API is supported, we take away these values and use our worklet to color a generative blob form. Superior!
The tip of the highway
Effectively, of us, we’re all performed. To cite the Grateful Useless — what a protracted, unusual journey it’s been!
I do know, there’s rather a lot to absorb right here. We now have coated core generative artwork ideas, discovered all in regards to the CSS Paint API, and made some superior generative blobs whereas we had been at it. Not dangerous going in any respect, I say.
Now that we now have discovered the fundamentals, although, we’re prepared to begin creating all types of generative magic. Preserve a watch out for extra generative UI design tutorials from me quickly, however within the meantime, try to take what we now have discovered on this tutorial and experiment! I’m certain you’ve a ton of unbelievable concepts.
Till subsequent time, fellow CSS magicians!
The submit Conjuring Generative Blobs With The CSS Paint API appeared first on CSS-Tips. You possibly can help CSS-Tips by being an MVP Supporter.


Subscribe to MarketingSolution.
Receive web development discounts & web design tutorials.
Now! Lets GROW Together!