
CSS ::earlier than and ::after pseudo-elements mean you can insert “content material” earlier than and after any non-replaced ingredient (e.g. they work on a <div> however not an <enter>). This successfully lets you present one thing on an internet web page which may not be current within the HTML content material. You shouldn’t use it for precise content material as a result of it’s not very accessible in which you could’t even choose and replica textual content inserted on the web page this fashion — it’s simply ornamental content material.
On this article, I’ll stroll you thru seven completely different examples that showcase how ::earlier than and ::after can be utilized to create fascinating results.
Observe that for many examples, I’m solely explaining the components of the code that deal particularly with CSS pseudo-elements. That stated, all the CSS is on the market within the embedded demos if you wish to see the code for extra styling.
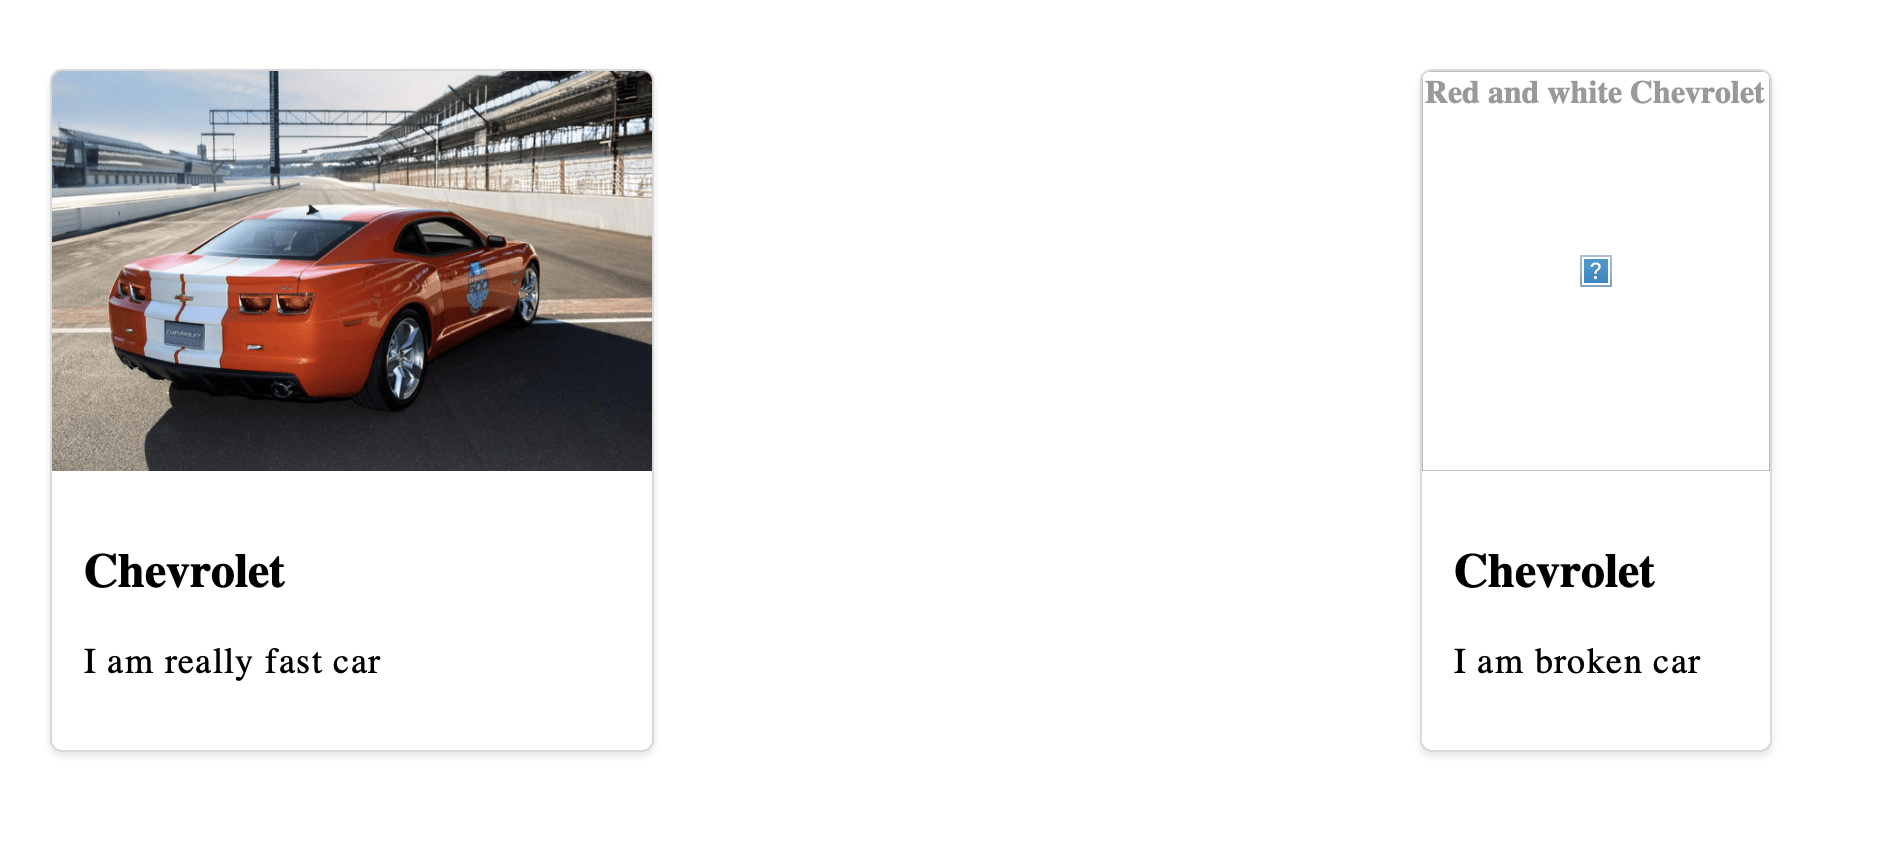
Styling Damaged photographs
When a person visits your web site, their web connection (or an element past your management) may stop your photographs from downloading and, consequently, the browser exhibits a damaged picture icon and and the picture’s alt textual content (if it’s really there).
How about displaying a customized placeholder as an alternative? You may pull this off utilizing ::earlier than and ::after with a little bit of CSS positioning.
First, we have to use relative positioning on the picture ingredient. We’re going to use absolute positioning on one of many pseudo-elements in a bit, so this relative place makes certain be certain that the pseudo-element is positioned inside the content material of the picture ingredient, reasonably than falling utterly out of the doc stream.
img {
show: block; /* Keep away from the area below the picture brought on by line peak */
place: relative;
width: 100%
}
Subsequent, let’s create the area of the damaged picture impact utilizing the picture’s ::earlier than pseudo-element. We’re going to model this with a lightweight grey background and barely darker border to start out.
img::earlier than {
background-color: hsl(0, 0%, 93.3%);
border: 1px dashed hsl(0, 0%, 66.7%);
/* … */
}
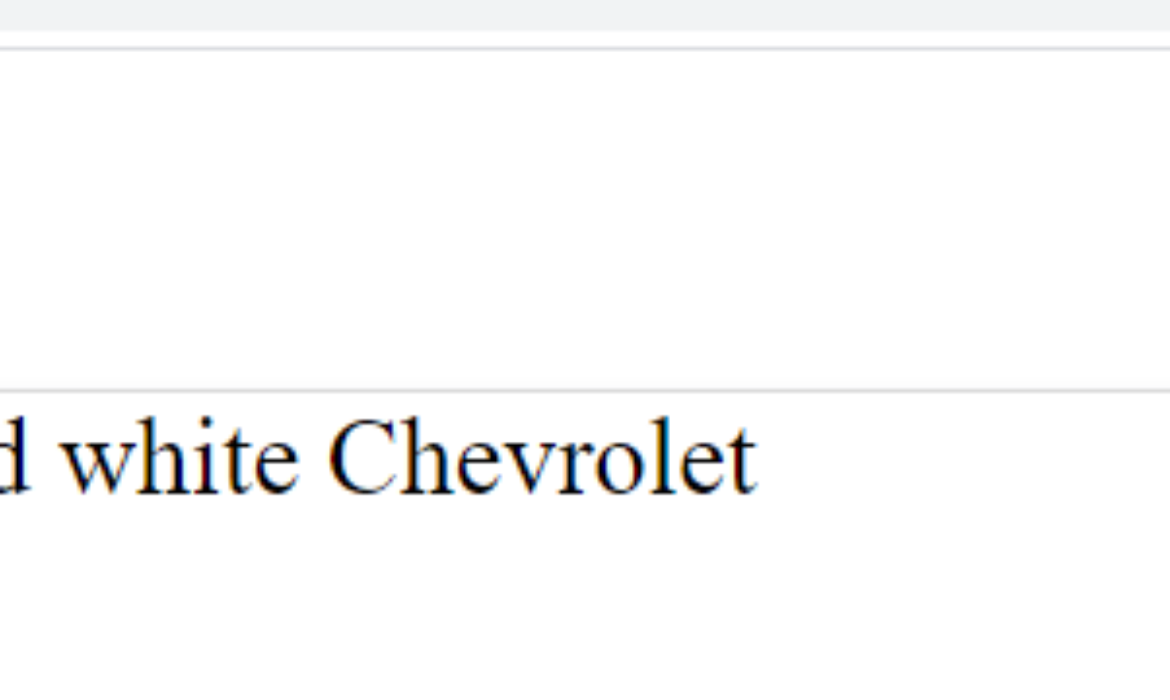
<img> is a changed ingredient. Why are you utilizing ::earlier than pseudo-element on it? It wont work!. Appropriate. On this state of affairs the pseudo-element will present in Chrome and Firefox when the picture fails to load, which is precisely what you need. In the meantime, Safari solely exhibits the styling utilized to the alt textual content.
The styling is utilized to the top-left nook of the damaged picture.
Thus far, so good. Now we are able to make it a block-level ingredient (show: block) and provides it a peak that fills your entire out there area.
img::earlier than {
/* … */
show: block;
peak: 100%;
}
Issues are already beginning to look higher!
We are able to refine the model a little bit extra. For instance, let’s around the corners. We also needs to give the alt textual content a little bit respiration room by giving the pseudo-element full width and absolute positioning for higher management inserting issues the place we would like.
img::earlier than {
/* … */
border-radius: 4px;
content material: “”;
place: absolute;
width: 100%;
}
When you stopped right here and checked your work, you is perhaps scratching your head as a result of the alt textual content is all of the sudden gone.
That’s as a result of we set content material to an empty string (which we have to show our generated content material and kinds) and canopy your entire area, together with the precise alt textual content. It’s there, we simply can’t see it.
We are able to see it if we show the alt textual content in an alternate (get it?) method, this time with assist kind the ::after pseudo-element. The content material property is definitely able to displaying the picture’s alt attribute textual content utilizing the attr() operate:
img::after {
content material: attr(alt);
/* Some mild styling */
font-weight: daring;
place: absolute;
peak: 100%;
left: 0px;
text-align: middle;
high: 1px;
width: 100%;
}
That is superior! In Chrome, not less than.
However, in Firefox, not a lot.
The generated content material is colliding with the precise alt textual content in Firefox.
A fast repair is to focus on the alt attribute instantly utilizing an attribute selector (on this case, img[alt]), and goal related kinds there so issues match up with Chrome.
img[alt] {
text-align: middle;
font-weight: daring;
colour: hsl(0, 0%, 60%);
}
Now we now have an ideal placeholder that’s constant in Chrome and Firefox.
Customized blockquote
Blockquotes are quotes or an excerpts from a cited work. They’re additionally present a extremely nice alternative to interrupt up a wall of textual content with one thing that’s visually fascinating.
There are every kind of the way to model blockquotes. Chris has a set of 5 kinds that go all the way in which again to 2007.
I wish to have a look at one other method, one that includes ::earlier than and ::after. Like we noticed with the final instance, we are able to use the content material property to show generated content material, and apply different properties to decorate it up. Let’s put massive citation marks initially and finish of a blockquote.
Firefox 91
The HTML is easy:
<blockquote>
<!– Your textual content right here –>
</blockquote>
Just a few cosmetics within the CSS:
blockquote {
font-style: italic;
line-height: 1.618;
font-size: 1.2em;
width: 30em;
place: relative;
padding: 40px 80px;
}
Observe the place: relative in there as a result of, as you’ll be taught, it’s important for positioning the blockquotes.
As you’ve most likely guessed, we’re going to make use of ::earlier than for the primary citation mark, and ::after for the closing one. Now, we may merely name the content material property on each and generate the marks in there. However, CSS has us coated with open-quote and close-quote values.
blockquote::earlier than {
content material: open-quote;
/* Place it on the top-left */
high: 0;
left: 0;
}
blockquote::after {
content material: close-quote;
/* Place it at thee bottom-right */
backside: 0;
proper: 0;
}
This will get us the citation marks we would like, however enable me to button up the kinds a bit:
blockquote::earlier than,
blockquote::after {
background-color: #cccccc;
show: block;
width: 60px;
peak: 60px;
line-height: 1.618;
font-size: 3em;
border-radius: 100%;
text-align: middle;
place: absolute;
}
Icon Bullet Listing
We’ve ordered (<ol>) and unordered (<ul>) lists in HTML. Each have default styling dictated by the browser’s Person Agent stylesheet. However with ::earlier than pseudo-element, we are able to override these “default” kinds with one thing of our personal. And guess what? We are able to use emojis (😊) on the content material property!
.name-list li::earlier than {
content material: “😊”;
margin-right: 15px;
font-size: 20px;
}
Whereas that is nice and all, it’s value noting that we may really attain for the ::marker pseudo-element, which is designed particularly for styling listing markers. Eric Meyer exhibits us how that works and it’s most likely a greater solution to go in the long term.
Animated toggle swap
One of many neatest tips for styling varieties is making a toggle swap out of a regular HTML checkbox. In reality, Preethi Sam not too long ago shared one strategy for it when displaying off a handful of different checkbox styling tips utilizing CSS masks.
True to its identify, a toggle swap is used to toggle or swap between the checked and unchecked states of a checkbox ingredient.
<kind class=”container”>
<label class=”swap”>
<enter sort=”checkbox” />
</label>
</kind>
The customization is all because of modifications added to the <enter> ingredient through the ::earlier than and ::after pseudo-elements. However first, right here is a few baseline CSS for the <kind> ingredient:
.container {
background: #212221;
background: linear-gradient(to proper, #1560bd, #e90);
border-radius: 50px;
peak: 40px;
place: relative;
width: 75px;
}
We’re not fairly there, however see how the checkbox ingredient is displayed.
We’re going to “conceal” the checkbox’s default look whereas making it take up the total quantity of area. Bizarre, proper? It’s invisible however nonetheless technically there. We do this by:
altering its place to absolute,setting the looks to none, andsetting its width and peak to 100%.
enter {
-webkit-appearance: none; /* Safari */
cursor: pointer; /* Present it is an interactive ingredient */
peak: 100%;
place: absolute;
width: 100%;
}
Now, let’s model the <enter> ingredient with its ::earlier than pseudo-element. This styling will change the looks of the enter, bringing us nearer to the ultimate outcome.
enter::earlier than {
background: #fff;
border-radius: 50px;
content material: “”;
peak: 70%;
place: absolute;
high: 50%;
remodel: translate(7px, -50%); /* Transfer styling to the middle of the ingredient */
width: 85%;
}
What, wait? You’d suppose that ::earlier than wouldn’t work with a changed ingredient, like <enter>. And that’s true, however solely when the enter sort is picture which is equal to an <img> ingredient. Different kind controls, like a checkbox, are outlined as non-replaced components within the HTML spec.
Subsequent, we have to create the “toggle” button and it simply so occurs we nonetheless have the ::after pseudo-element out there to make it. However, there are two issues value mentioning:
The background is a linear-gradient.The “toggle” button is moved to the middle of the <enter> with the remodel property.
enter::after {
background: linear-gradient(to proper, orange, #8e2de2);
border-radius: 50px;
content material: “”;
peak: 25px;
opacity: 0.6;
place: absolute;
high: 50%;
remodel: translate(7px, -50%);
transition: all .4s;
width: 25px;
}
Attempt clicking on the toggle button. Nothing occurs. That’s as a result of we’re not really altering the checked state of the <enter>. And even when we had been, the result’s… disagreeable.
The repair is to use the :checked attribute to the ::after pseudo-element of the <enter>. By particularly focusing on the checked state of the checkbox and chaining it to the ::after pseudo-element, we are able to transfer the toggle again into place.
enter:checked::after {
opacity: 1;
remodel: translate(170%, -50%);
}
Gradient border
We are able to adorn photographs with borders to make them stand out or match extra seamlessly inside a design. Do you know we are able to use a gradient on a border? Nicely, we are able to with ::earlier than (there are different methods, too, in fact).
The core thought is to create a gradient over the picture and use the CSS z-index property with a unfavourable worth. The unfavourable worth pulls the gradient under the picture within the stacking order. This implies the picture at all times seems on high so long as the gradient has a unfavourable z-index.
.gradient-border::earlier than {
/* Renders the kinds */
content material: “”;
/* Fills your entire area */
place: absolute;
high: 0;
left: 0;
backside: 0;
proper: 0;
/* Creates the gradient */
background-image: linear-gradient(#1a1a1a, #1560bd);
/* Stacks the gradient behind the picture */
z-index: -1;
}
determine {
/* Removes the default margin */
margin: 0;
/* Squeezes the picture, revealing the gradient behind it */
padding: 10px;
}
Gradient overlays
That is just like what we did within the earlier instance, however right here, we’re making use of the gradient on high of the picture. Why would we do this? It may be a pleasant method so as to add a little bit texture and depth to the picture. Or maybe it may be used to both lighten or darken a picture if there’s textual content on high it that wants further distinction for legibility.
Whereas that is just like what we simply did, you’ll discover just a few obtrusive variations:
determine::earlier than {
background-image: linear-gradient(to high proper, #1a1a1a, clear);
content material: “”;
peak: 100%;
place: absolute;
width: 100%;
}
See that? There’s no z-index as a result of it’s OK for the gradient to stack on high of the picture. We’re additionally introducing transparency within the background gradient, which lets the picture bleed by means of the gradient. You already know, like an overlay.
Customized radio buttons
Most, if not all, of us attempt to customise the default kinds of HTML radio buttons, and that’s normally completed with ::earlier than and ::after, like we did with the checkbox earlier.
Firefox 91
We’re going to set just a few base kinds first, simply to set the stage:
/* Facilities every thing */
.flex-center {
align-items: middle;
show: flex;
justify-content: middle;
}
/* Kinds the shape ingredient */
.kind {
background: #ccc;
peak: 100vh;
width: 100%;
}
/* Kinds the inputs */
.form-row {
background: #fff;
border-radius: 50px;
peak: 40px;
margin: 10px;
overflow: hidden;
place: relative;
width: 150px;
}
Now let’s take away the default styling of the radio buttons, once more, with look: none;
.form-input {
-webkit-appearance: none; /* Safari */
look: none;
}
::earlier than must be positioned on the top-left nook of the radio button, and when it’s checked, we alter its background colour.
.form-input::earlier than {
/* Renders the kinds */
content material: ”;
/* Exhibits that it is interactive */
cursor: pointer;
/* Positions it to the top-left nook of the enter */
place: absolute;
high: 0;
left: 0;
/* Takes up your entire area */
peak: 100%;
width: 100%;
}
/* When the enter is in a checked state… */
.form-input:checked::earlier than {
/* Change the background colour */
background: #21209c;
}
We nonetheless have to iron just a few issues out utilizing ::after. Particularly, when the radio button is checked, we wish to change the colour of the round ring to white as a result of, in its present state, the rings are blue.
.form-input::after {
/* Renders the kinds */
content material: ”;
/* Exhibits that it is interactive */
cursor: pointer;
/* A bit border styling */
border-radius: 50px;
border: 4px strong #21209c;
/* Positions the ring */
place: absolute;
left: 10%;
high: 50%;
remodel: translate(0, -50%);
/* Units the size */
peak: 15px;
width: 15px;
}
/* When the enter is in a checked state… */
.form-input:checked::after {
/* Change ::after’s border to white */
border: 4px strong #ffffff;
}
The shape label continues to be unusable right here. We have to goal the shape label instantly so as to add colour, and when the shape enter is checked, we alter that colour to one thing that’s seen.
.form-label {
colour: #21209c;
font-size: 1.1rem;
margin-left: 10px;
}
Click on the buttons, and nonetheless nothing occurs. Right here what’s happening. The place: absolute on ::earlier than and ::after is protecting issues up when the radio buttons are checked, as something that happens within the HTML doc hierarchy is roofed up except they’re moved to a brand new location within the HTML doc, or their place is altered with CSS. So, each time the radio button is checked, its label will get coated.
You most likely already know learn how to repair this since we solved the identical type of factor earlier in one other instance? We apply z-index: 1 (or place: absolute) to the shape label.
.form-label {
colour: #21209c;
font-size: 1.1rem;
margin-left: 10px;
z-index: 1; /* Makes certain the label is stacked on high */
/* place: absolute; That is another possibility */
}
Wrapping up
We coated seven other ways we are able to use the ::earlier than and ::after pseudo-elements to create fascinating results, customise default kinds, make helpful placeholders, and add borders to pictures.
On no account did we cowl all the prospects that we are able to unlock once we reap the benefits of these further components that may be chosen with CSS. Lynn Fisher, nonetheless, has made a interest out of it, making superb designs with a single ingredient. And let’s not neglect Diana Smith’s CSS artwork that makes use of pseudo-elements in a number of locations to get practical, painting-like results.
The submit 7 Sensible Makes use of for the ::earlier than and ::after Pseudo-Parts in CSS appeared first on CSS-Tips. You may assist CSS-Tips by being an MVP Supporter.


Subscribe to MarketingSolution.
Receive web development discounts & web design tutorials.
Now! Lets GROW Together!